
Wondering how to photograph Sossusvlei, Namibia?
You’re not alone. Many, like you, search for the secrets to photographing this unique destination. It’s not just about snapping a picture; it’s about telling a story through the lens.
Navigating the challenges of desert photography – from the intense light to the vast, shifting landscapes – can be overwhelming. But fear not.
Drawing from our Namibian three-month adventure in our own 4×4 bush camper, as part of our wider Africa travels through Namibia, Botswana and South Africa, I’ve put together a guide that addresses these very challenges.
In this article, I’ll share insights from my personal experience – the early mornings waiting for the perfect light, experimenting with different lenses, and finding those unique angles that bring out the magic of Sossusvlei.
My goal? To equip you with practical tips that help you capture the best photos possible.
Photographing Sossusvlei is more than just capturing the grandeur of its sand dunes; it’s about embracing the small, intricate details that make this place unique—looking for different ways to capture this magnificent landscape.
Based on my experiences, I’ll guide you through your own photography journey in Sossusvlei – ensuring you leave with not just memories but stunning visual stories of your own.
In a Hurry? Jump Straight to A Particular Section
- What are Sossusvlei and Deadvlei in Namibia?
- My Photo Tips for Sossusvlei – An Overview
- Why is Photography so Special at Sossusvlei?
- The Best Photo Locations in Sossusvlei
- Tips on Photographing the Sands of Sossusvlei
- Photography Travel Tips for Deadvlei (Sossusvlei)
- My Camera Gear Used at Sossusvlei
- What to Avoid at Sossusvlei To Capture Your Best Images
- Wildlife You May See at Sossusvlei
Sony 24-105mm @ 24mm, f/10
My Photo Tips for Sossusvlei – An Overview
- For the best shooting conditions in Deadvlei, arrive there at or before sunrise.
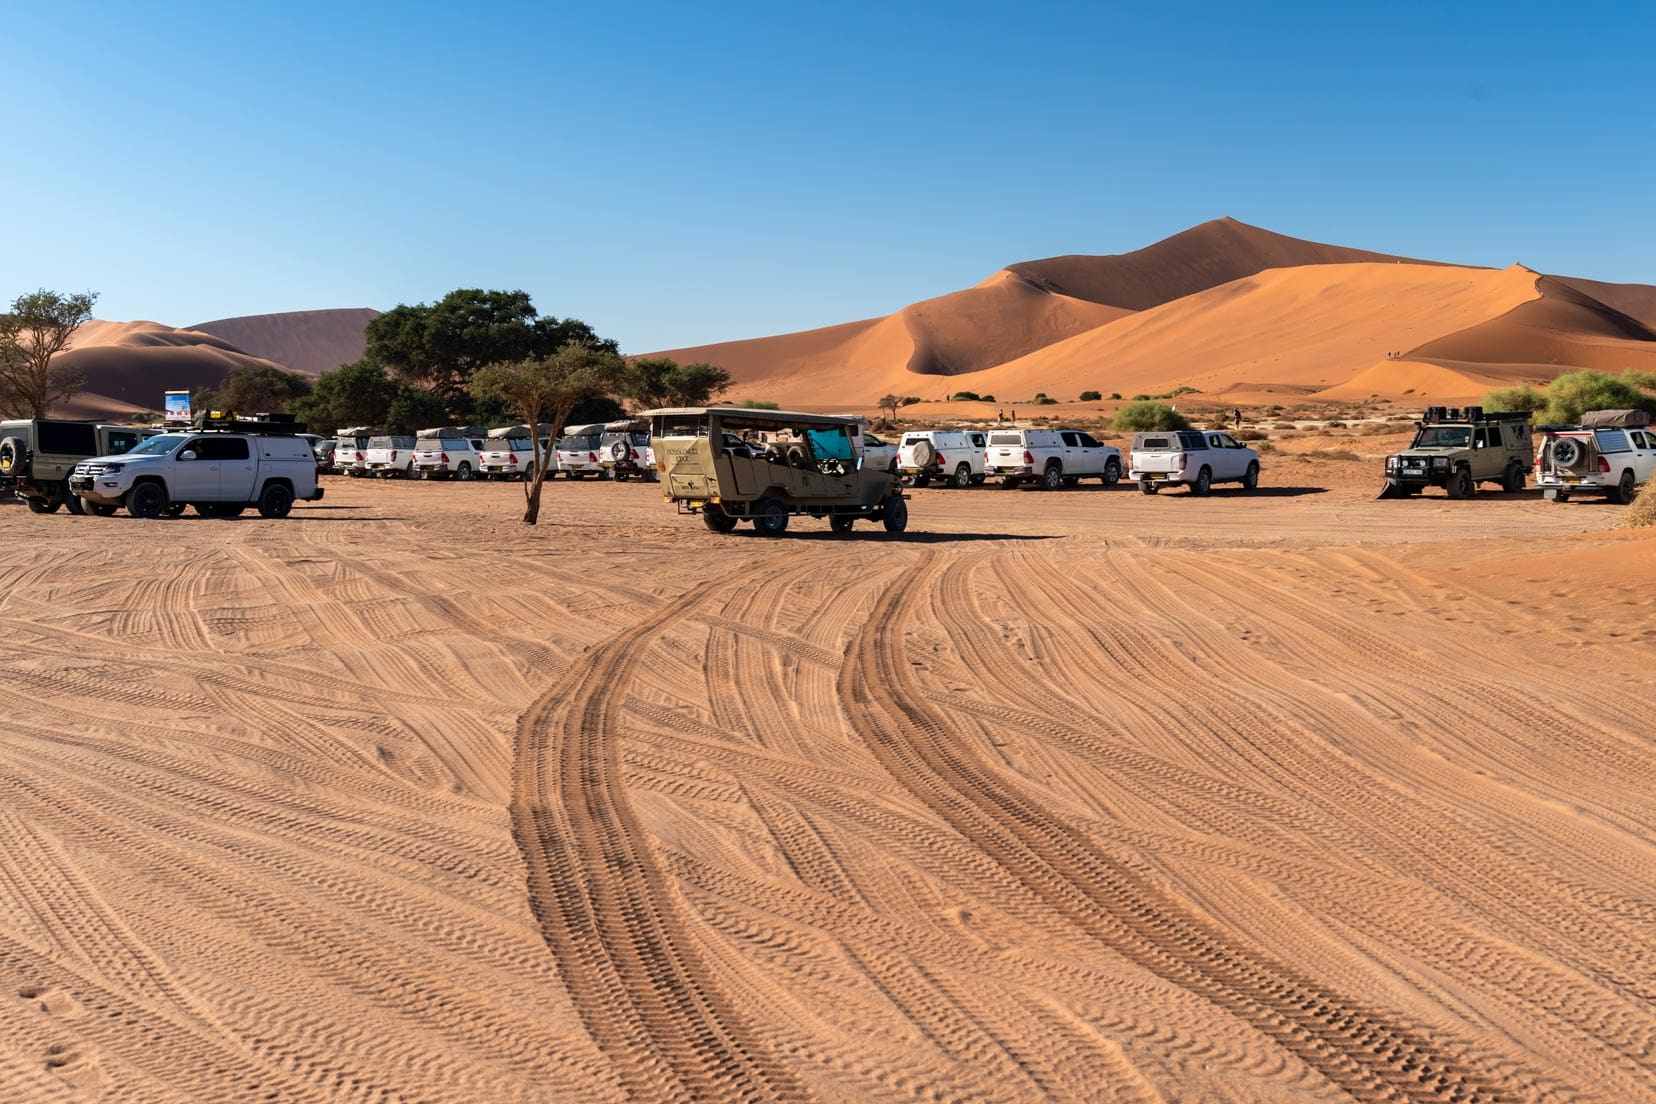
- Early access to the Sossusvlei dunes is granted when you overnight inside park gate 1.
- Use a wide-angle lens to capture Sossusvlei’s big landscapes.
- Spend two days visiting Sossusvlei with early morning starts photographing Deadvlei.
- Hike Dune 45 for sunset views of Dune Alley.
👉 Need more comprehensive information about visiting Soussevlei? Check out our article How to Visit Sossusvlei and Sesriem Canyon
Tamron 28-75mm @ 75mm, f/11
What are Sossusvlei and Deadvlei in Namibia?
Before we get into the nitty gritty – what are Sossusvlei and Deadvlei?
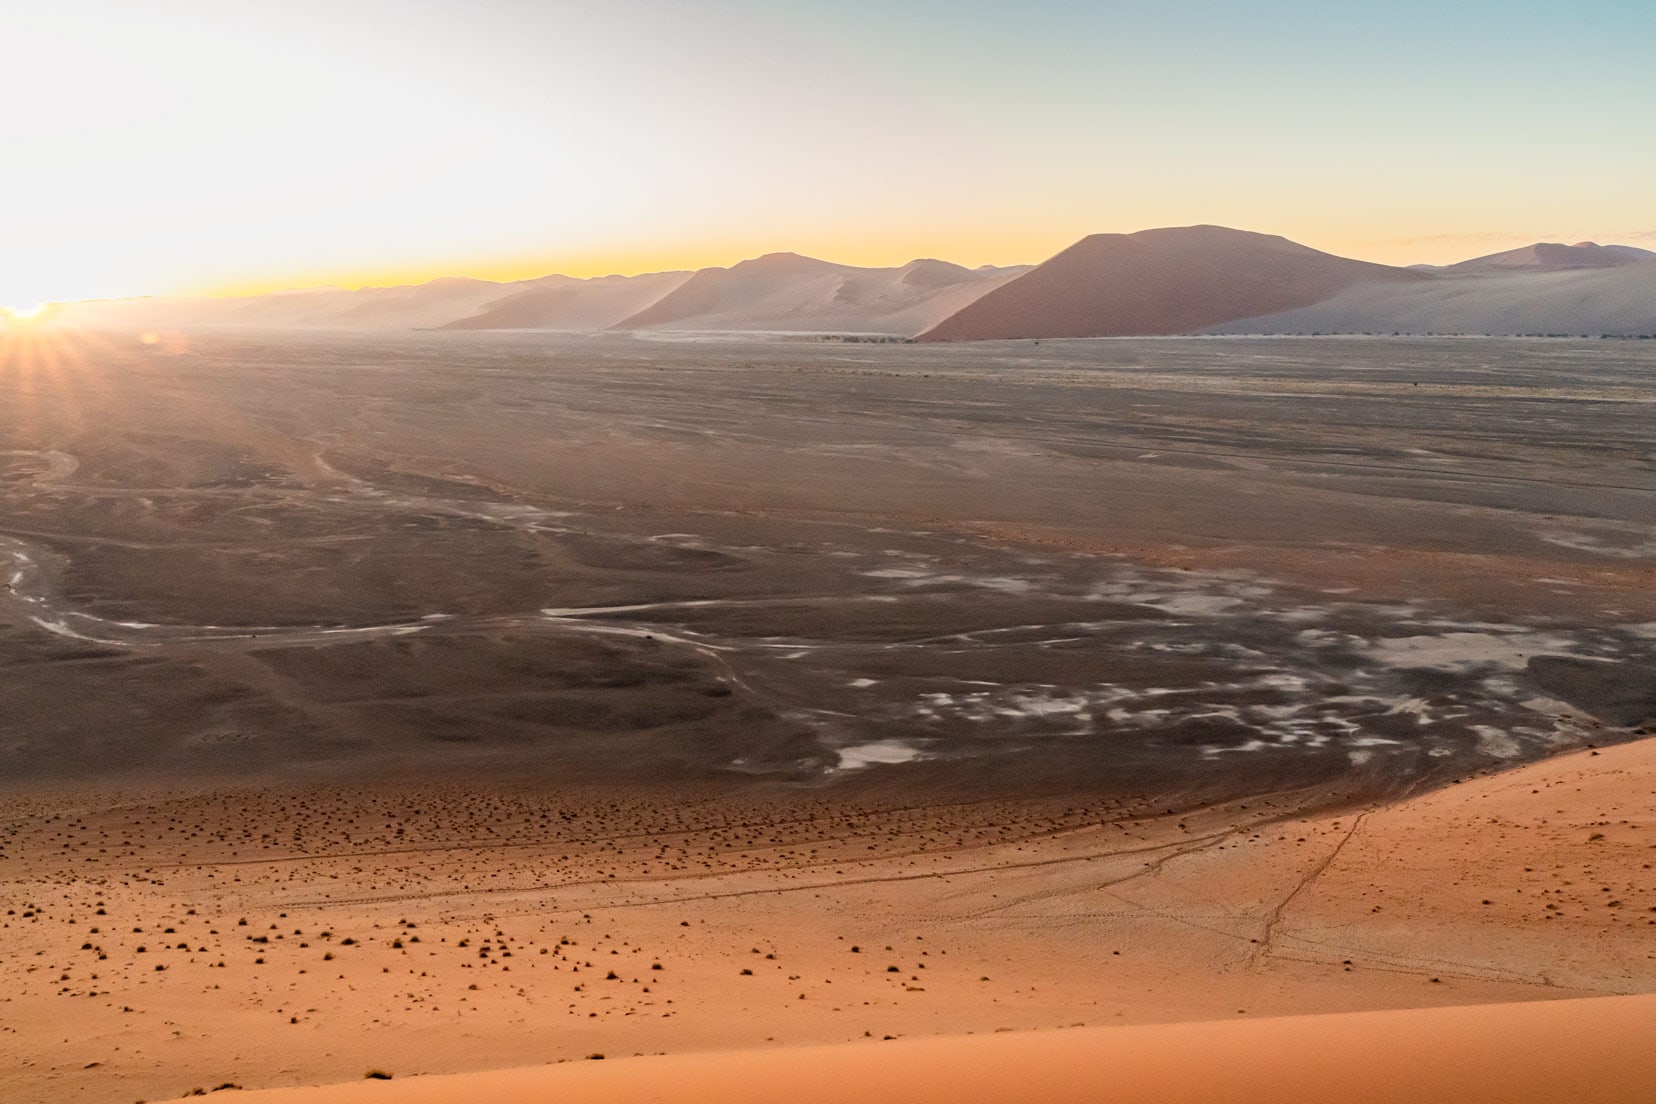
Sossusvlei is a large salt pan located in the Namib-Naukluft Park in the Hardap Region of western Namibia, Southern Africa. It is surrounded by huge sand dunes beautifully sculptured by the dry desert winds.
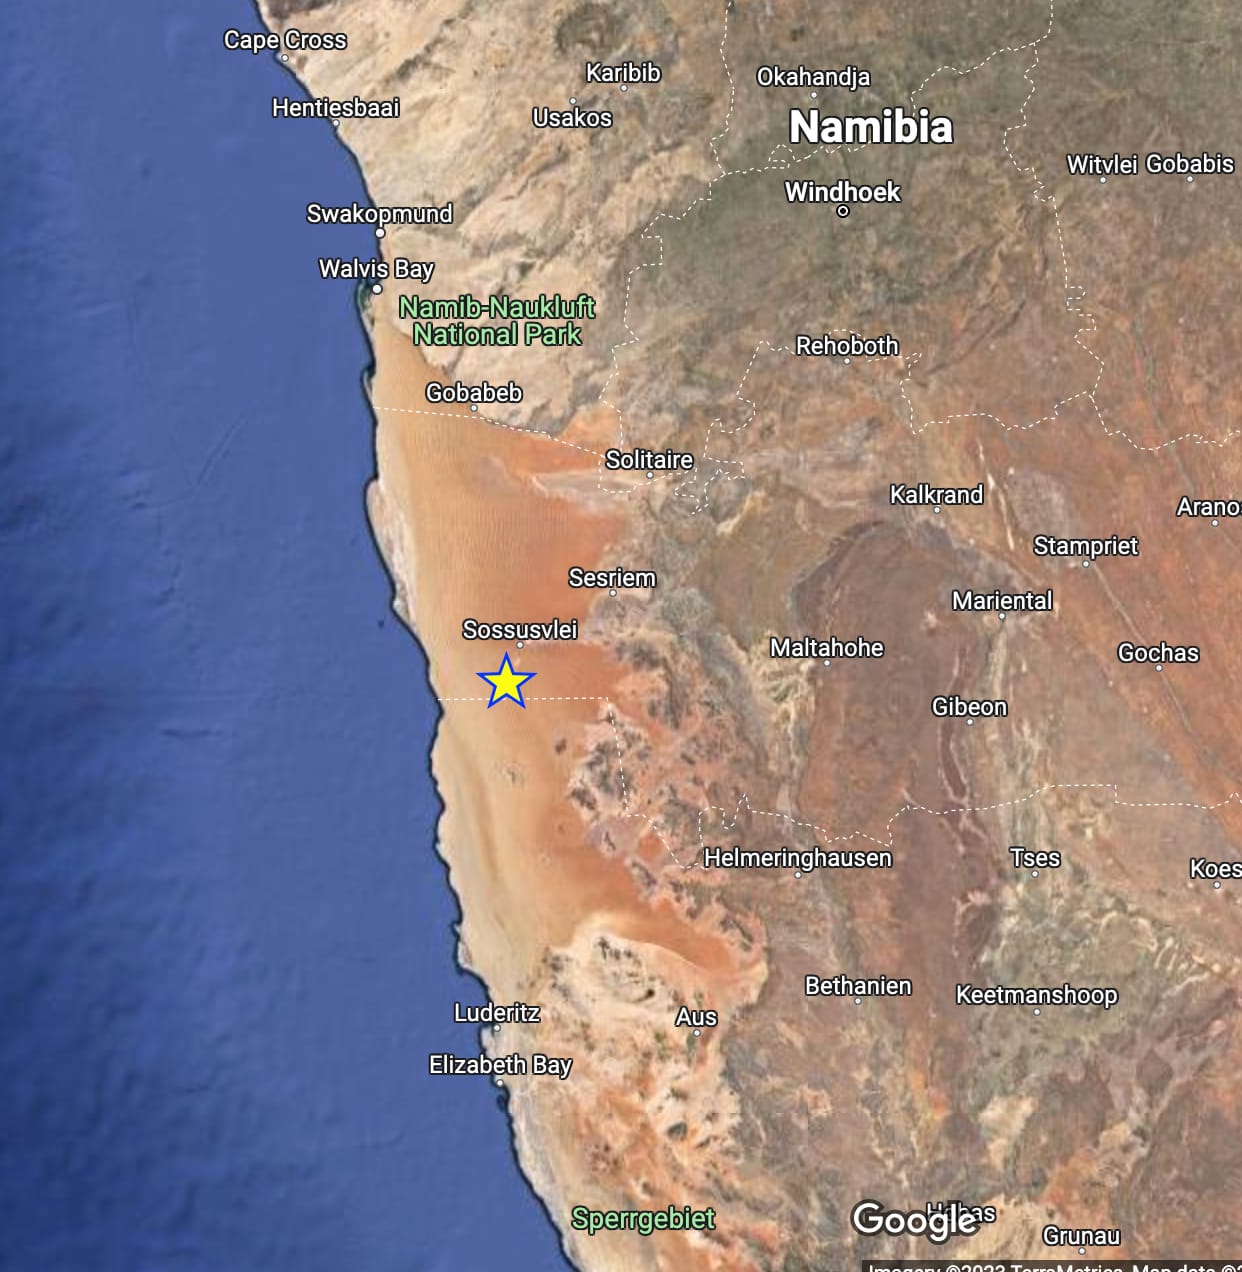
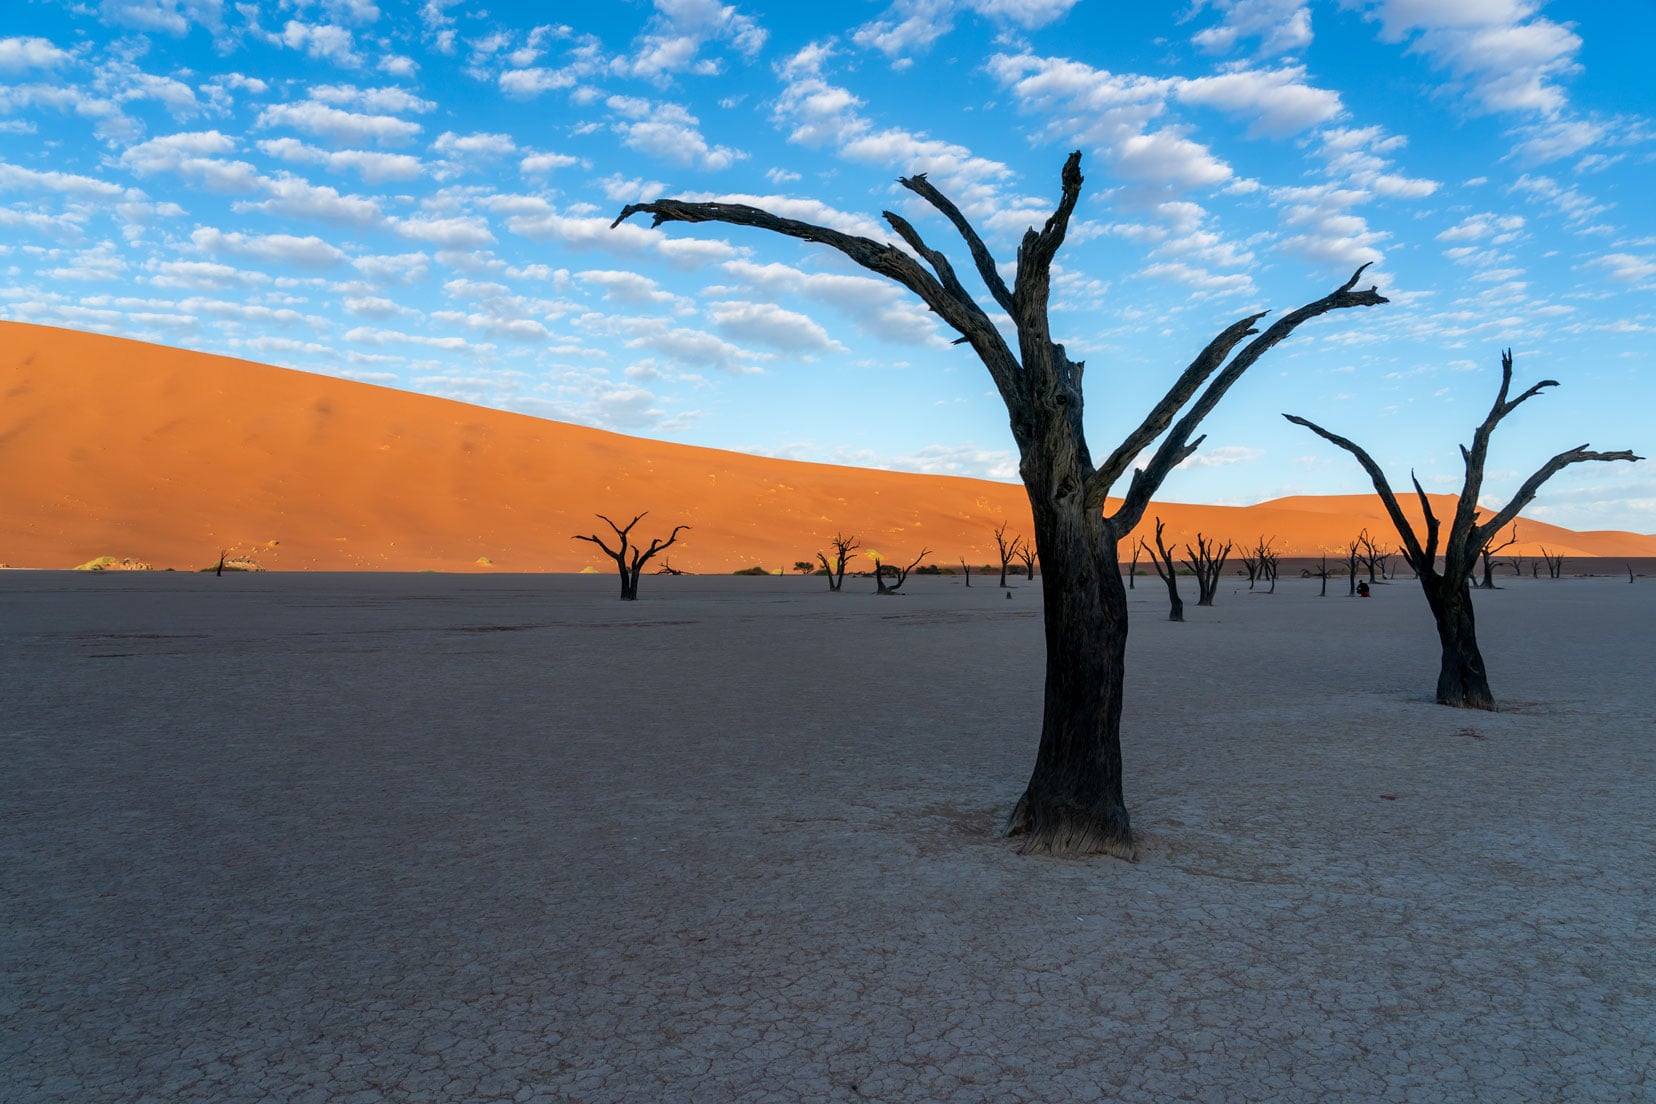
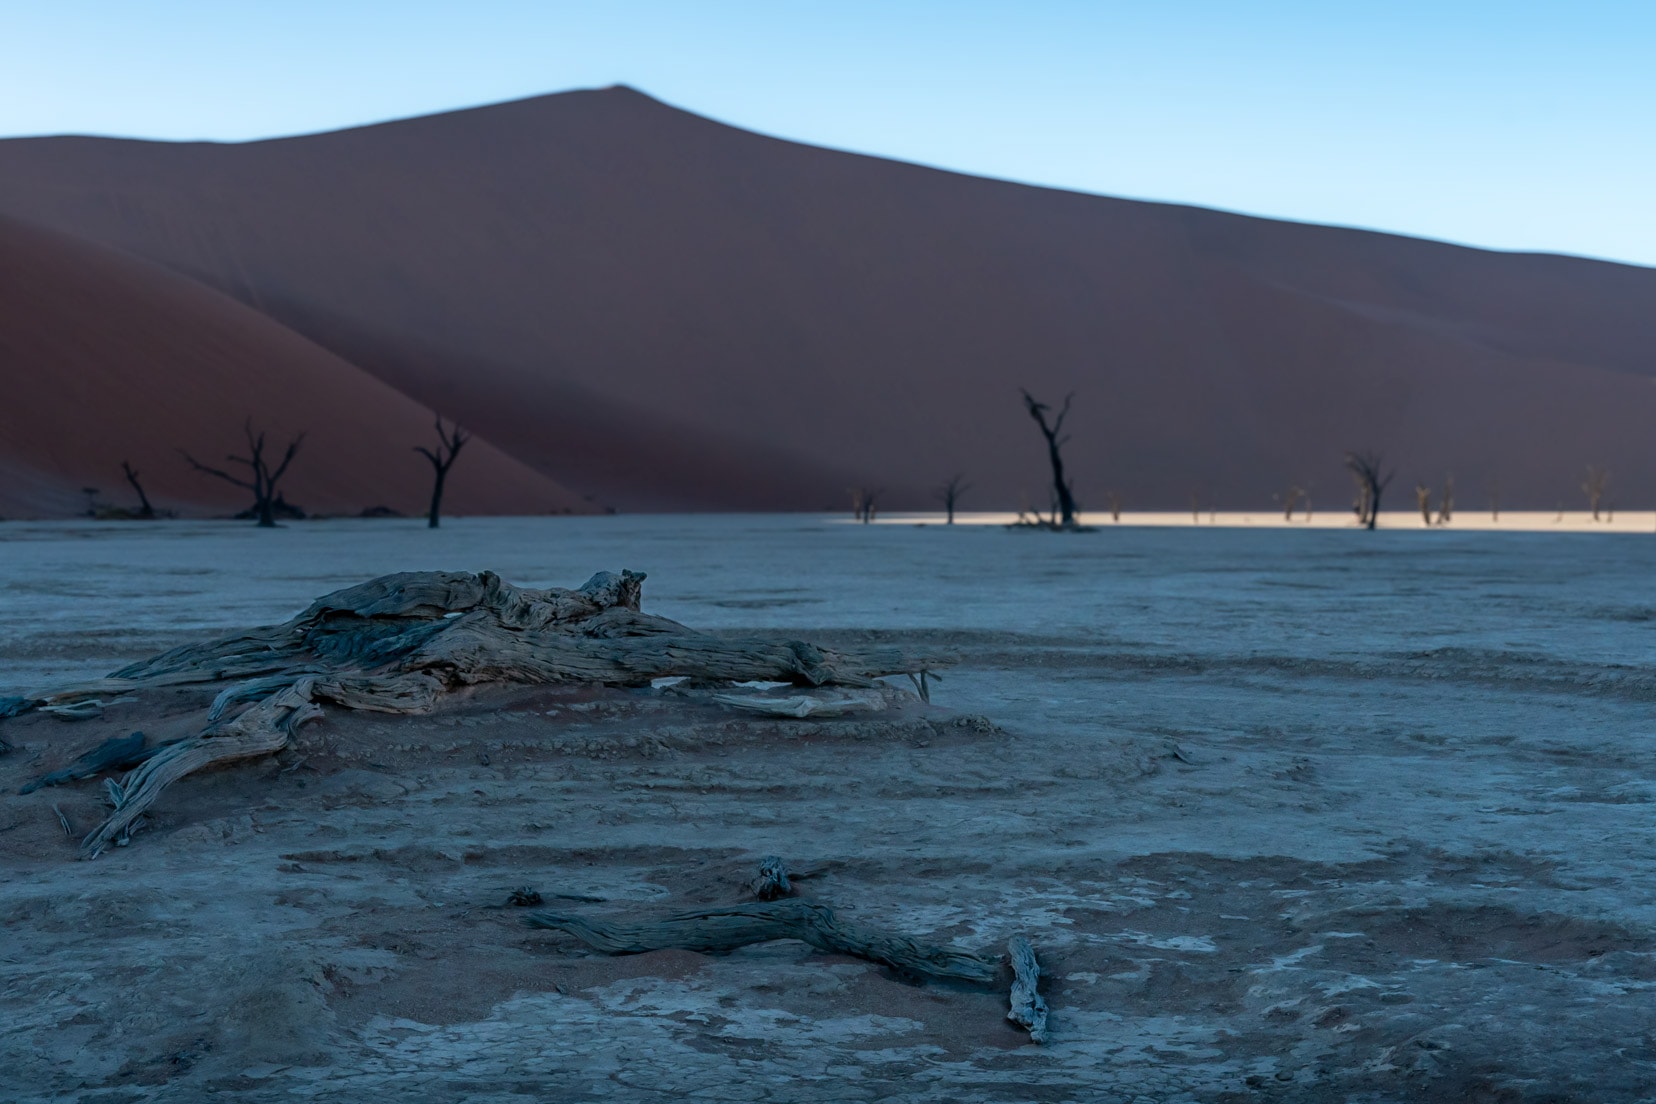
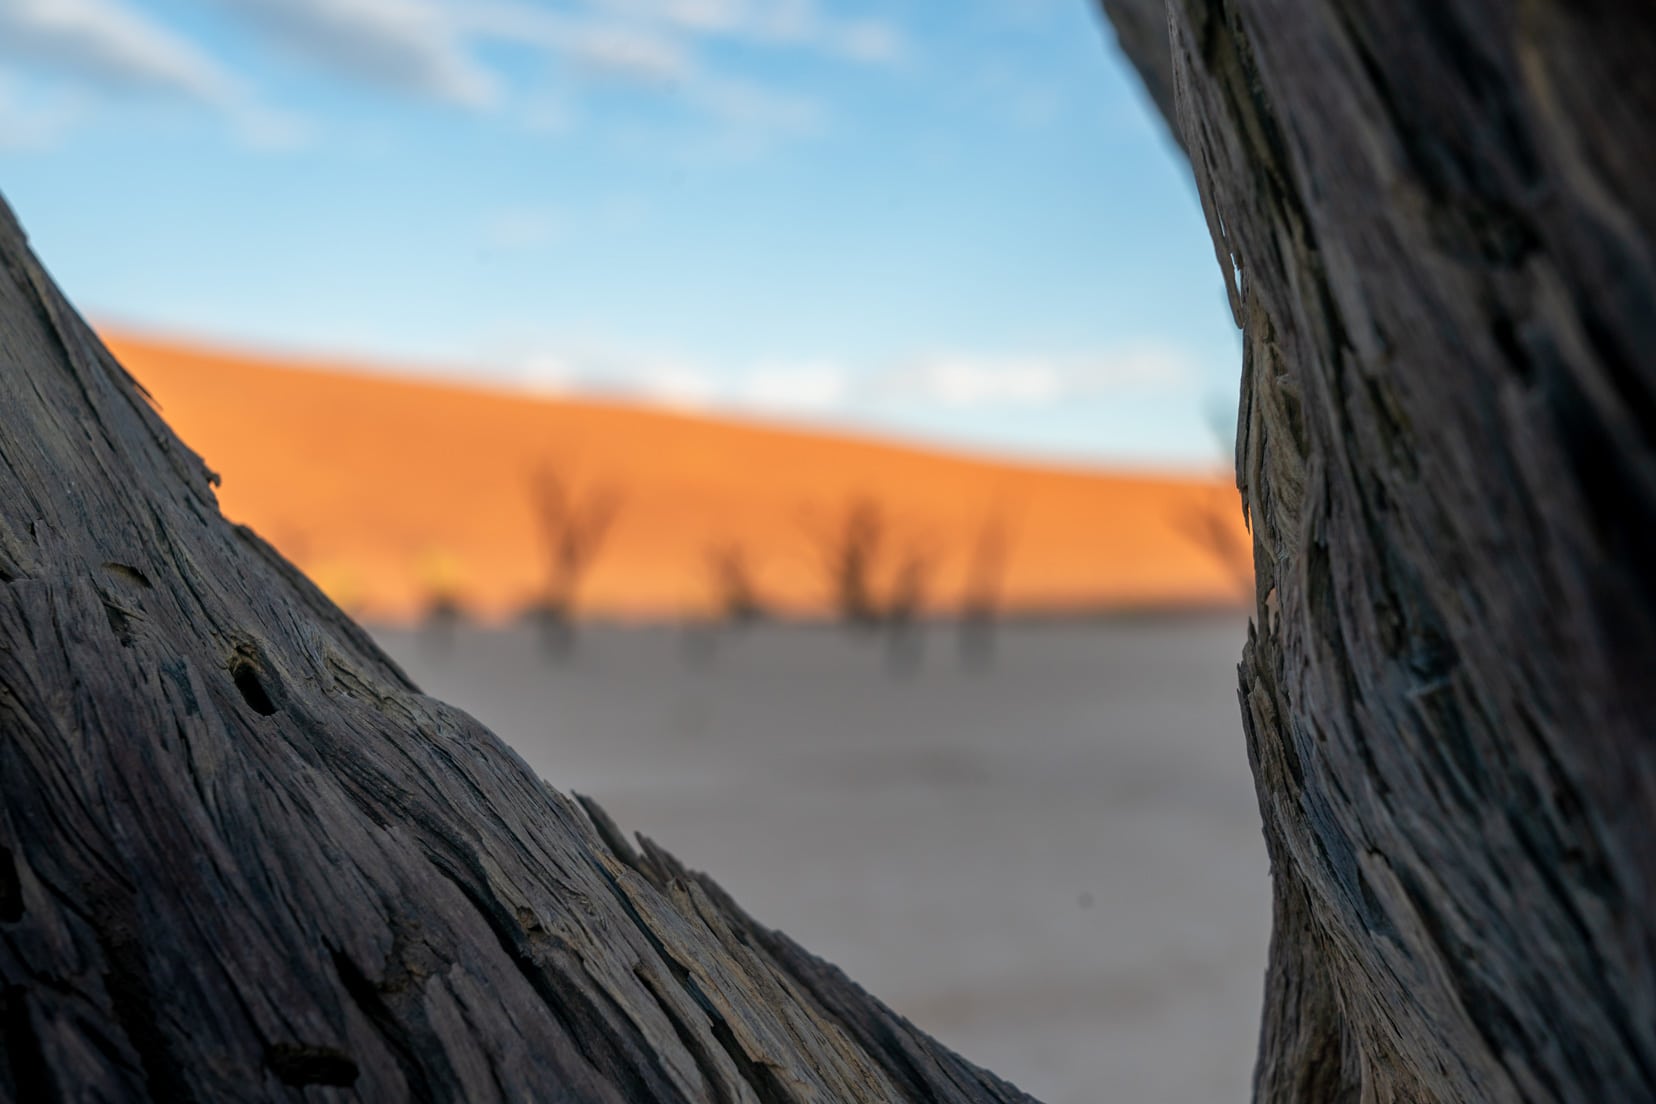
Close by Sossusvlei is the equally famous clay pan, Deadvlei. This pan hosts a sparsely populated array of preserved camel thorn trees over 1000 years old.
Even though Sossusvlei is a single pan, the name is generally used to prescribe this area of dunes, including Deadvlei. The dunes of Sossusvlei were listed as a UNESCO World Heritage site in 2013.
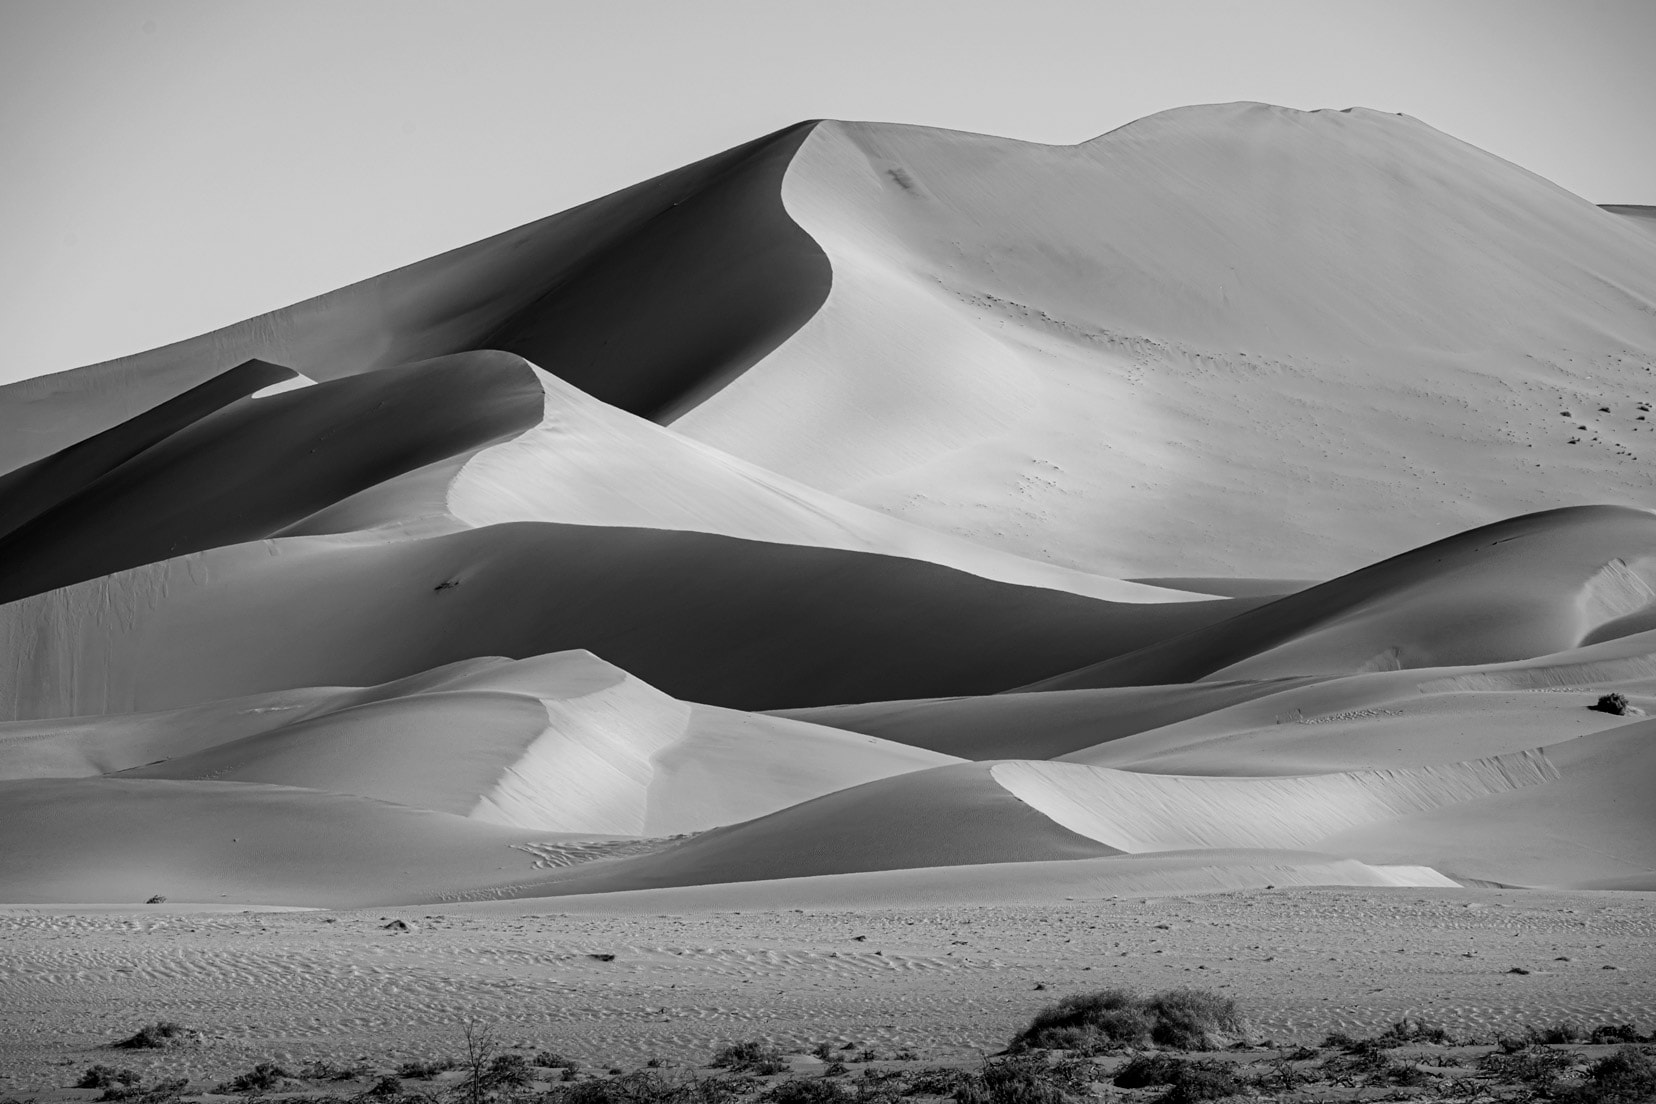
These old Namib desert sand dunes, illuminated red and orange by a rising sun, with their exquisite shapes, shadows, contrasts, and colours, defy the photographer to capture their beauty.
Sony 70-300mm @ 256mm, f/11
If you’re fascinated by the unique landscapes of Namibia, you’ll love exploring the vibrant coastal town of Luderitz. Here’s our guide on things to do in Luderitz to complement your desert adventure.
And as a photographer – don’t miss out on shooting the eerie yet photogenic Kolmanskop Ghost Town.
Why is Photography so Special at Sossusvlei?
The combination of red/orange monster sand dunes, blue sky, contrasting light and dark shadows make for compelling images. The sheer vastness of Sossusvlei is phenomenal.
It’s a place of big landscapes.
During the course of the day, the light direction and intensity change, causing the dunes to take on different colours with shifting shadows, accentuating the dunes’ different shapes. It’s easy to be blown away by the hugeness of it all. I certainly was.
However, I didn’t forget to look for the smaller elements of nature that also contribute to Sossusvlei’s reputation, e.g. the small sand ripples and the roots and bark of a preserved camel tree.
Telling the Story – What Does That Mean?
When discussing photography, you may have heard of the phrase ‘telling the story’. In simple terms, it means that an image or series of images conveys the narrative or emotion of a place.
I like to capture a place’s essence by combining wide and zoom lenses to shoot close-ups and distance shots. This allows a location to be portrayed in different ways. Also, I shoot the scenes differently because certain things attract my eye. It’s a point of interest for me.
In each image caption, I include lens information and camera settings.
The Best Photo Locations in Sossusvlei
Below, I include a list of Sossusvlei’s best photo locations and discuss how I photographed them:
- Deadvlei
- Big Daddy
- Big Moma Dune
- Dune 45
- Dune 40
- Hiddenvlei (we didn’t visit here)
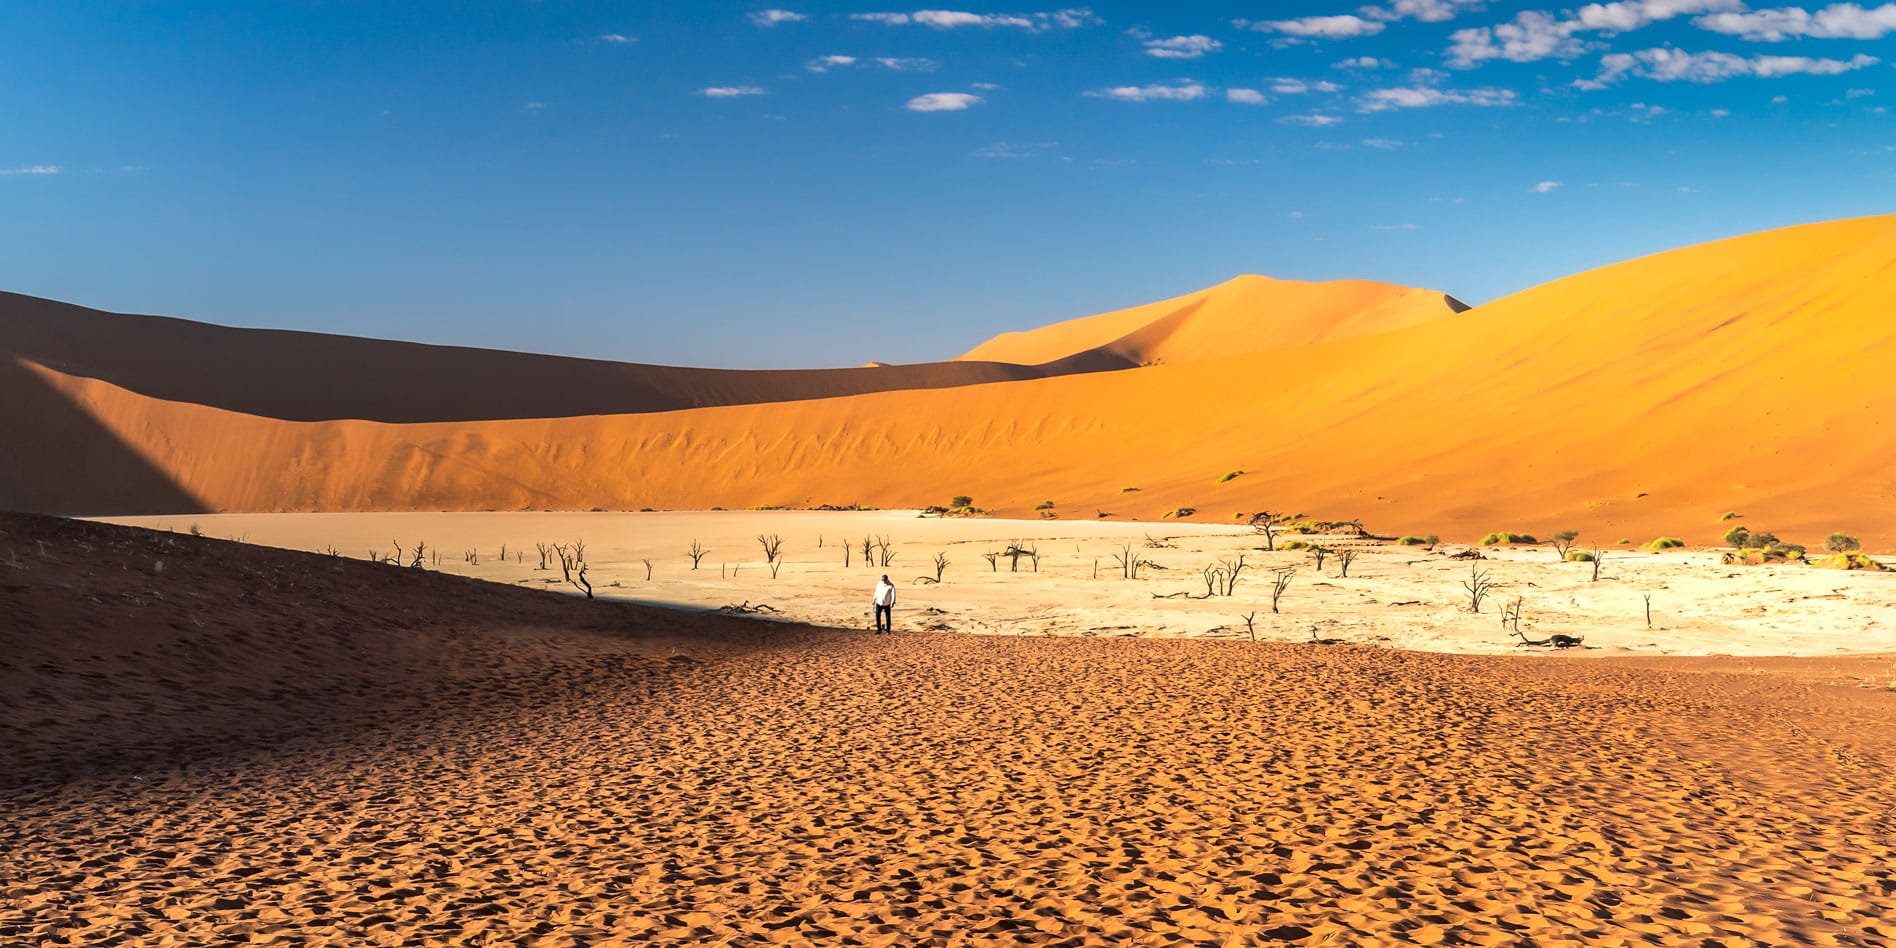
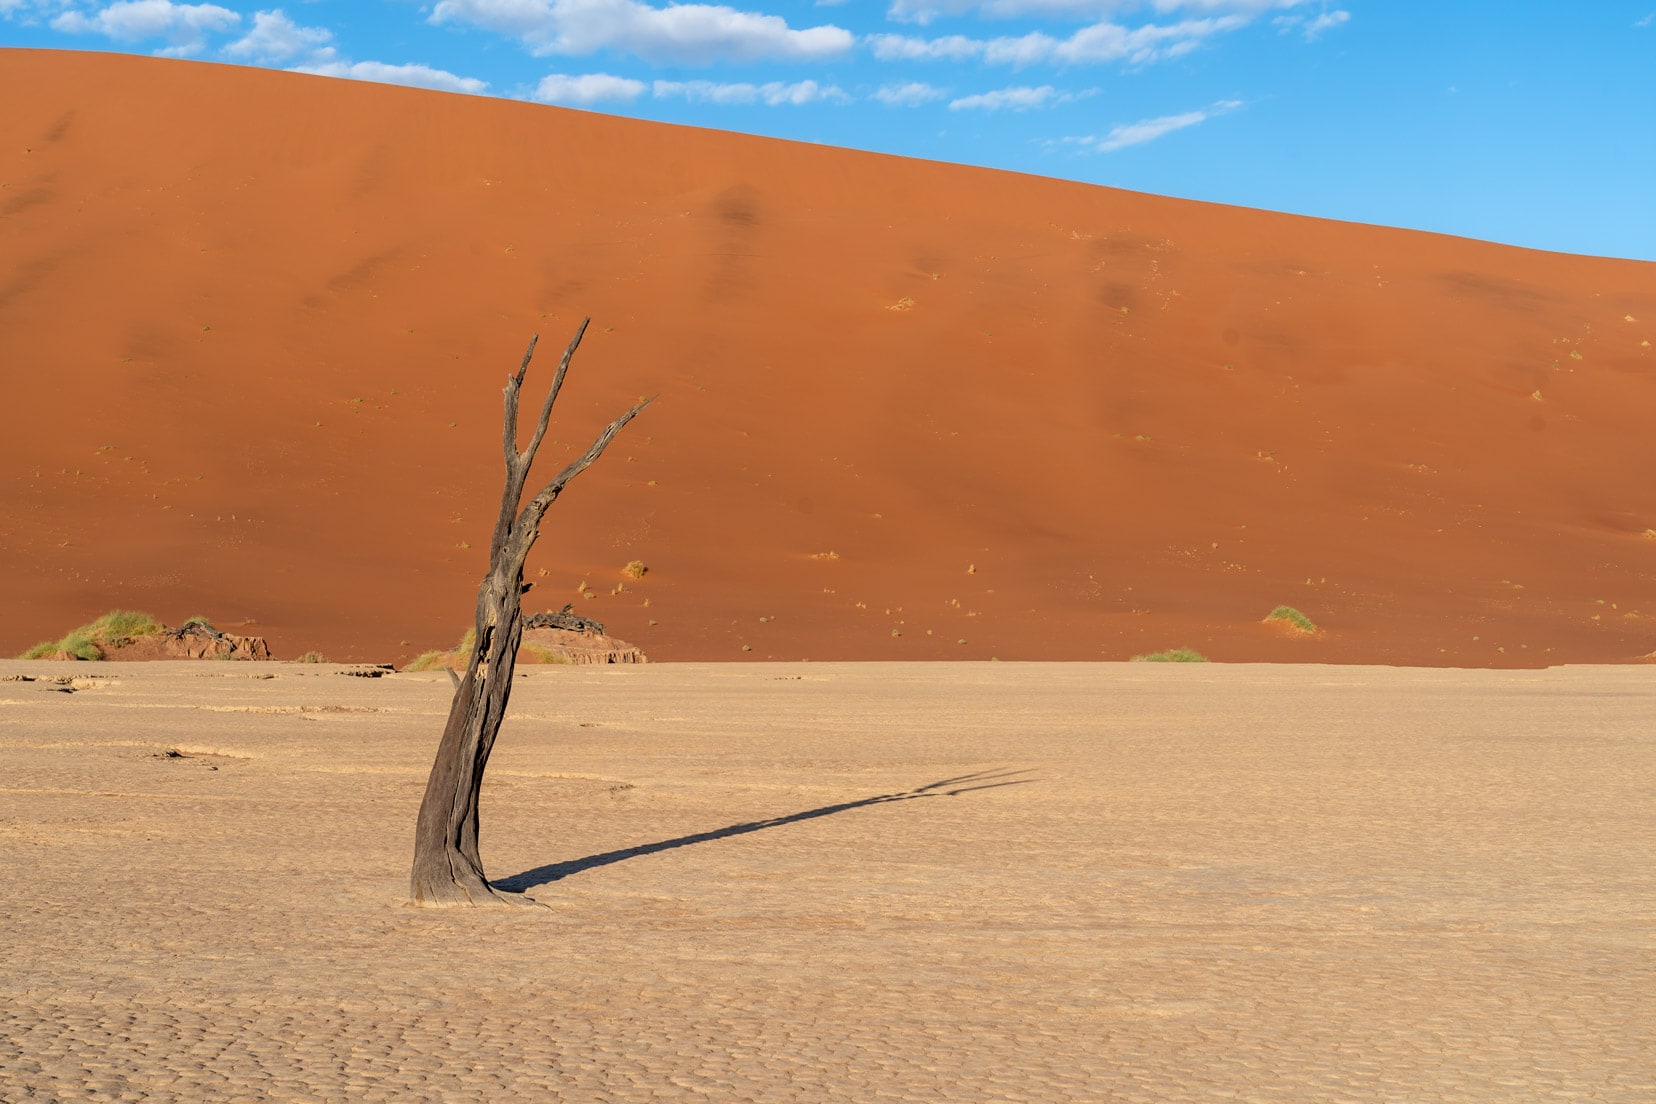
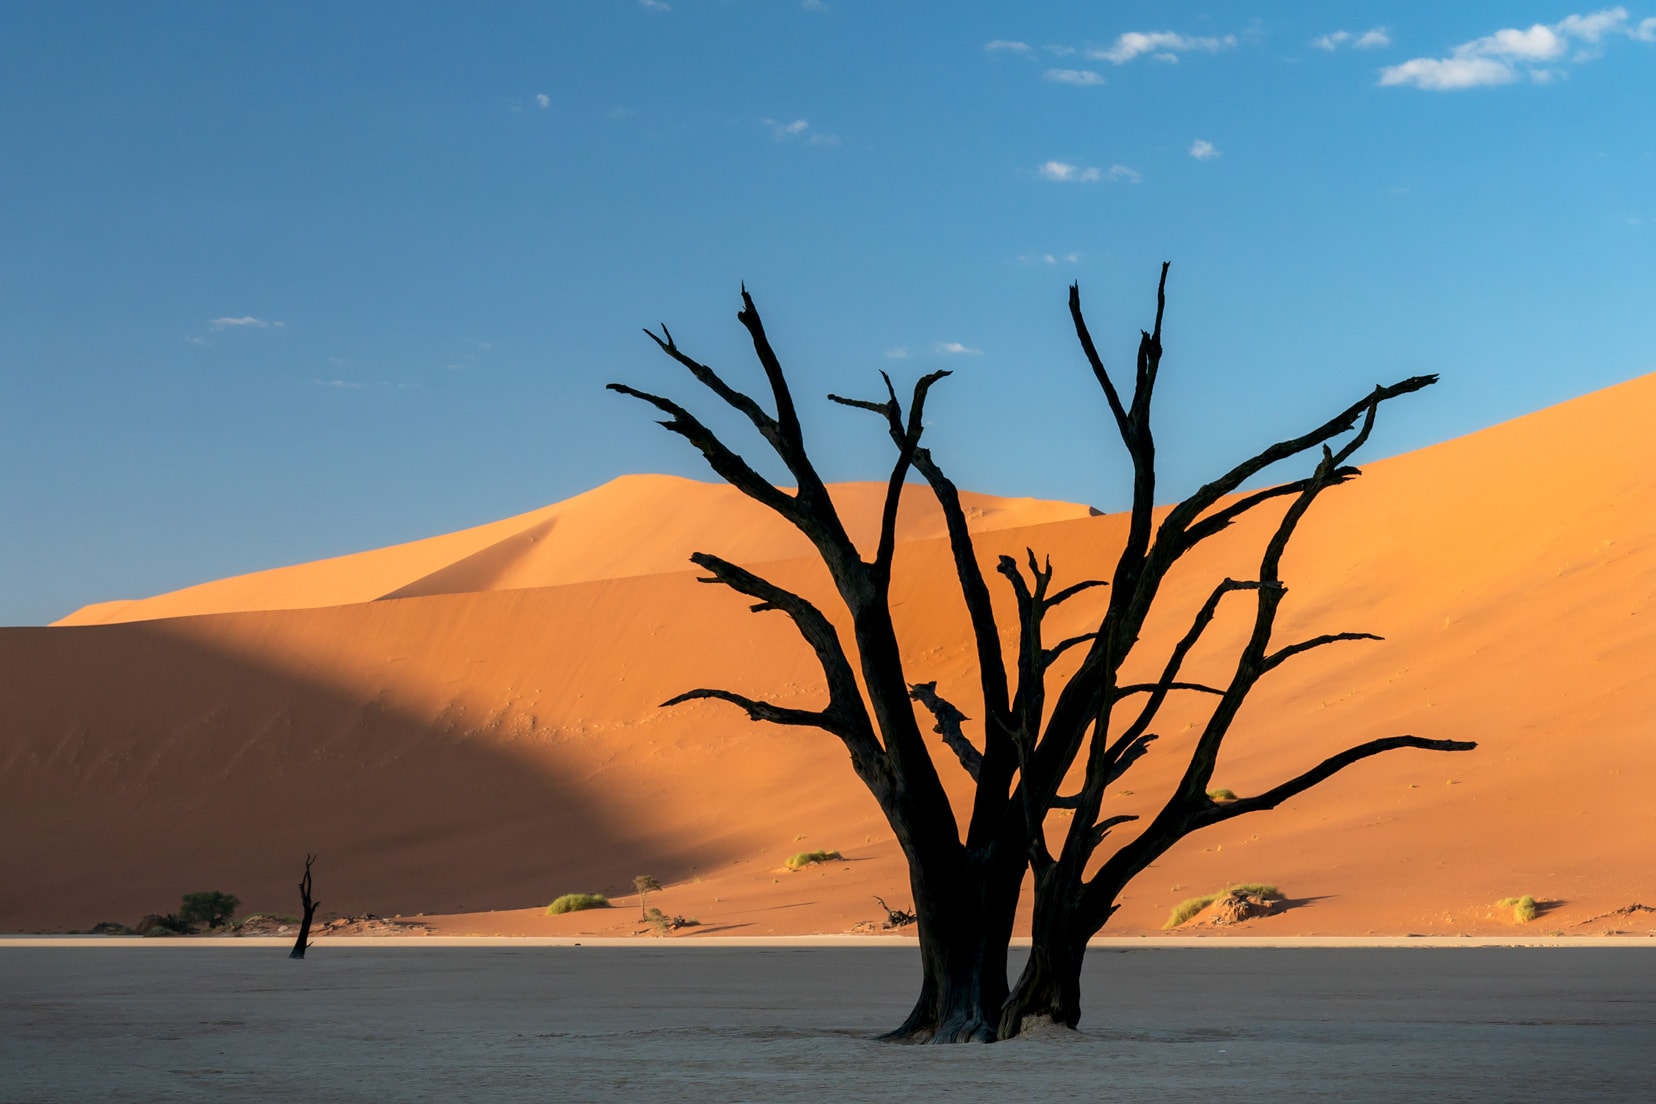
How I Photographed Deadvlei
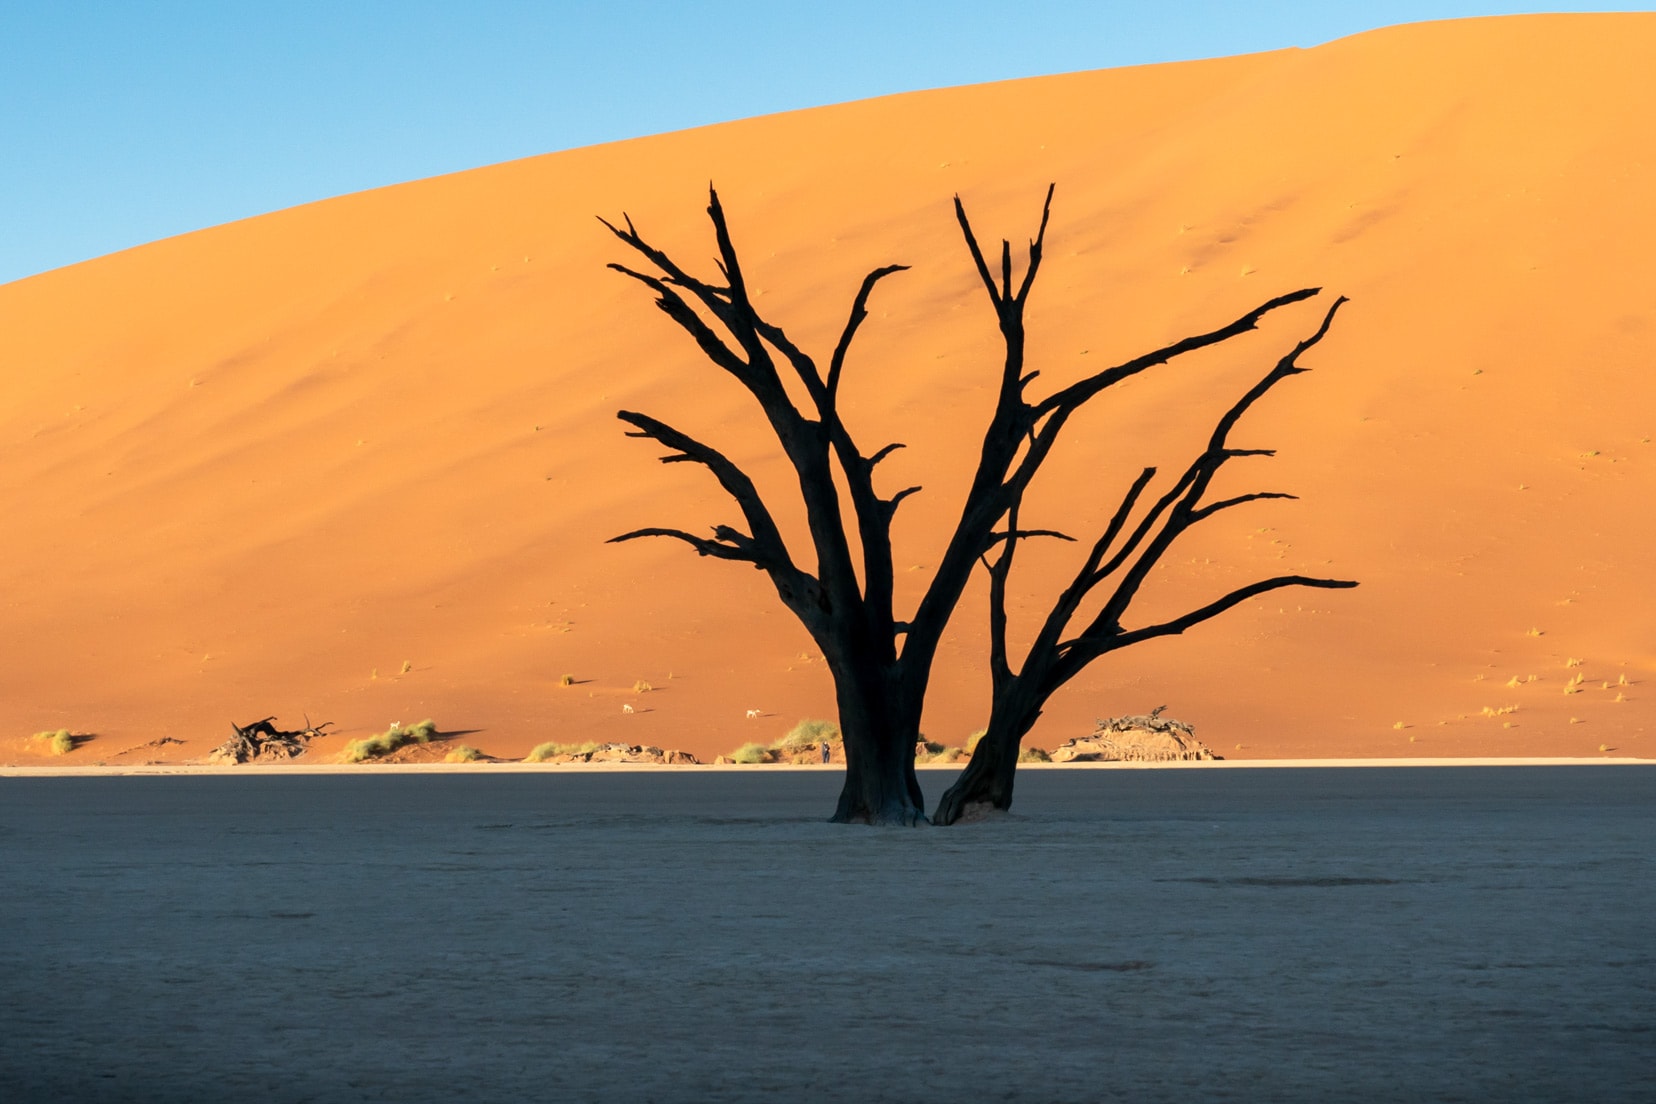
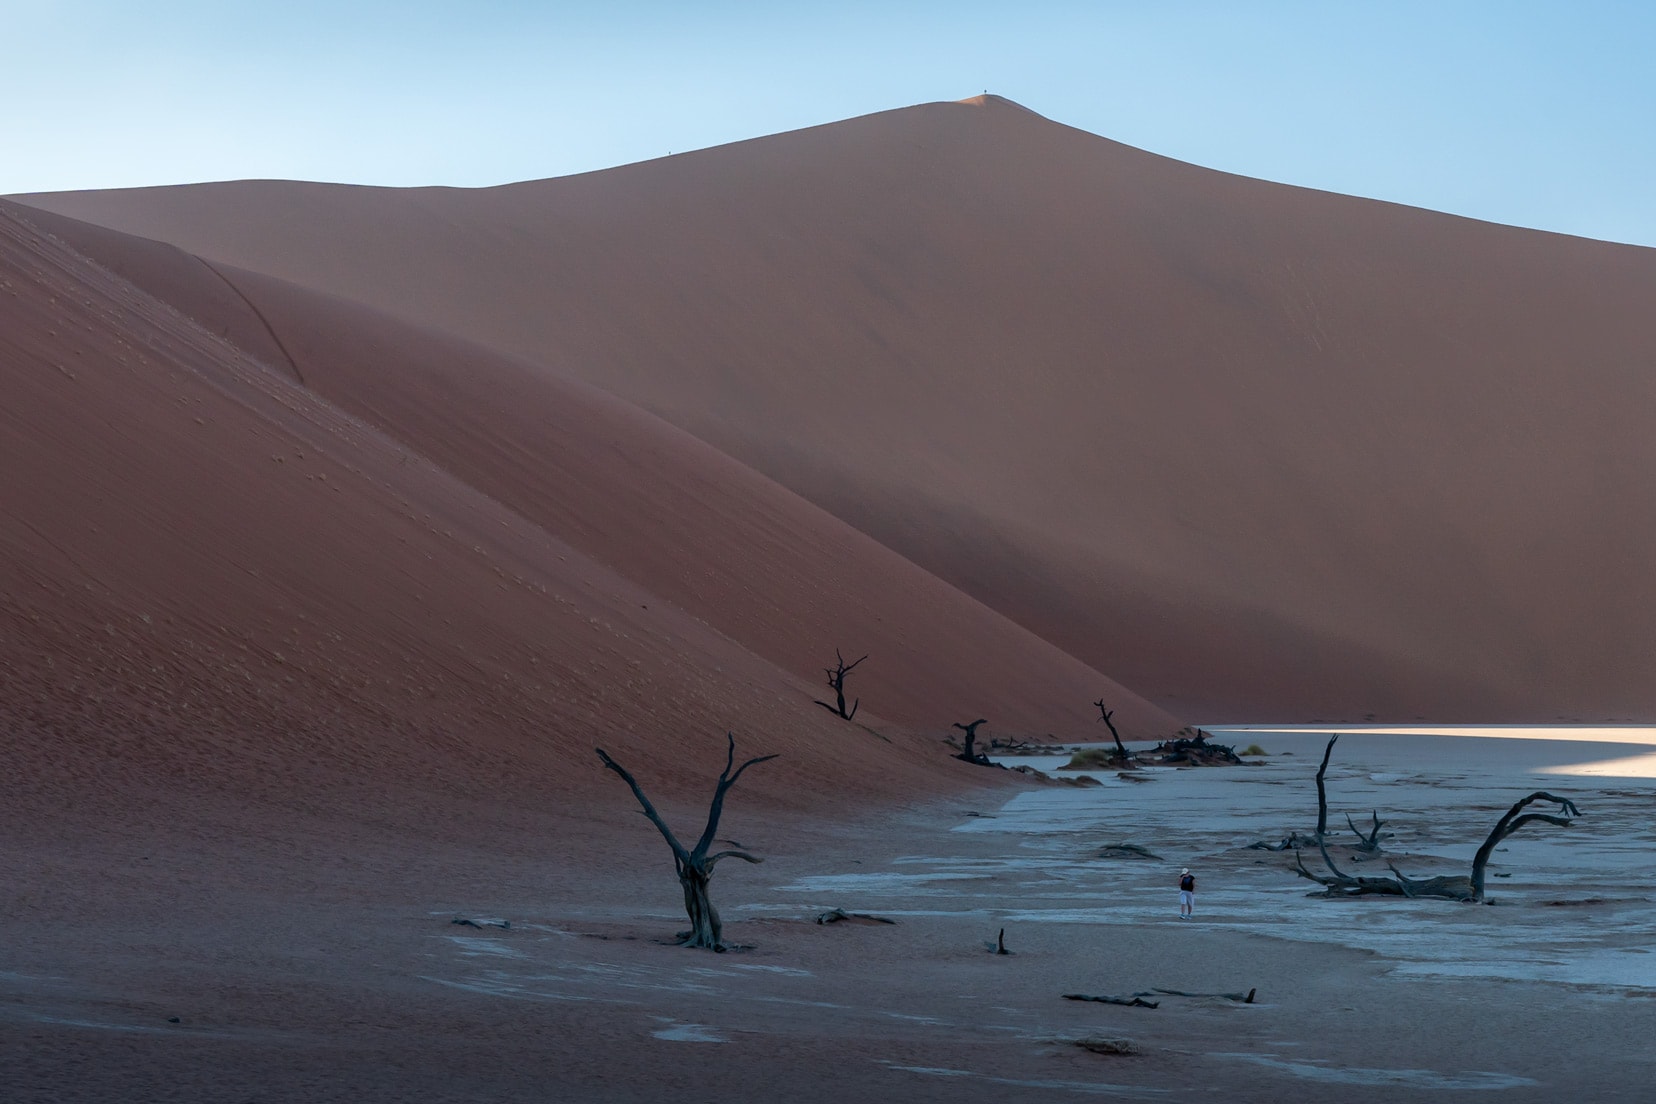
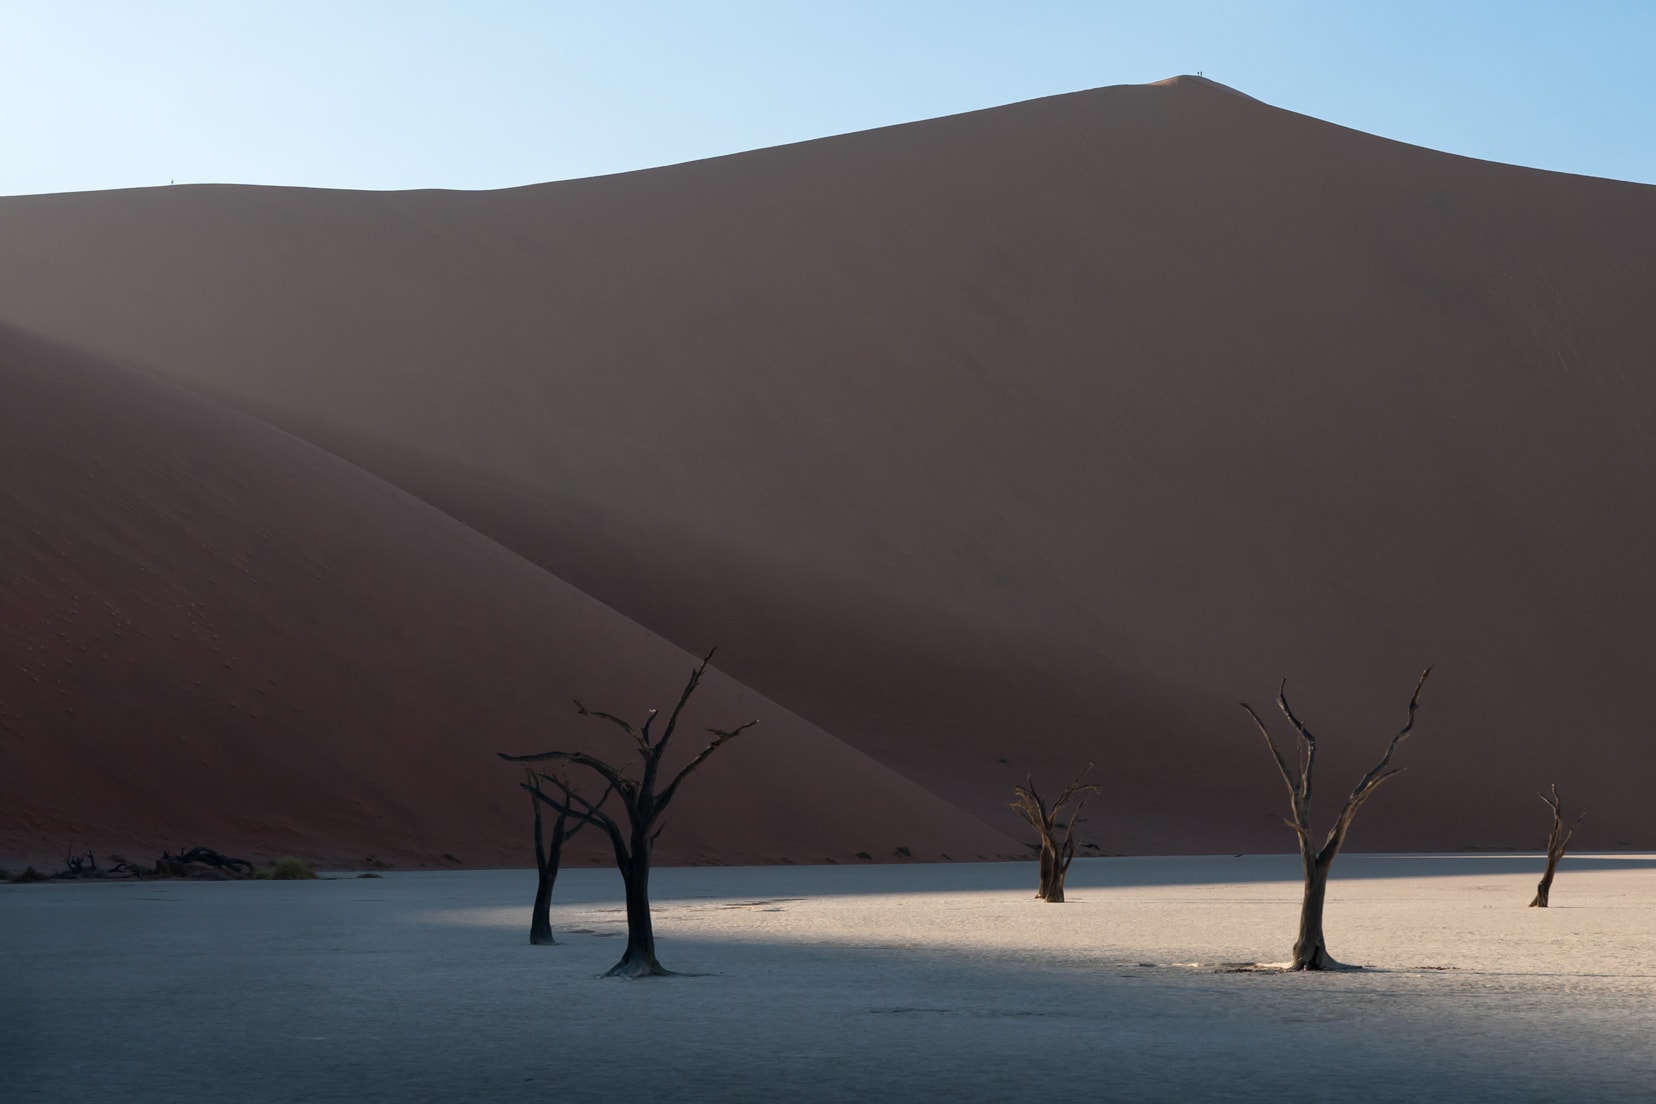
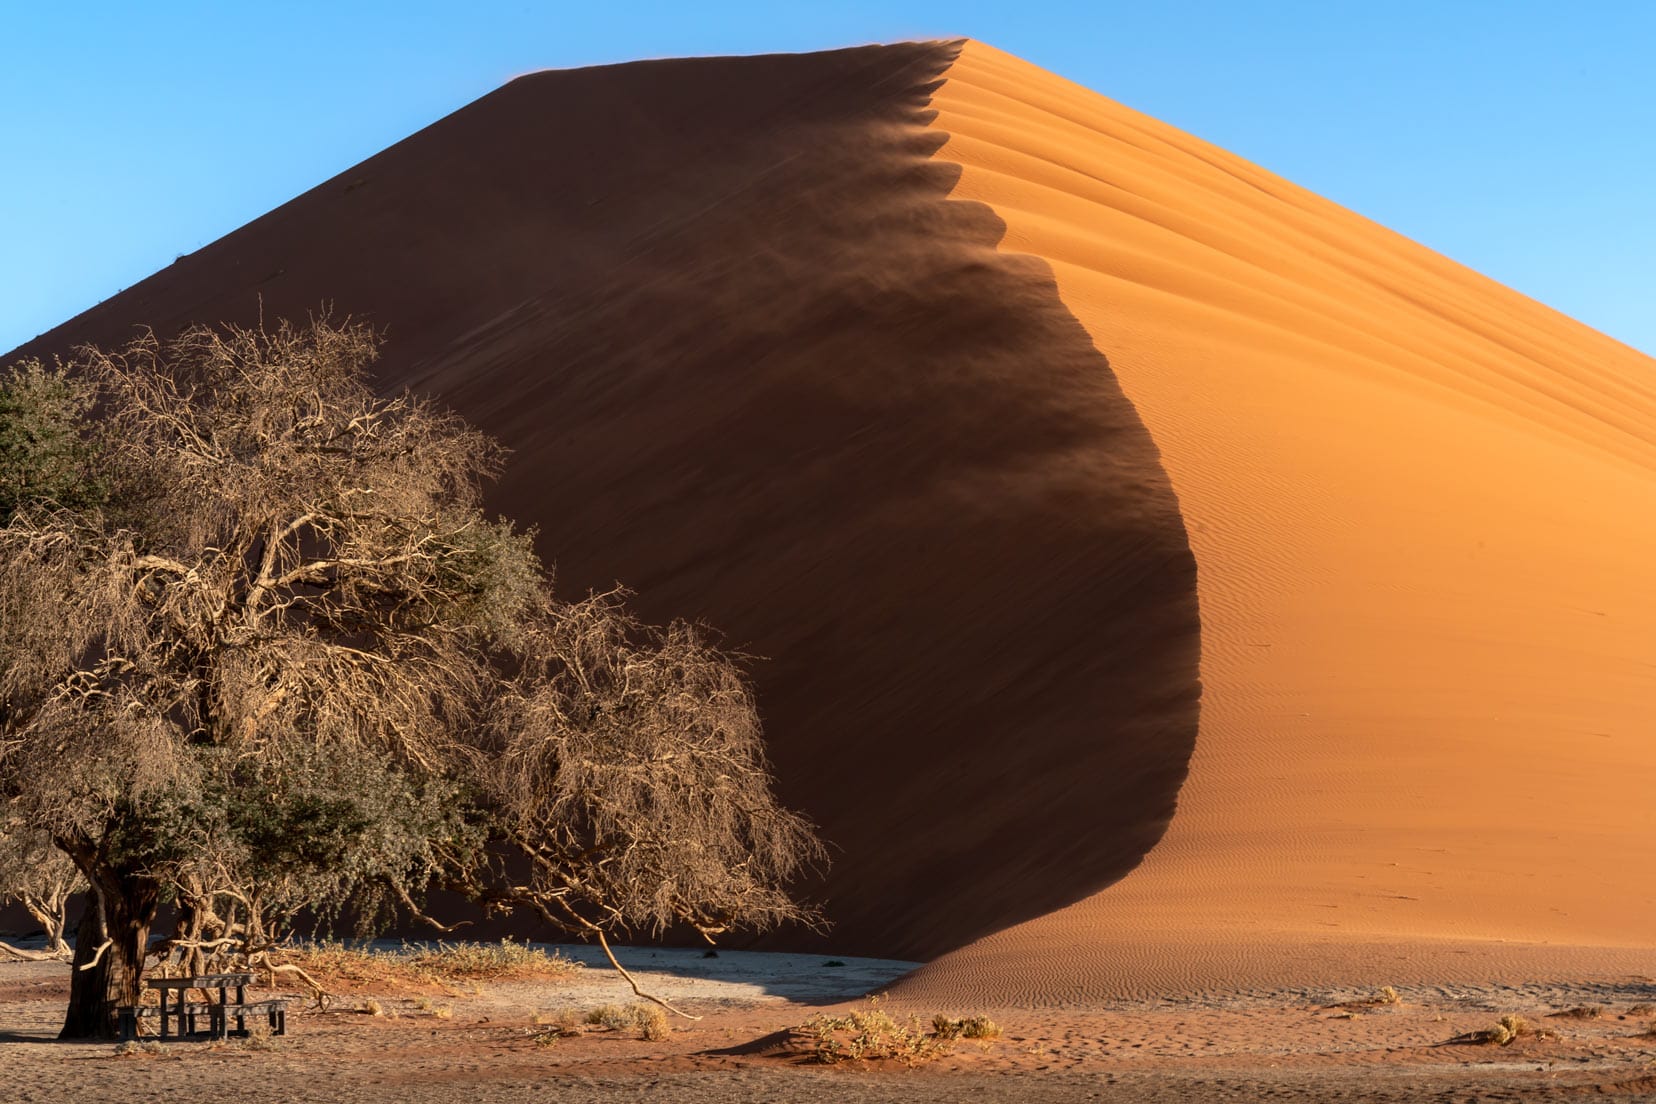
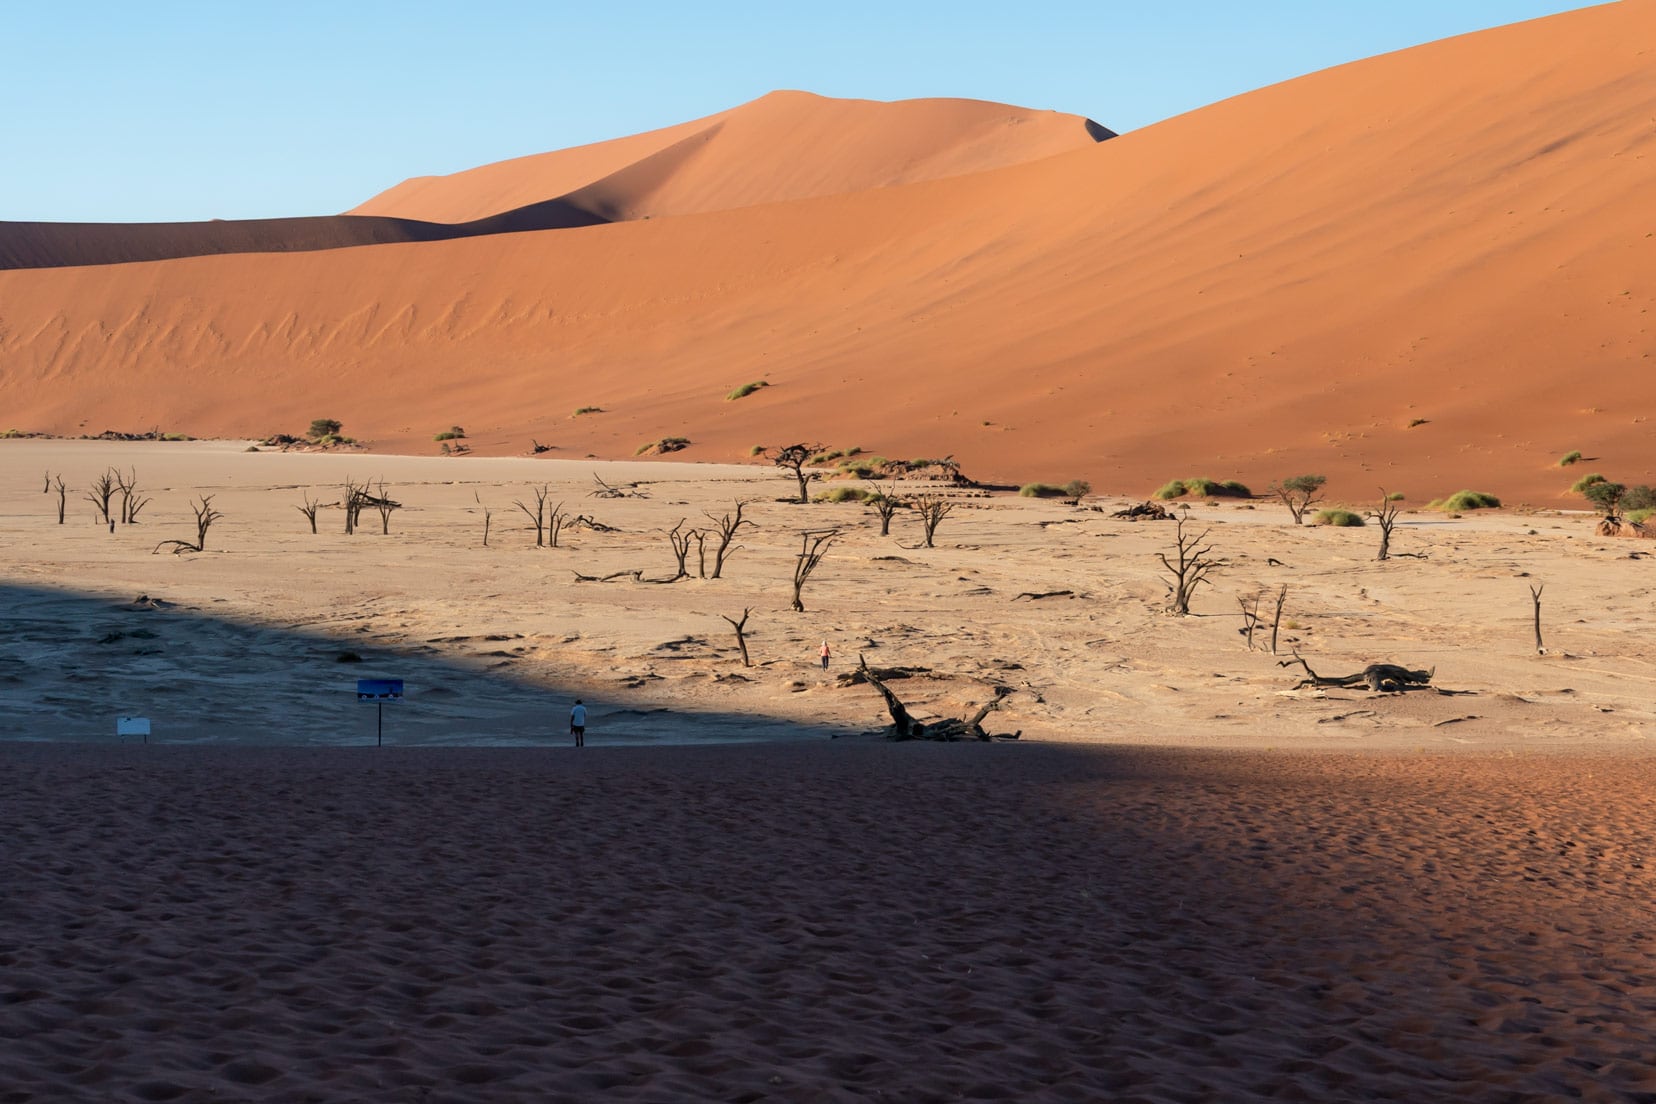
Deadvlei is a salt pan with 1000-year-old preserved skeletal camelthorn trees blackened by the sun. Butting up to Deadvlei’s eastern side is the towering Big Daddy dune.
At dawn, Big Daddy’s shadow falls across the pan. Generally, photographers want to capture iconic images of the blackened camel trees, the dune’s retreating shadow in a sea of orange dune sands and the brilliant blue sky here.
It’s a compelling scene.
Tamron 28-75mm @ 53mm, f/10
The light is vibrant yet soft from sunrise and the next +1.5 hours. This is precious time to capture your shots. After this, the sun’s rays and Deadvlei’s white clay pan reflections blow out the scene with a harsh glare.
This is why I recommend two early morning visits to Deadvlei. Two days give you approximately 3 hours of good, photo-friendly light.
Arriving at Deadvlei to Start The Shoot: My Account
With the sun about to breach the horizon, I pulled into the carpark closest to Deadvlei. I was surrounded by beautiful, soft light – perfect for photography. Walking alongside the white pole markers towards Deadvlei, I was already shooting.
Walking perpendicular to the rising sun, the ripples on the closest sand dunes caught my eye. These ripples cast minuscule shadows, creating an attractive patterned effect.
Tamron 28-75mm @ 42mm, f/9
With Deadvlei in sight, it was now a race against time. The sun rose quickly, the light losing its softness, and Big Daddy’s shadow was retreating across Deadvlei.
Walking onto Deadvlei, I am focused on how to compose my shots of this wondrous scene.
I initially face west and shoot a single blackened camelthorn tree, still in shadow, with the illuminated orange-hued sand dune backdrop. The blue sky offers the complementary colour I was hoping for.

Sony 24-105mm @ 37mm, f/9
Facing south, I look to tell the story of an epic fight for survival. I capture a close-up shot of a camelthorn tree lying beaten on the pan, the life waters of a once-flooded Tsauchab River, which can no longer flow into the pan.
Tamron 28-75mm @ 37mm, f/10
A close-up shot of the camelthorn tree provides a different perspective.
Sony 24-105mm @ 49mm, f/10
The sun continued its rise, casting harsh light over the adjacent sand dunes. The pan then literally lit up from the reflected sunlight.
The image below tells the story of the desert’s harshness and inevitability. I was facing south for this shot.
Tamron 28-75mm @ 61mm, f/9
Tamron 28-75mm @ 64mm, f/9
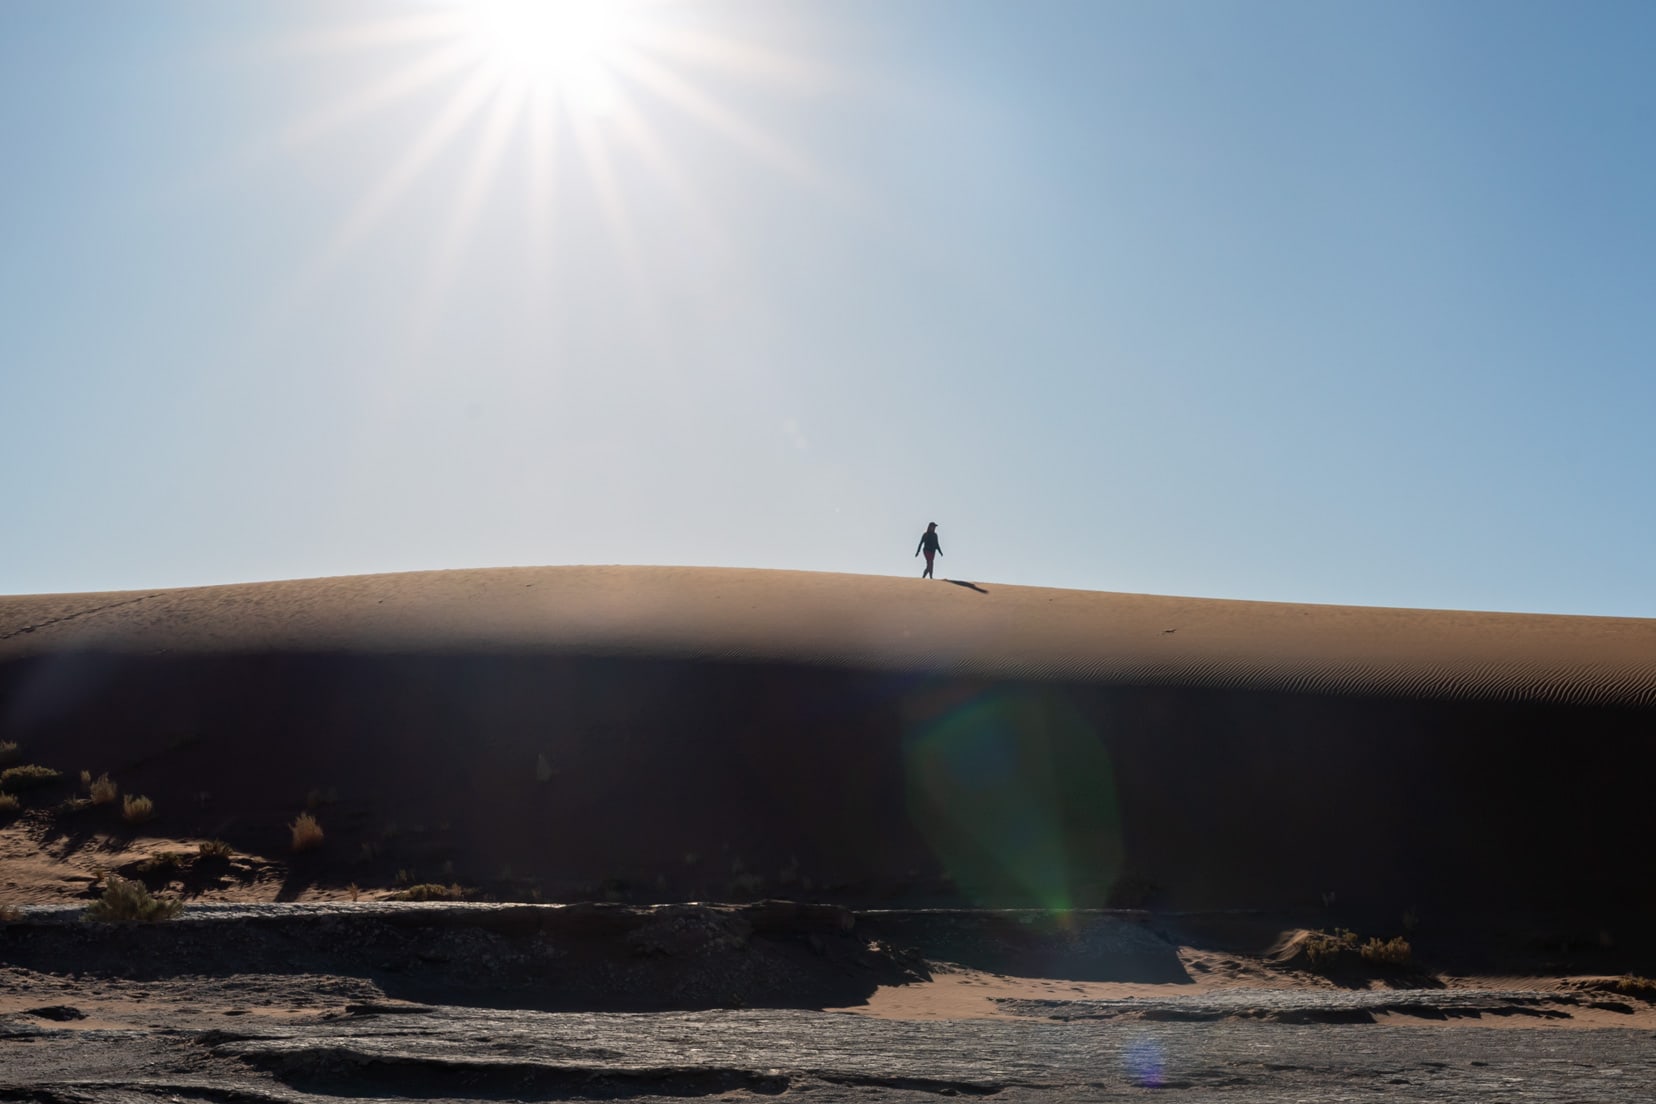
After one and a half hours, the shadow from Big Daddy was all but gone.
But, one part of the story still remained missing. I soon spied what I sought—a lone hiker traversing the dunes in the harsh sun.
To make the image more interesting, I wanted some sun stars.
Checking that the focal length was greater than f/9, I briefly (to avoid looking at the sun) pointed the camera towards the person and took the shot.
Tamron 28-75mm @ 37mm, f/10
Sony 24-105mm @ 51mm, f/10
The day’s shoot of Deadvlei was complete. I would review my images that night and see what I missed or could have done better before returning for my final shoot the following morning.
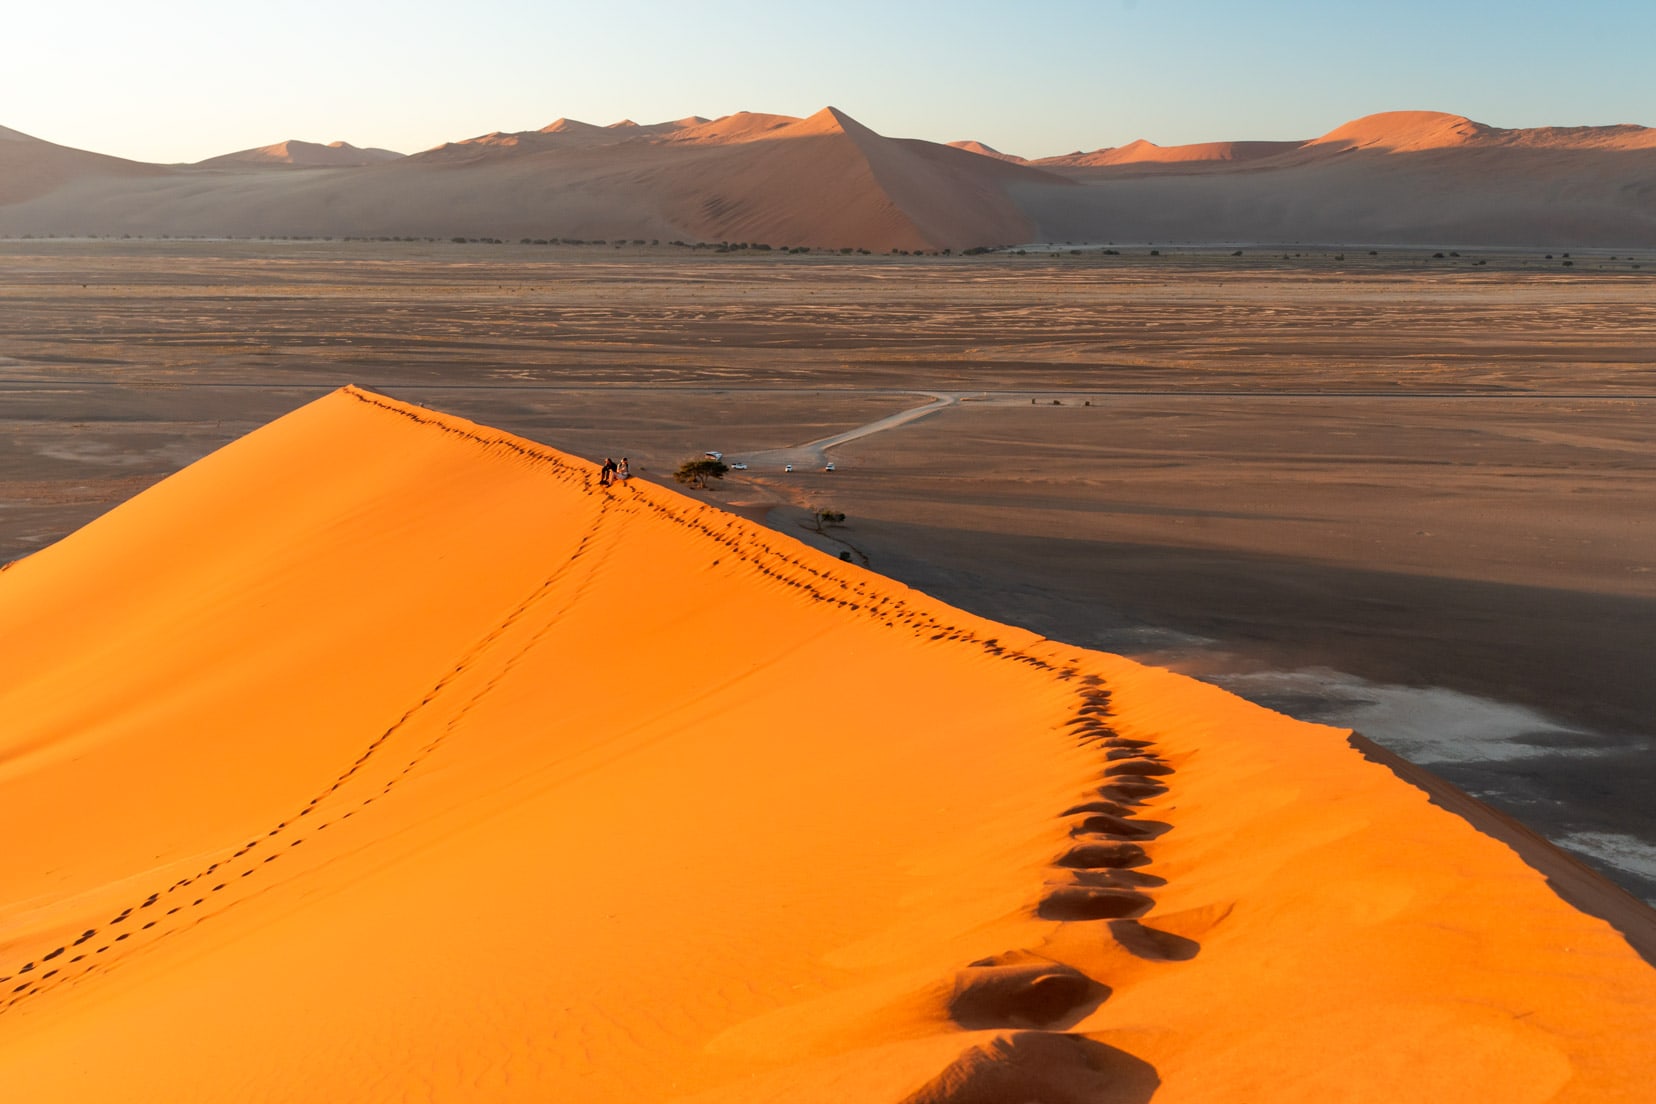
How I Photographed Big Daddy Dune
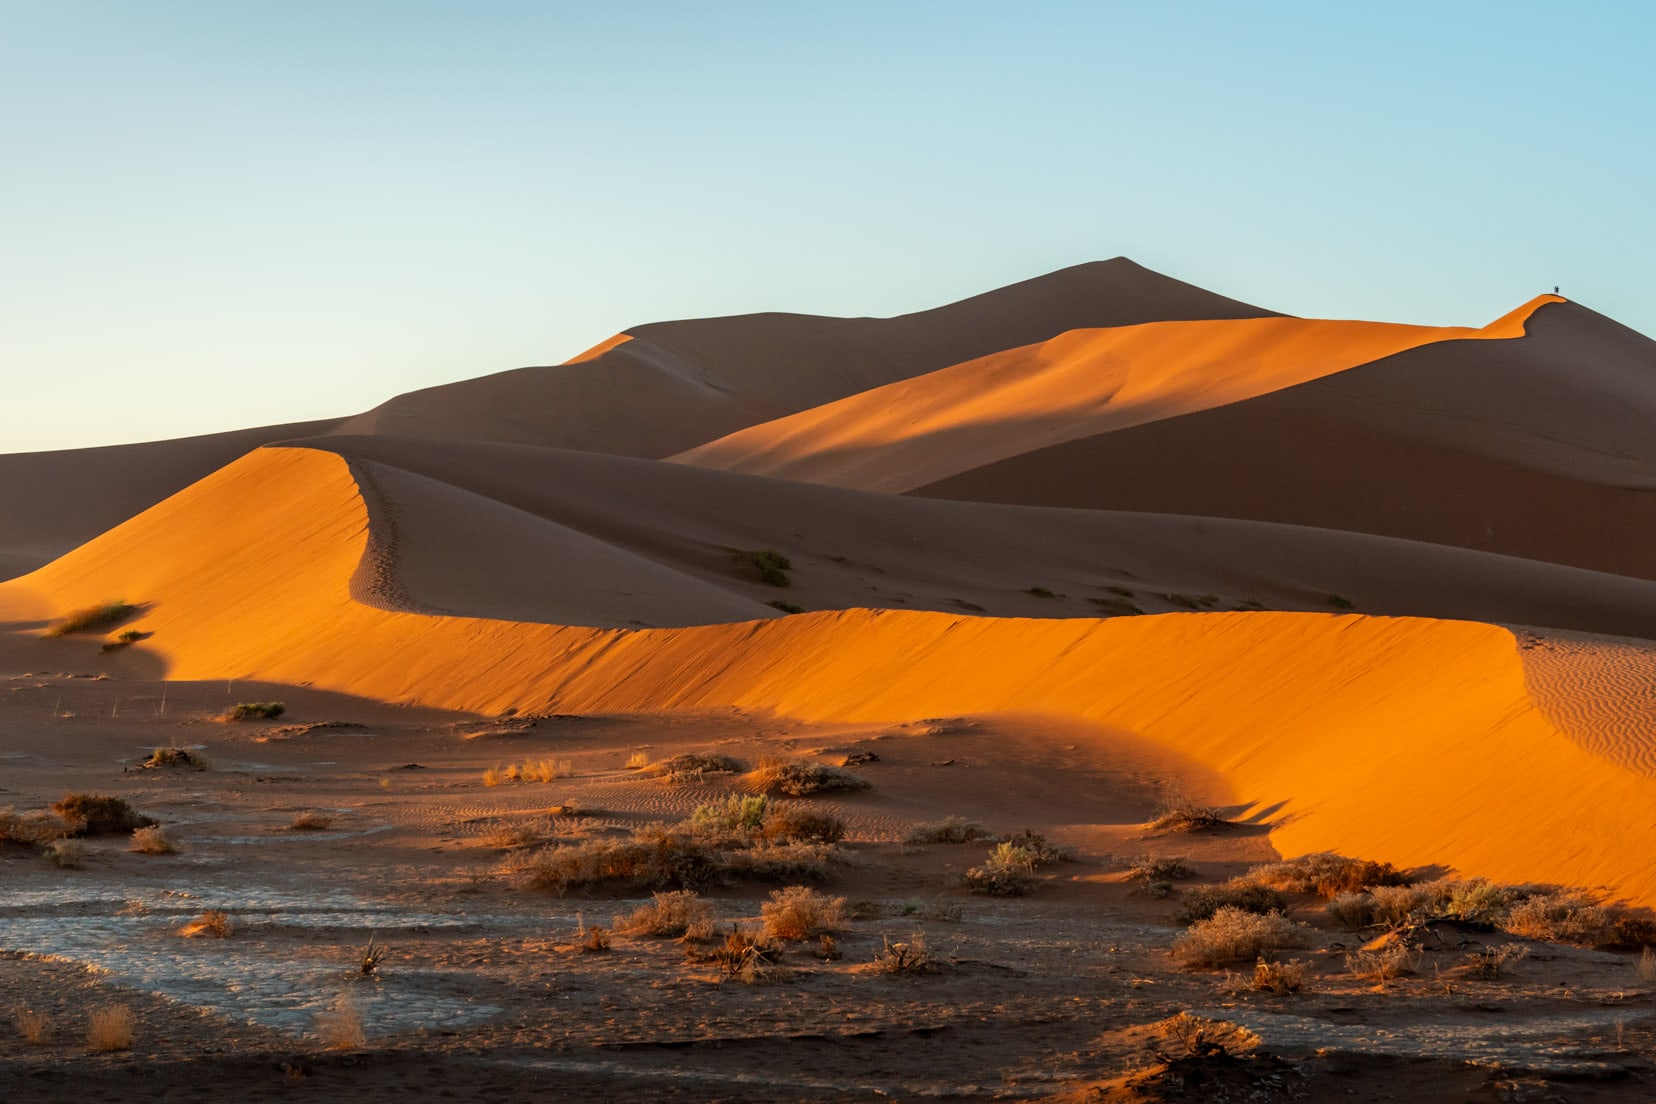
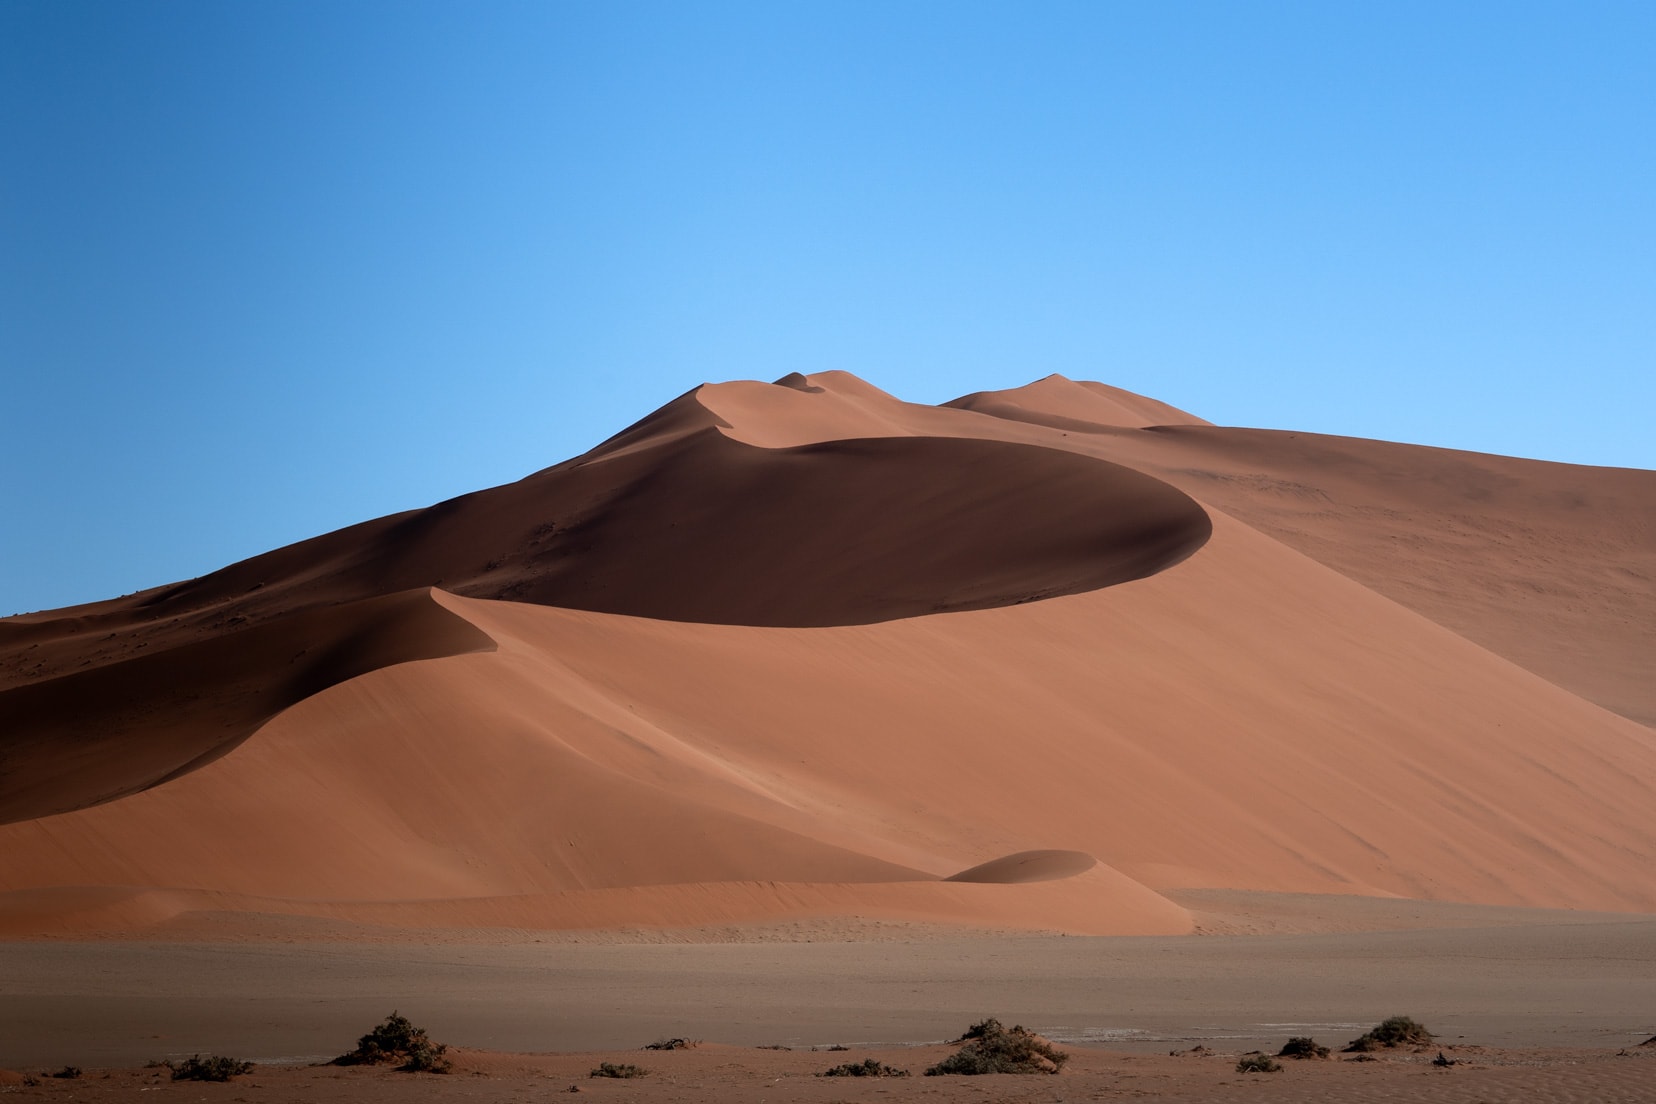
Overlooking Deadvlei, Big Daddy is a monster 325m high dune. This dune is popular for climbing and watching both the sunrise over Sossusvlei and tracking Big Daddy’s receding shadow across Deadvlei.
In my image below, taken at sunrise, you can see two people standing on the apex of Big Daddy.
With big landscapes, getting an idea of scale without using some sort of benchmark can be difficult.
Having these two people immediately gives perspective to the image—that sense of size and grandness to the dunes.
Deadvlei is located to the right of where the people are. Although we didn’t climb Big Daddy, others told us it took them about an hour to reach the top.
Tamron 28-75mm @ 75mm, f/10
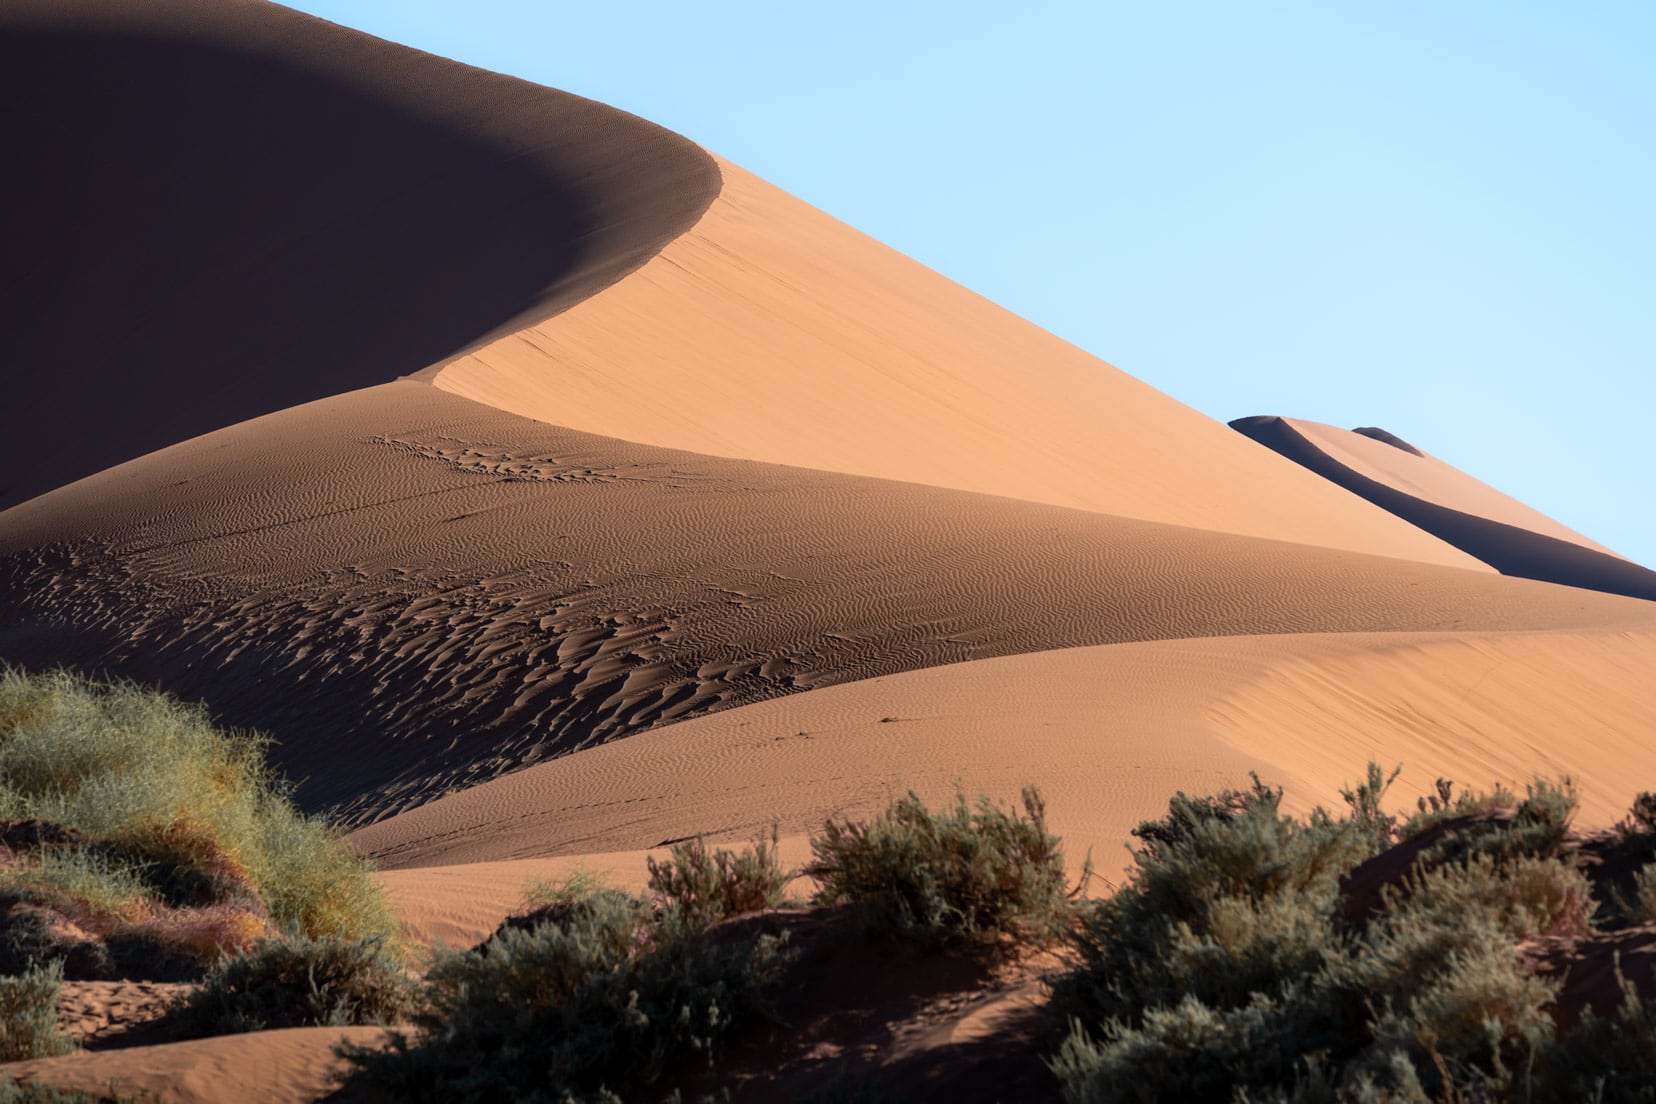
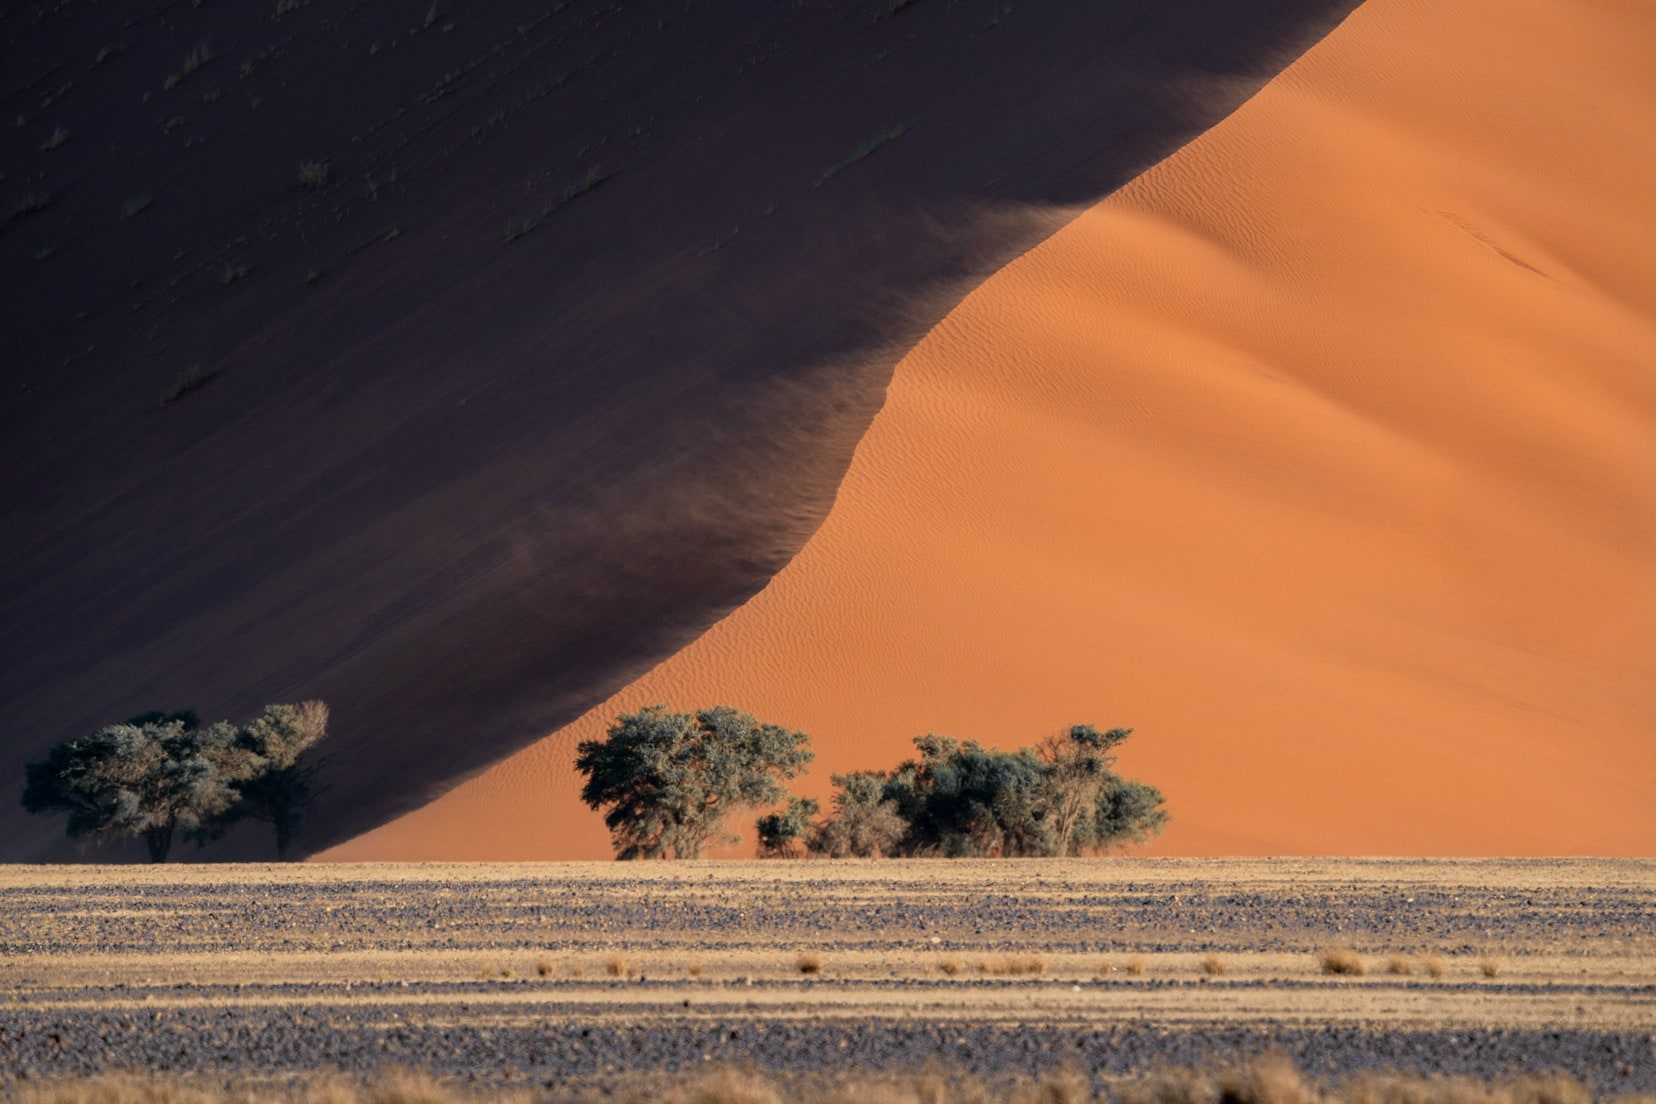
How I Photographed Big Mama Dune
The curving sand dunes, aptly named Big Mama, immediately attract the eye. Big Mama is located on the northern perimeter of Sossusvlei. To orientate yourself, when standing at the carpark looking towards Big Daddy, behind you is the sweeping form of Big Mama.
Yes, she has some sensuous curves.
At an agreeable 200m height, Big Mama is also a popular choice for hikers. Early morning is the best time to shoot Big Mama before any climbers spoil her perfect sandy canvas.
Firstly, a wide-angle shot of Big Mama is a must. The walk back from Deadvlei to the carpark offers the most photographic views of Big Mama (see below image).
Again, providing a sense of scale is important. Below, you can see vehicles in the foreground and people hiking along the spine of Big Mama.

Tamron 28-75mm @ 75mm, f/11
I wanted some close-up shots of Big Mama’s curving dunes to tell the story. We drove to the open area at the base of Big Mama by the dry salt pan. I isolated some of the dunes using my Sony 70-300mm zoom lens.
During post-processing the two images below, I darkened the shadows even more to add contrast. This immediately draws the eye to the curvy spine of the dune.
Sony 70-300mm @ 300mm, f/9
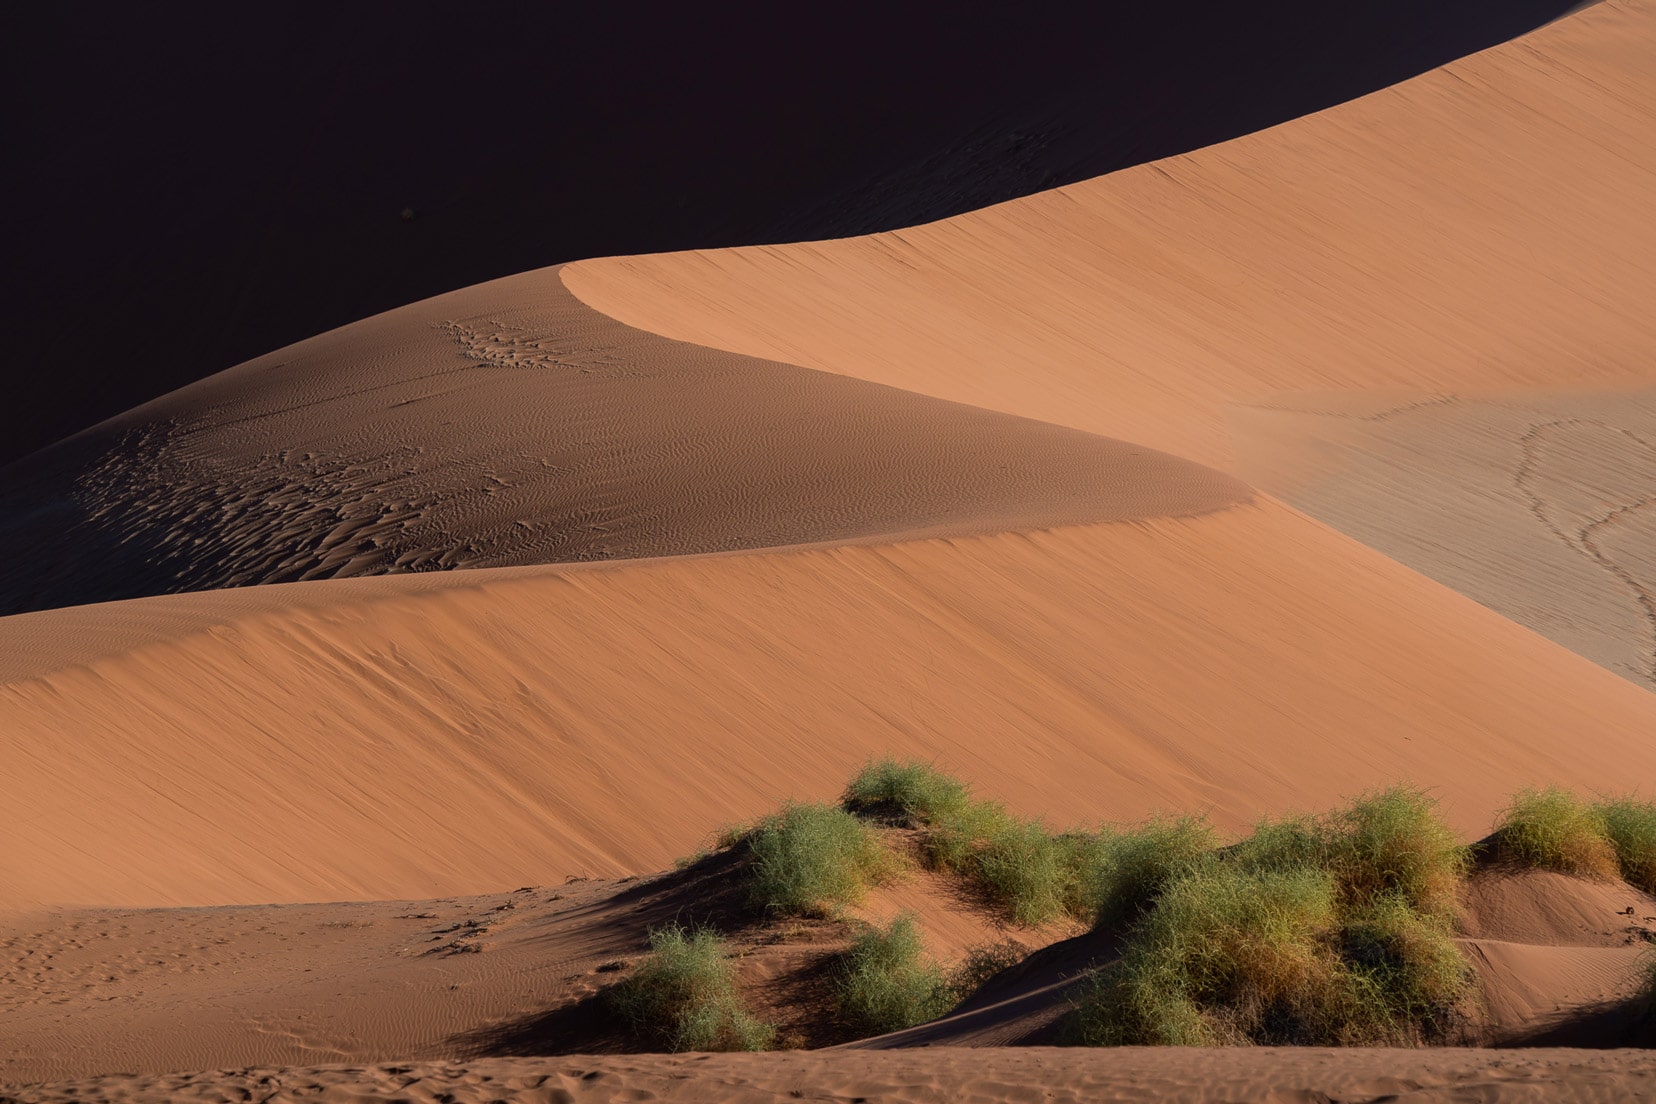
Sony 70-300mm @ 300mm, f/9
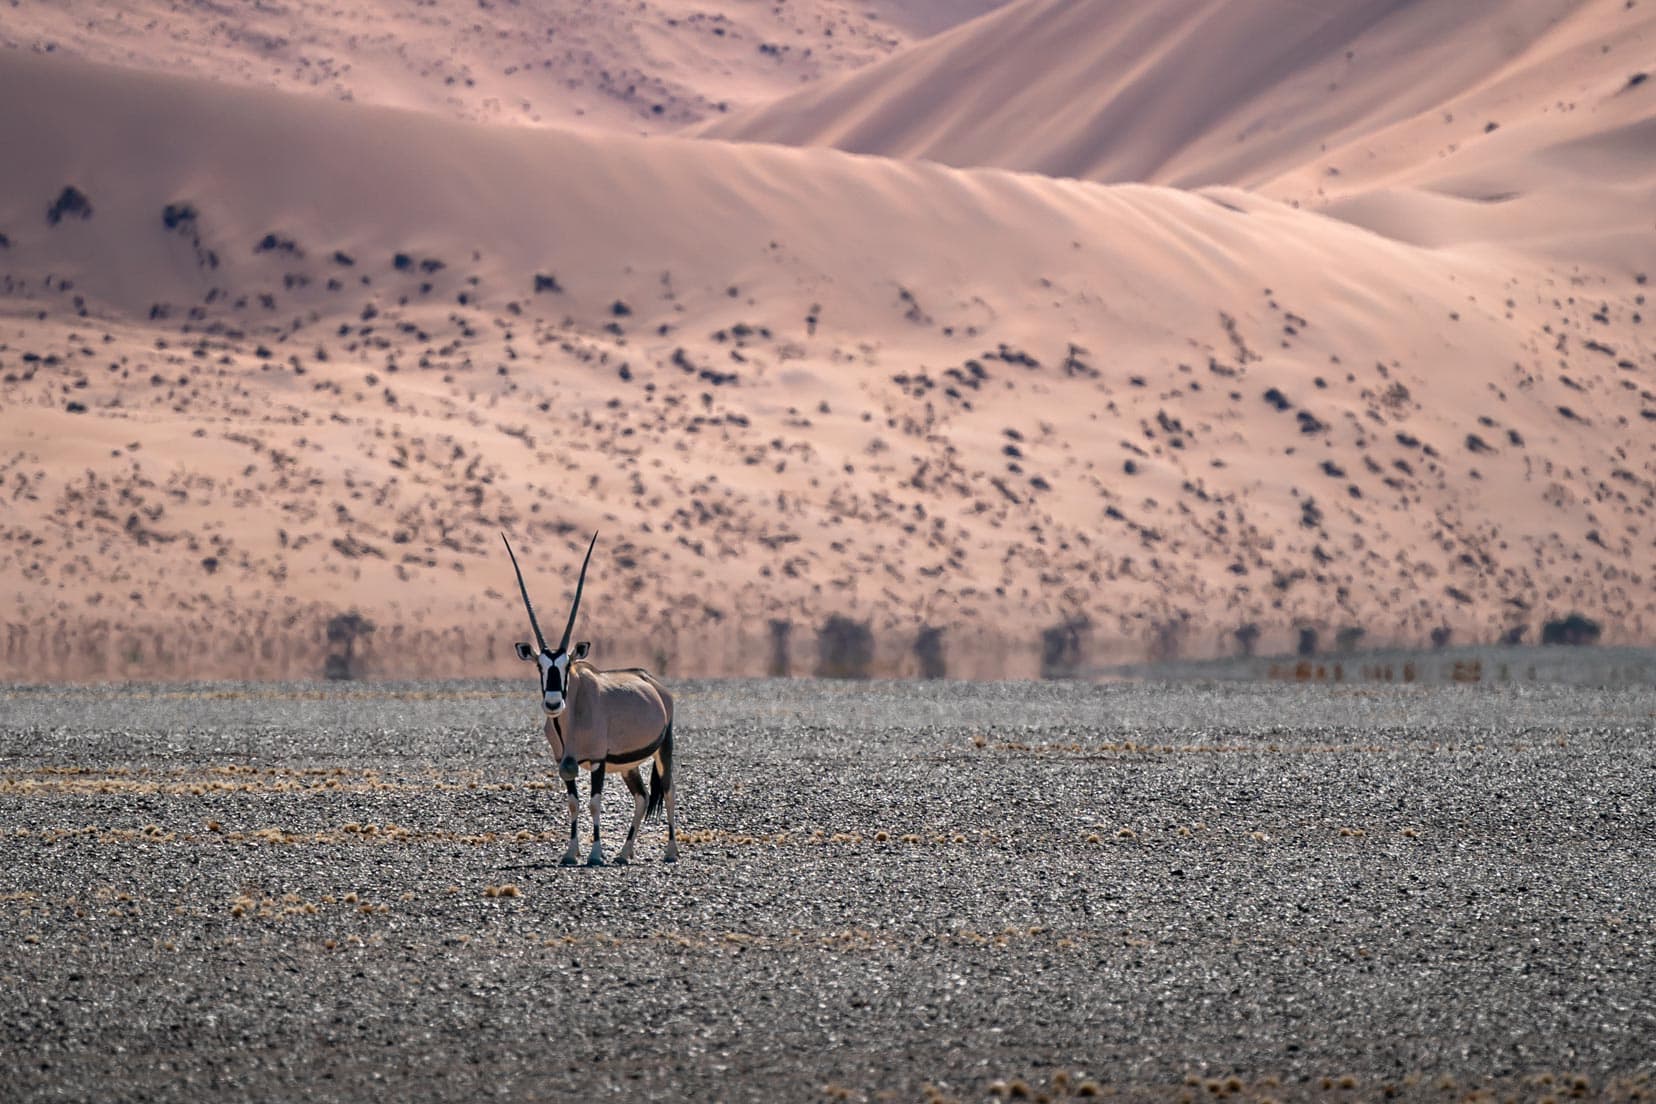
Sossusvlei has wildlife, but it isn’t prolific, so you rely on a fair bit of luck to see it. A shot I was hoping for was an Oryx in the sand dunes, and as luck would have it, I had an opportunity.
As I was a fair distance from the animal, I stalked it to be much closer when it walked into the open spaces. The Oryx, however, was working off a different plan. It reappeared near the camelthorn bushes, which did not make for the clear shot with the curvy dunes in the background that I was looking for.
In the end, I grabbed the shot you see below.
It wasn’t the image I envisioned of the Oryx in the open, but the silhouette of the Oryx does work in the rather harsh light and has the sweeping sand dune background. Just goes to show that you can’t script the wildlife.
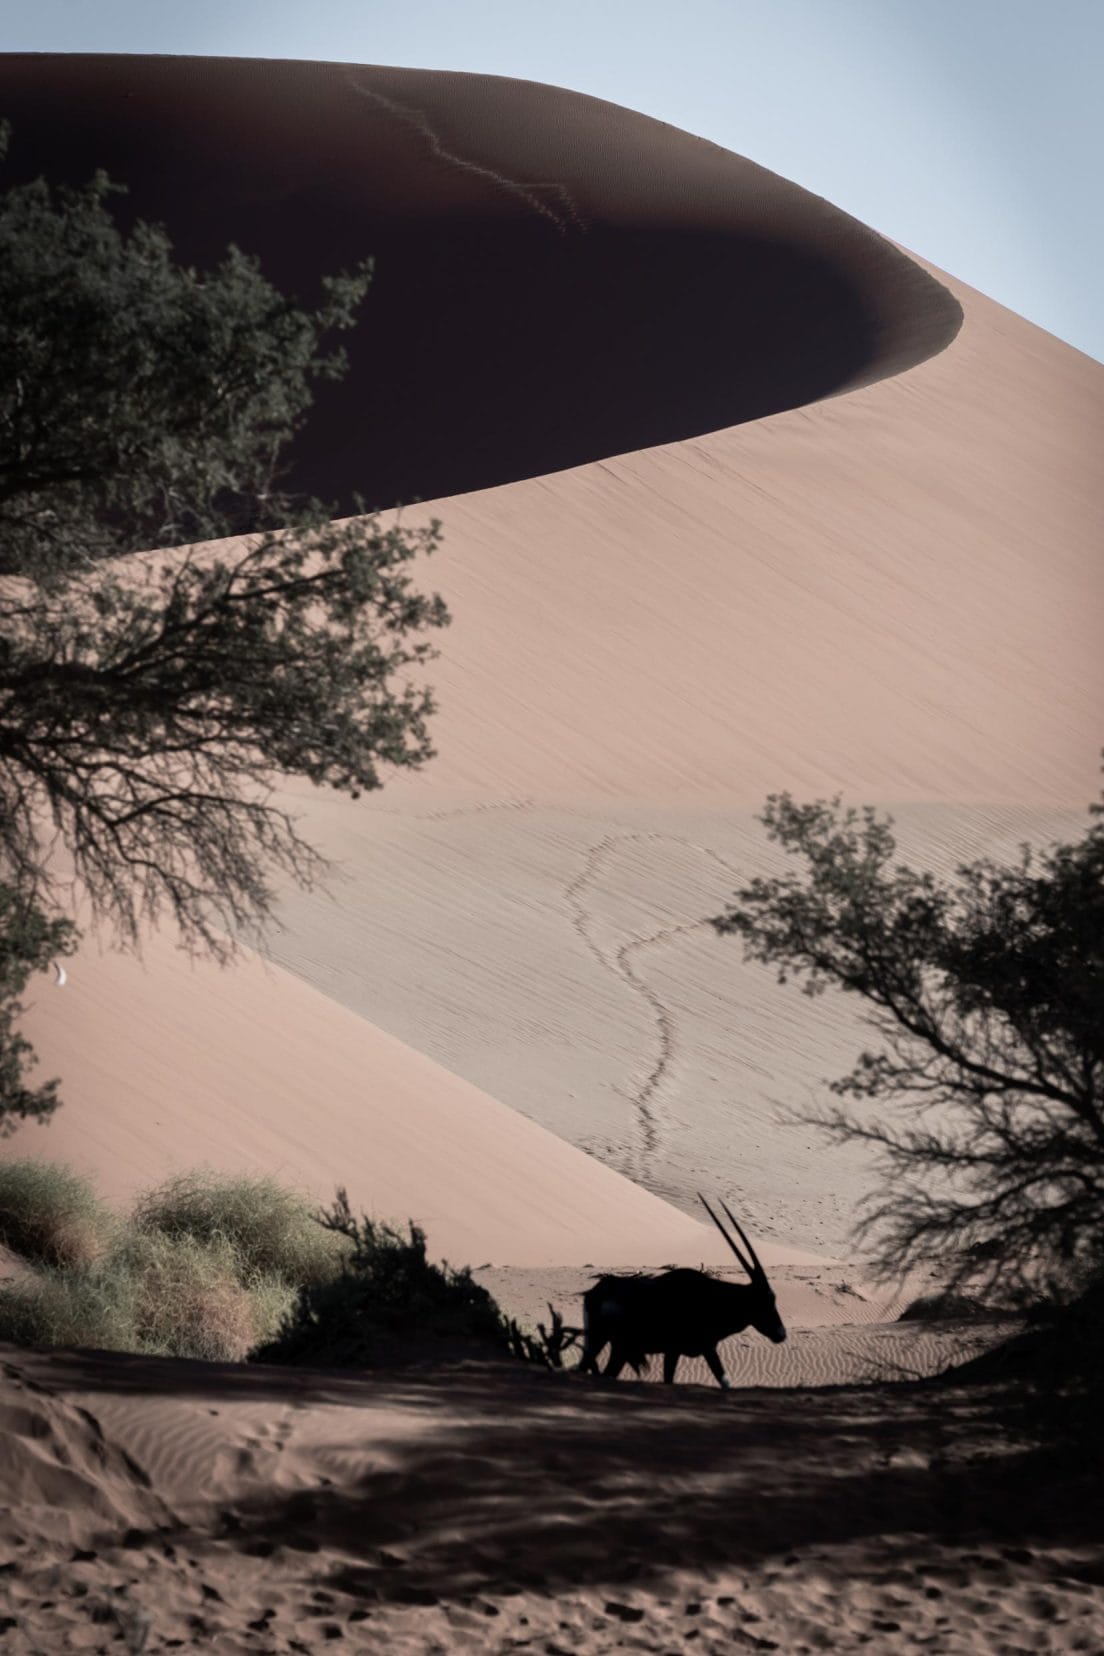
Sony 70-300mm @ 300mm, f/9
How I Photographed Dune 45
One of the most popular dunes to climb is Dune 45 at a much more manageable height of 85m. I climbed Dune 45 to catch the sunset and look down into Dune Alley from the top.
Dune 45 is a relatively easy dune to climb for those with an average fitness level. Dune Alley is the natural gap between the sand dunes where the paved road passes from gate 2 to the 4×4 carpark.
I started shooting wide using my 28-75mm lens to capture the grandness of the dunes.
Tamron 28-75mm @ 69mm, f/13
In the below image, I wanted to capture the dunes in the background, with one dune’s shadows overlapping the dune behind. This pattern kept repeating.
Tamron 28-75mm @ 50mm, f/7.1
Tamron 28-75mm @ 50mm, f/7.1
Below, taken from the top of Dune 45, the setting sun casts its last rays across the many dunes lining Dune Alley. I balanced having enough light in the foreground and not blowing out the highlights around the sun.
Tamron 28-75mm @ 28mm, f/11
Lying down to get low at the peak of Dune 45, I photograph the dune’s spine with its myriad number of small scallop-shaped patterns and open up the focal length to depict the shapes of the dunes in the background.
Tamron 28-75mm @75mm, f/10
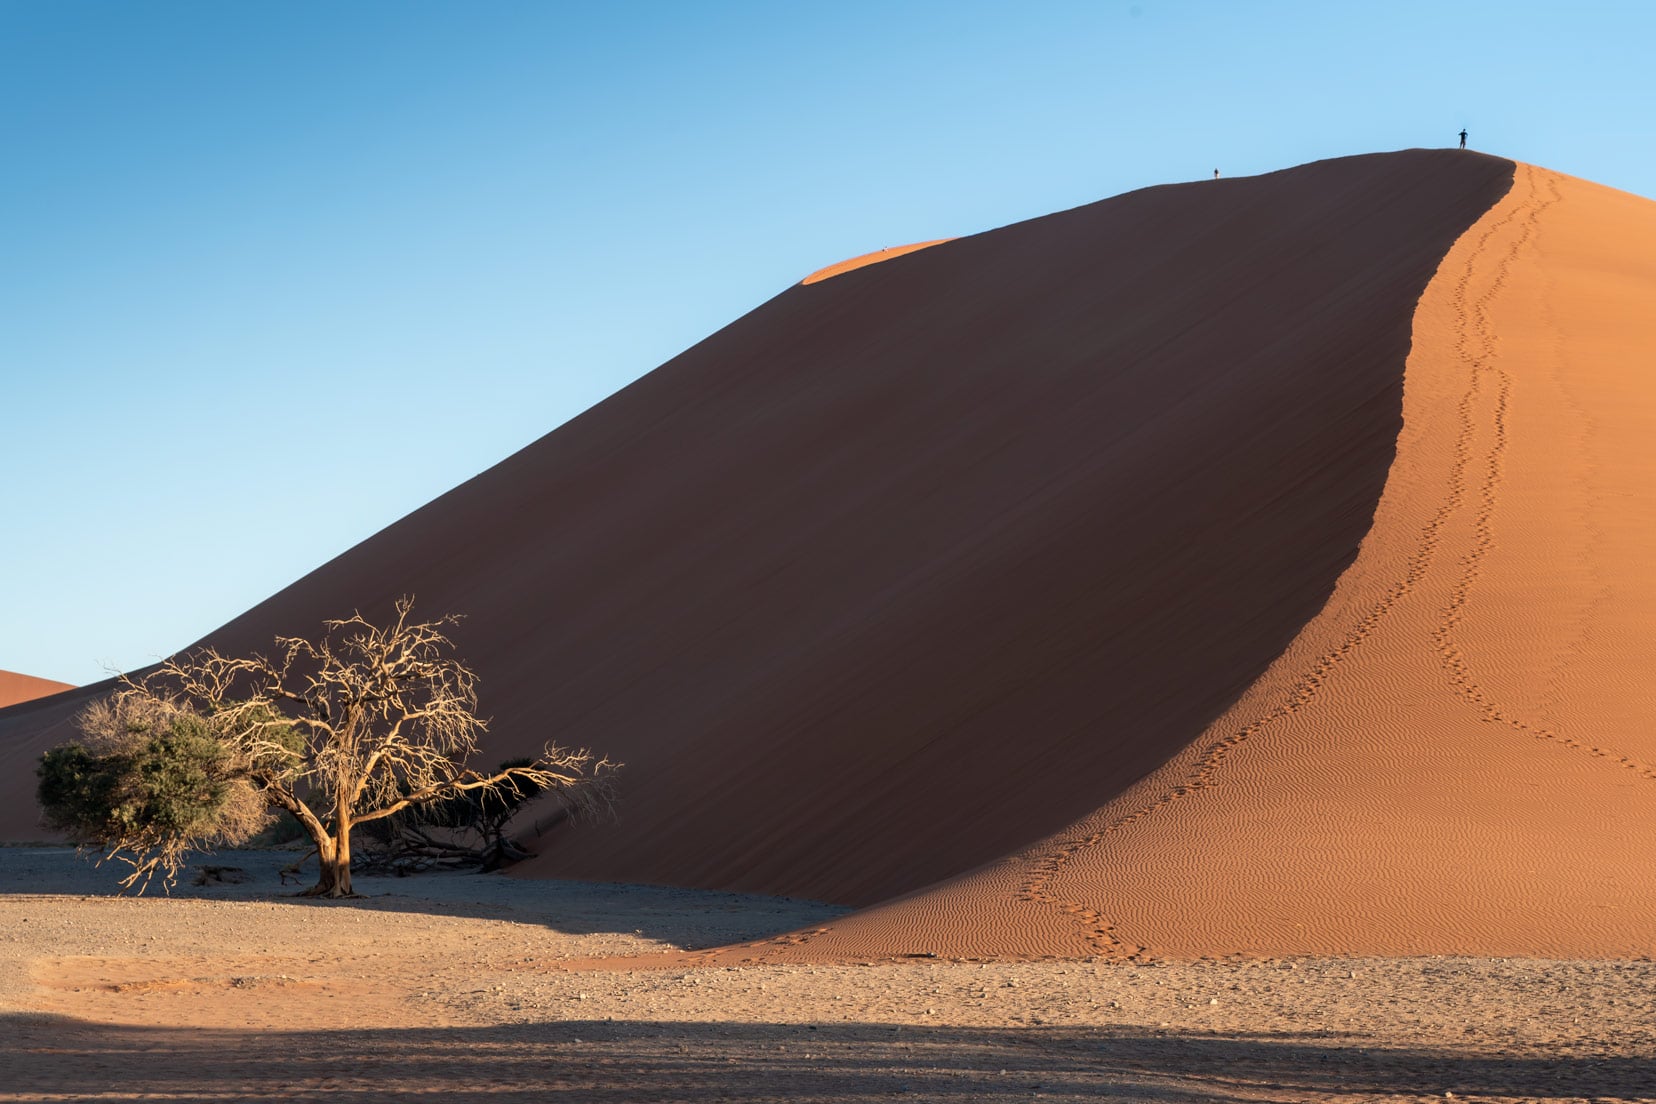
How I Photographed Dune 40
There are some nice photographic opportunities right from the carpark of Dune 40.
The dune on its own might be a bit of a dull image. However, a distinctive camelthorn tree growing at the base of the sand dune now adds a point of interest to the image.
Additionally, when the wind blows, you can see the small sand particles, illuminated by the sun, being blown off the dune’s spine—an important part of the story of Sossusvlei.
Tamron 28-75mm @ 75mm, f/22
Hiddenvlei
Hiddenvlei is a mini-version of Deadvlei but with fewer preserved camelthorn trees and no towering dune. We didn’t visit here as it was midday and very hot. You definitely need to be mindful of the timing of your visits when hiking in the desert.
If you do choose to visit Hiddenvlei, then a two-kilometre walk from the 4×4 carpark at Sossusvlei awaits you.
Hiddenvlei has a dune to its east, and when I checked Google Earth, it looked like its height was roughly 10m. This is not high enough to cast those alluring shadows like Big Daddy.
🦭 Looking for more sand dune adventure? Discover the dramatic landscapes of dunes meeting the Atlantic Ocean and the wildlife that survives in these harsh conditions on one of the thrilling Sandwich Harbour Tours from Swakopmund or Walvis Bay.
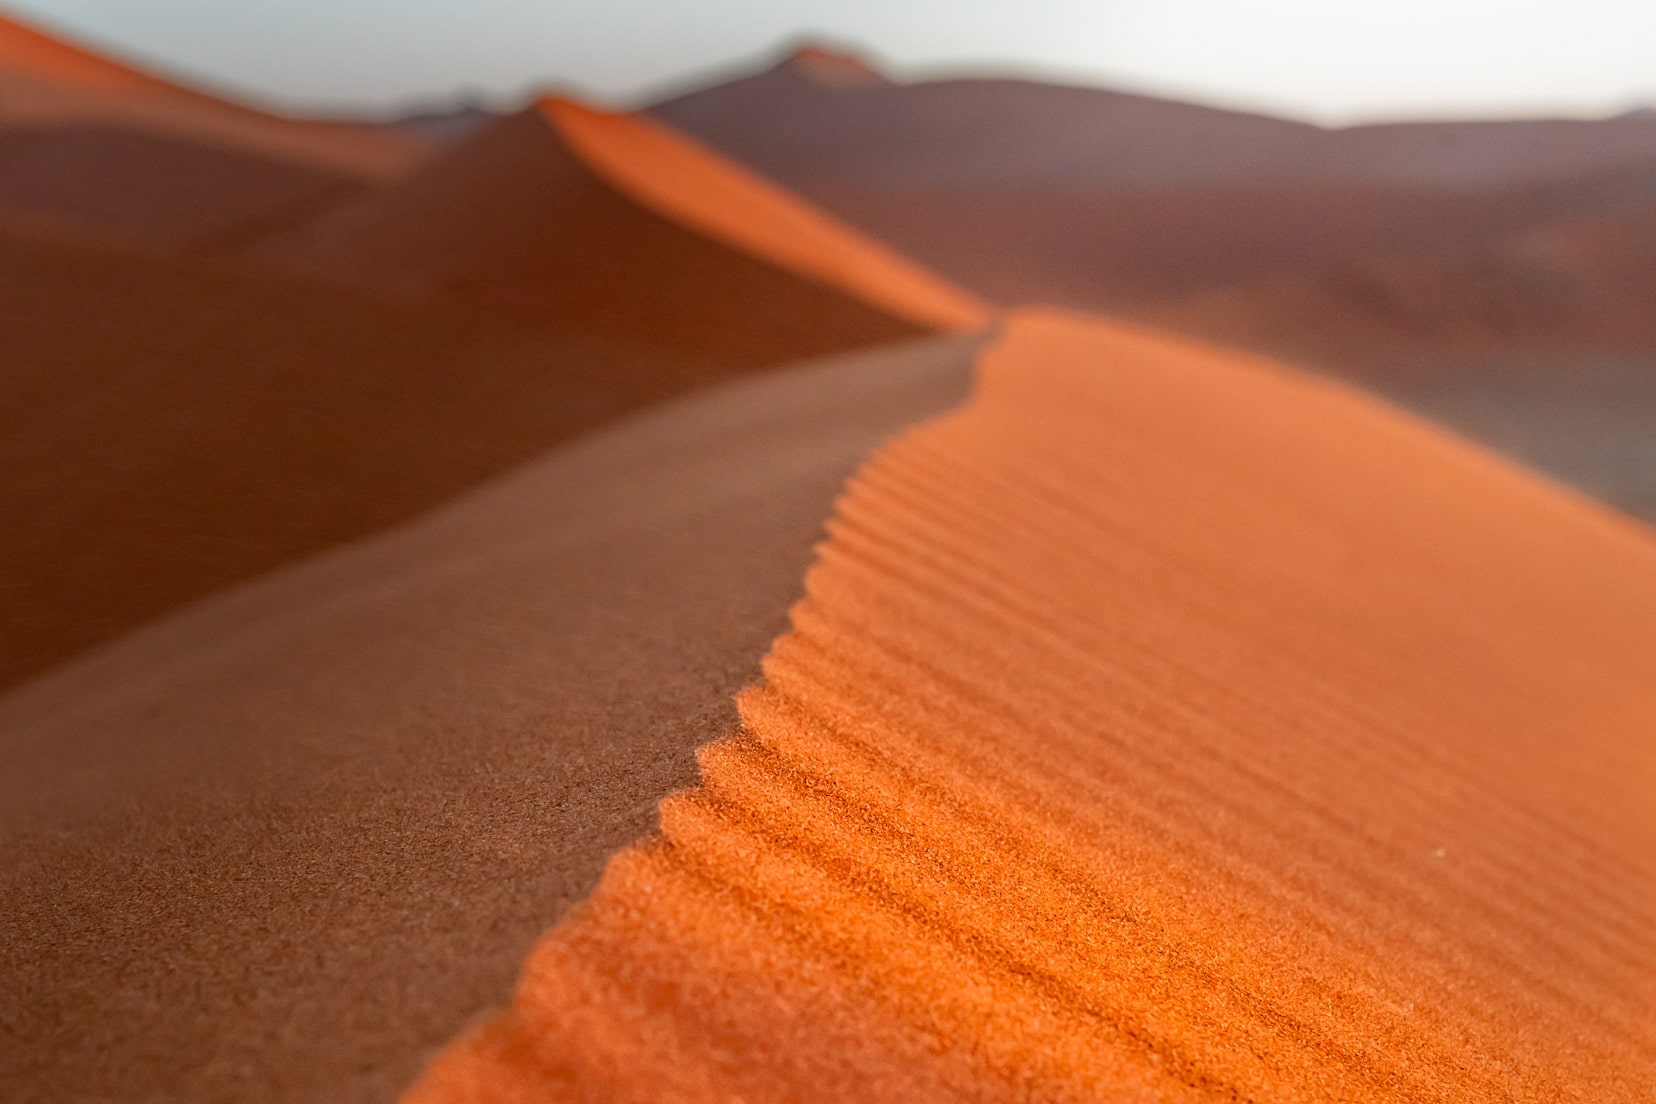
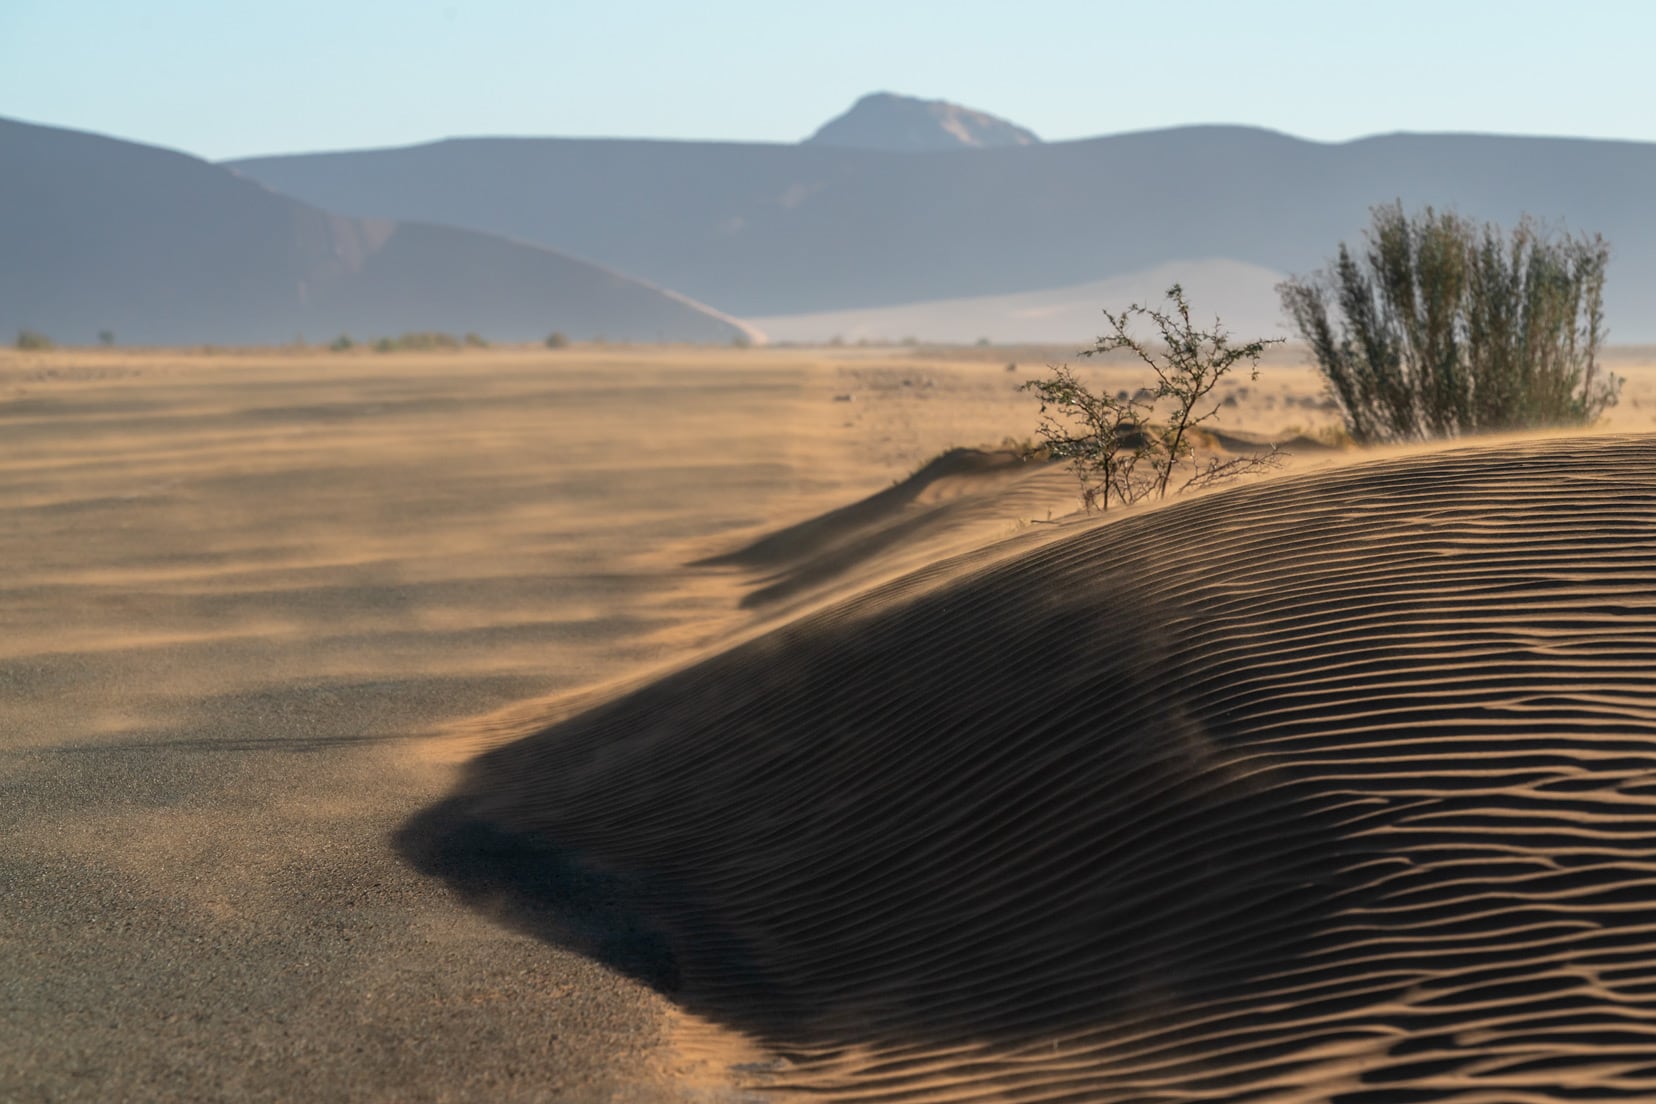
Top Tips: Photographing the Sands of Sossusvlei
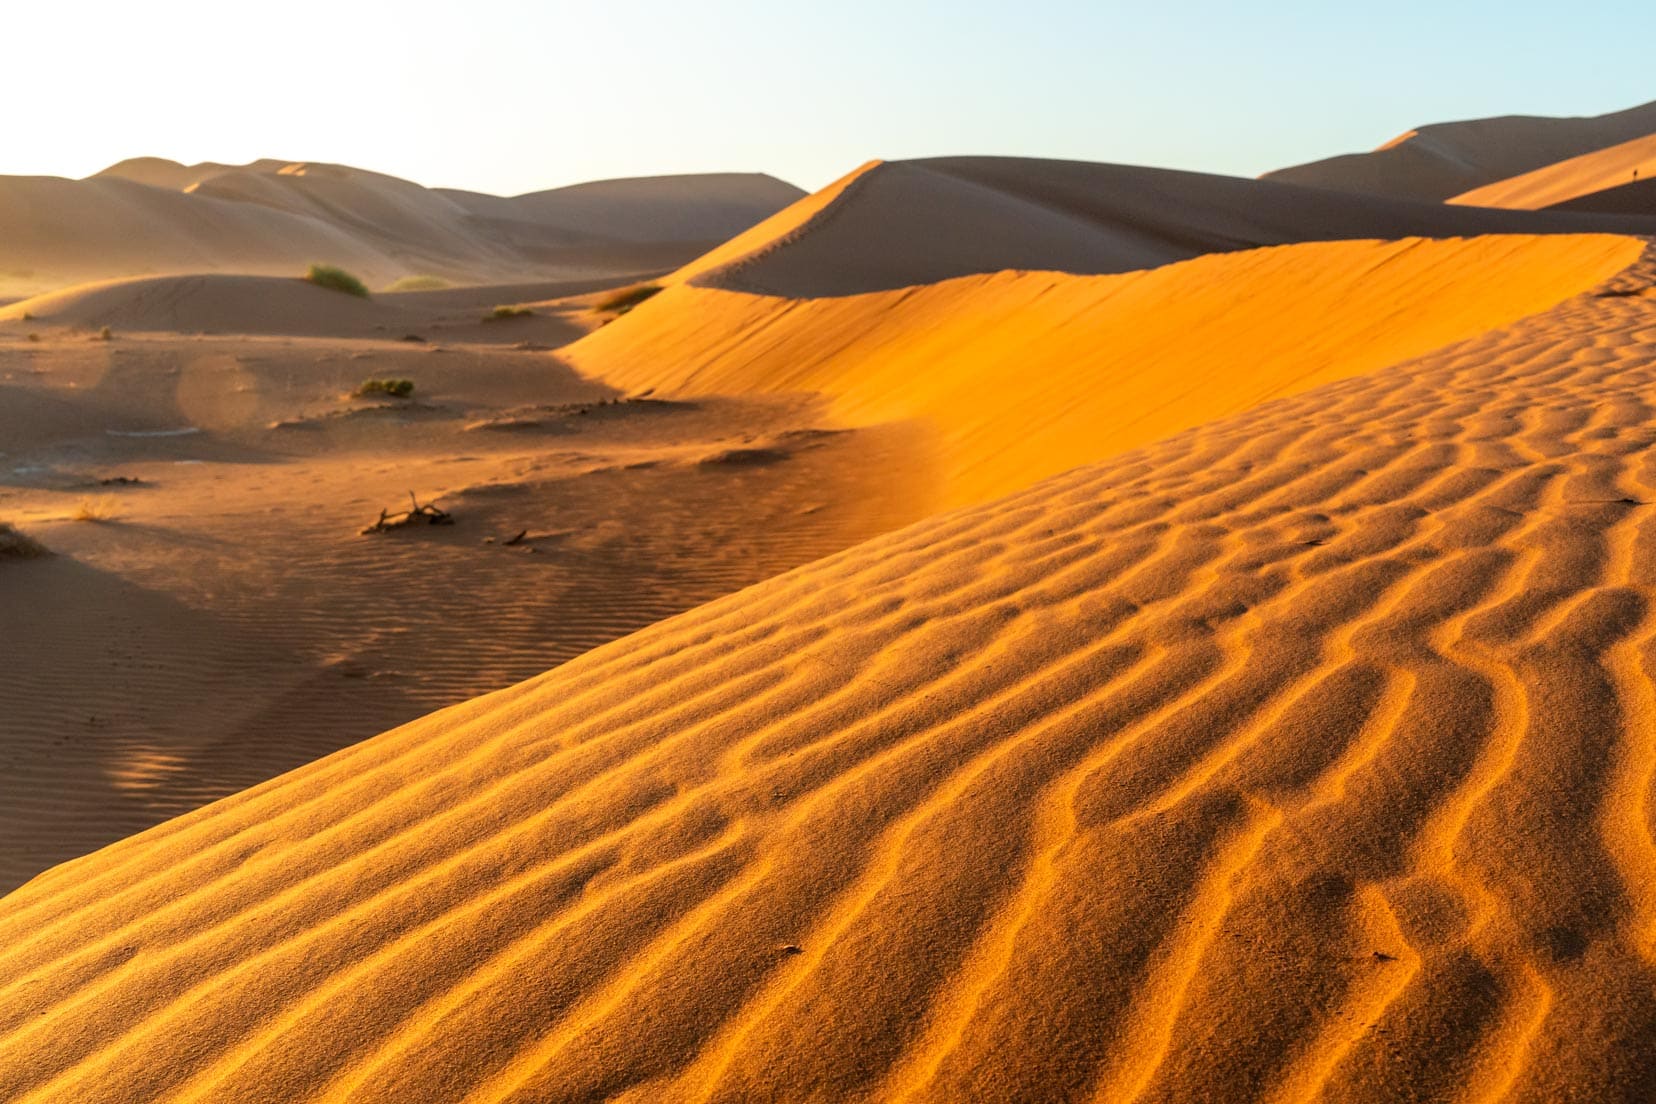
- Unique Characters: Each sand dune has its own character. Look for curves and shadows created by the light for fabulous shots. Observe the airborne sand blowing off the dunes’ spine when the wind blows.
- Vast Skies: In some of my landscape images, I try to include more of the sky in the shot to convey the vastness of Sossusvlei.
- Heat Haze: Be aware of reflected heat or heat haze during hot parts of the day, causing shimmer and impacting image sharpness.
- Using CPL Filters: Using a Circular Polarising Filter (CPL) helps to reduce reflected light by blocking certain wavelengths of light. A CPL filter lets you dial in the amount of filtering you want and is most effective when at 90 degrees to the sun.
- Focus on Details: Zeroing in on a small part of a larger scene can make the image more intriguing and invoke the imagination.
Sony 200-600mm @ 600mm, f/11
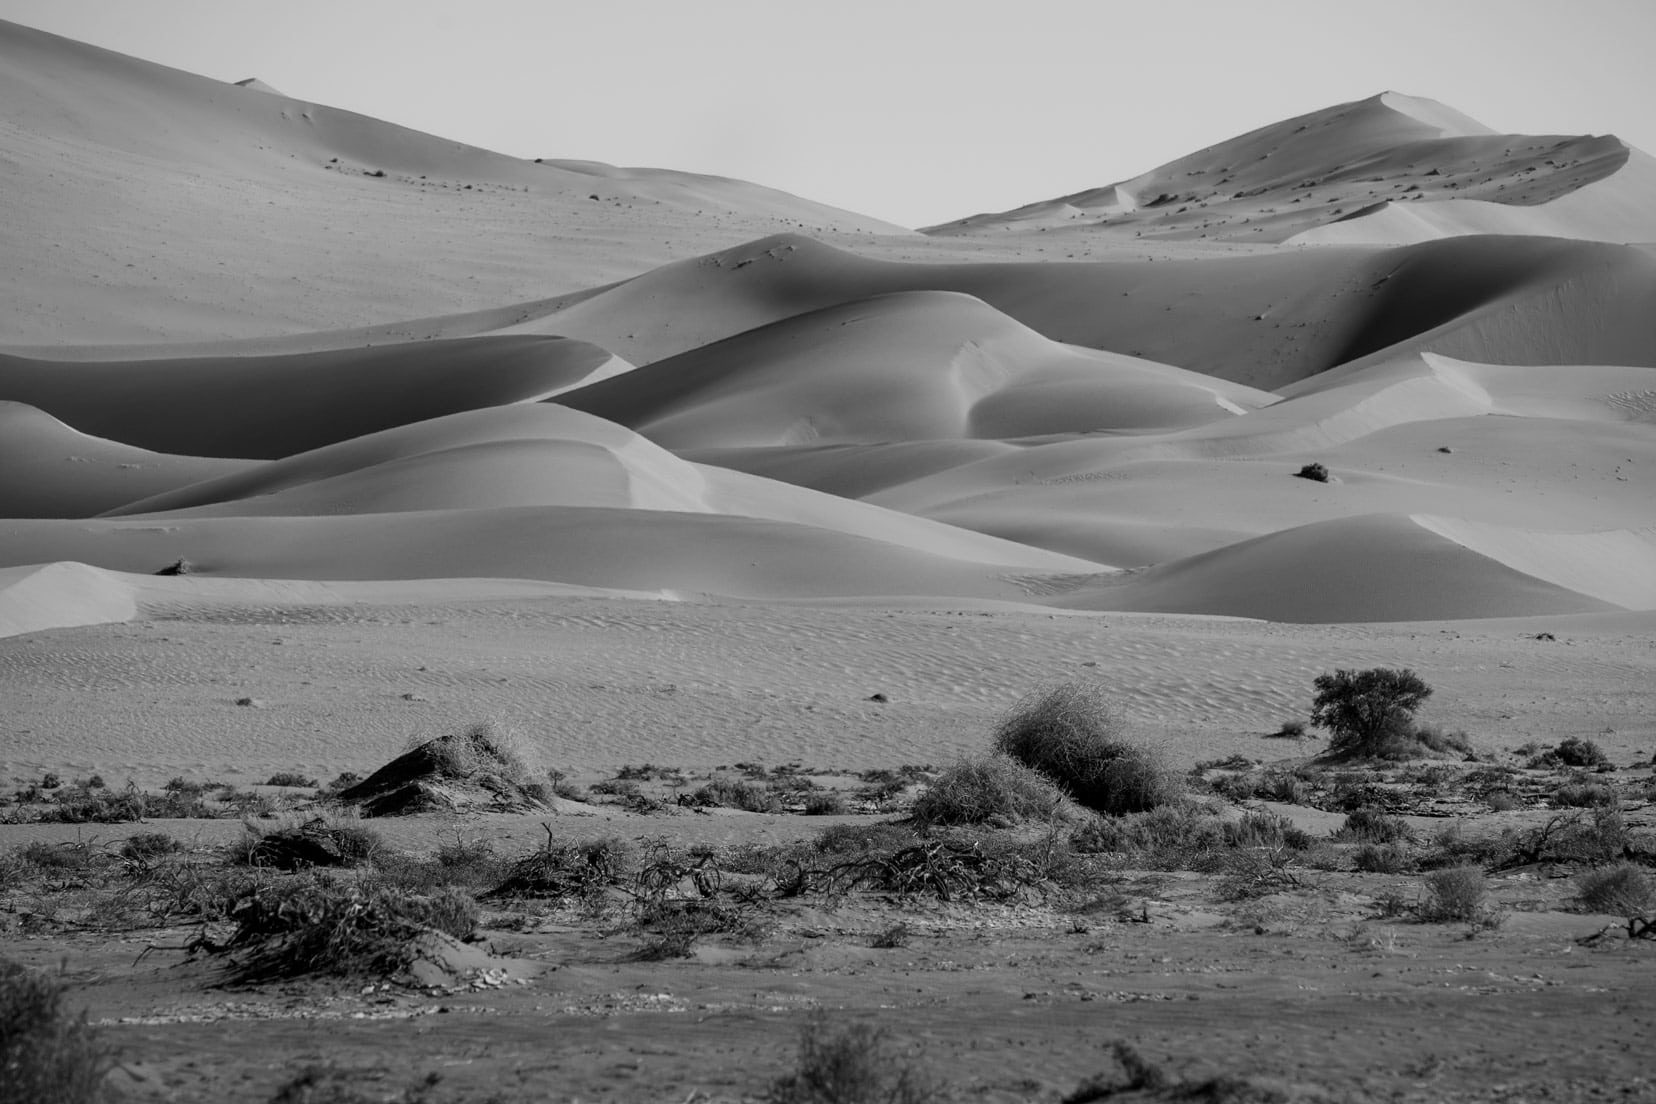
- Black & White: Consider black and white for high-contrast scenes to emphasize texture and form.
- Scenic Elements: Look for interesting elements in the scenery, including textures, contrast, colours, shadows and leading lines. For me, the scene needs to invoke an emotion.
Let me share an example of scenic elements.
Whilst driving in Sossusvlei, I saw this interesting scene below and pulled over to take the shot.
What caught my eye?
The prevailing wind was blowing sand across the road from the top of the mini sand dunes, partially covering the road itself. Additionally, the direction of the light is from the northeast, highlighting the shadows in the ripples of the sand.
This image represents another part of Sossusvlei’s story: the sand’s relentless march to possess anything in its path.
Sony 70-300mm @ 181mm, f/11
What are the Best Camera Settings for Desert Photography?
If you’re not capturing moving subjects, a good shutter speed to avoid camera shake when hand-holding during daylight hours is 1/ focal length seconds. This is a rough rule of thumb.
Based on this rule, the minimum shutter speed for my Tamron 28-75mm lens would be 1/75s. However, this was too slow for me because if there were something moving, it would be blurry in the final image, so I chose 1/250s.
Shooting under daylight conditions in the desert, an ISO setting of 100 and a focal length of f/11 will give reliable results.
What is the Best Lens for Desert Photography?
The desert has big landscapes, and you’ll want to capture this using a wide-angle lens. Most of my shots were taken using these wide-angle lenses: Tamron 28-75mm and Sony 24-105mm lens.
If you find your lens is not wide enough to take in the whole scene in a single shot, then take a series of shots, making sure to overlap each shot by 50%. Use a program like Adobe’s Lightroom to stitch these images together to produce a single panoramic image.
This is exactly what I followed for the panoramic image of Deadvlei at the beginning of this article.

Tamron 28-75mm @ 50mm, f/10
What is the Best Lens Filter for the Desert?
I recommend using a Circular Polarising Filter as it can help reduce reflected light (glare) and has the added advantage that you can control the amount of filtering you require.
What is the Best Time for Desert Photography?
The best time of day for desert photography is an hour on either side of sunrise and sunset. The light is soft, and the colours are full and vibrant.
You could use a tripod to steady the camera in these low-light conditions.
Tamron 28-75mm @60mm, f/9
How Do You Shoot in Full Sun?
Consider shooting at different angles to the sun, looking for shadows in the sand that can make a shot look more appealing. Stop down the lens between f/11 and f/16 to capture those appealing sun stars, but don’t look directly into the sun.
Any images I took with sun stars were initially focused away from the sun in manual mode, followed by a quick shot towards the sun.
Can You Aim a Camera at the Sun?
You should not point any camera directly at the sun and look through the viewfinder for a length of time without the lens having a special solar filter. This solar filter reduces the amount of light (visible spectrum plus the invisible infrared and ultraviolet spectrums) by 16 to 20 stops, thus protecting your eyes from permanent damage.
Verify that the solar filter is at least ISO-certified and made by a recognised manufacturer. Do a thorough check, and I’d also talk to the local camera store guys.
Using any type of Neutral Density filter or Ultraviolet filter will not provide adequate eye protection from the sun’s rays.
Tamron 28-75mm @ 28mm, f/11
Want more photography tips for your travels? Elevate your photography skills on the road with our essential tips for capturing stunning images during your travels.
Photography Travel Tips for Deadvlei (Sossusvlei)
This section of our photography guide focuses on optimizing your early morning photography session at Deadvlei.
Learn how to position yourself for the best light, understand the importance of your accommodation choice, and prepare for the unique challenges of shooting in this stunning desert landscape.
Let’s make sure you capture Deadvlei in its best light!
Where to Stay – Essential for Early Morning Photography
You’ll need to arrive at sunrise to capture those iconic images of Deadvlei. This guarantees that the Big Daddy dune is casting its shadow across Deadvlei as the sun rises in the east.
Important to note
To arrive at Deadvlei close to sunrise, you’ll have to stay in overnight accommodation inside gate 1. This means you are granted early access (1 hour before sunrise) to drive through gate 2 and into the Naukluft National Park towards Sossusvlei.
Staying outside gate 1 means access into and out of the park is only granted between sunrise and sunset, and you won’t see the sunrise at Sossusvlei.
We stayed 2 nights in March and camped at Sesriem Oshana campsite. This camp is located between the first and second gates.
A couple of lodges are lucky enough to be located inside the second park gate within Namib-Nauklaft Park. This allows those guests even earlier access to Sossusvlei.
One couple we met, staying at one of these lodges inside the park, were allowed to start their self-drive two hours before dawn to allow them enough time to climb Big Daddy (which takes approximately 1 hour to 1hr 15mins for most) and watch the sunrise.
How Much Time Do You Need at Deadvlei?
I would recommend that people allocate consecutive mornings to visit Deadvlei. The first day is to orientate yourself with Deadvlei, see its changing light, work out how you might want to shoot it and capture some initial images.
The second morning, with hindsight, is to capture those shots that resonate with you.
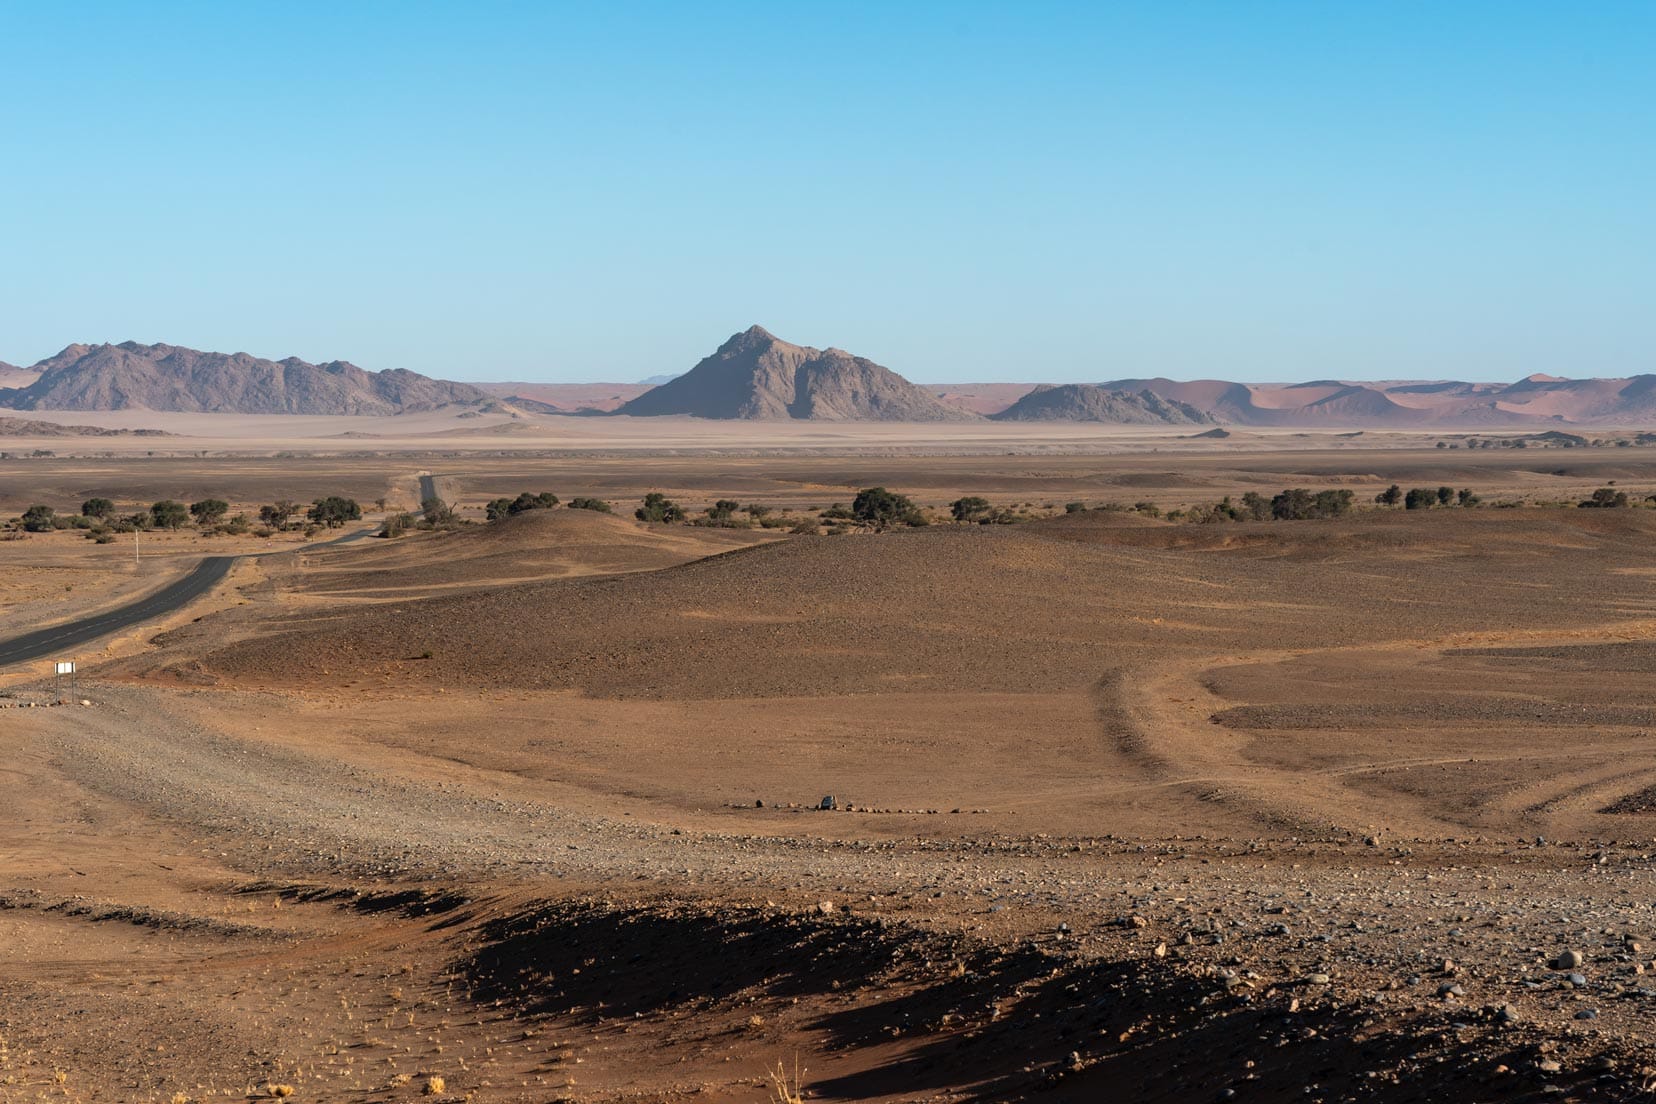
The drive from the 2nd park gate to the Sossusvlei 4×4 carpark is approximately 60 km on very good tarmac, and with the 60 km/hr park speed limit, should take around an hour.
Tamron 28-75mm @ 75mm, f/11
Upon arrival, if you are driving a 4WD, you can deflate your tyres and drive the last 5km through the soft, boggy sand to the Deadvlei carpark. From there, it’s a little more than a kilometre walk before you set eyes on Deadvlei.
No 4WD? No problem. There are 4WD shuttle cars that will drive you to the Deadvlei car park for a fee. You can arrange a pick up time with them.
Tamron 28-75mm @ 40mm, f/9
To give some idea on timings, when gate 2 opened to allow access into the park about an hour before sunrise, we arrived at the Deadvlei carpark just as the sun rose above the horizon.
With a 20-minute walk to follow, you will reach Deadvlei right on time.
Best Time of Year for Sossusvlei Photography?
In the southern hemisphere, Namibian summers (November to February) can have temperatures reach 40 degrees with sporadic rain. In contrast, winter (June to August) sees night-time temperatures plummet to freezing but without rain.
To be honest, Sossusvlei is good to visit all year round, but if given a choice, timing a visit to fall outside of the summer months when the worst of the heat can be avoided is ideal.
Not surprisingly, these are also the more popular months for visitors.
Sony 70-300mm @ 253mm, f/9
Can you photograph Deadvlei at night?
Yes, it is possible to photograph Deadvlei at night by positioning your camera at sunset the day before, leaving it overnight and returning to collect it the next morning. Be warned, however, that your equipment will be at the mercy of the weather and wildlife.
Just to be clear, I didn’t try the above.
From my online research, visiting Deadvlei at night will require a permit, and these permits are only issued for commercial purposes. So, the night visit seems out of reach for the normal visitor.
I recommend approaching NWR (Namibia Wildlife Resorts) as they deal specifically with tourism. I have asked them the same but, to date, have not received a response.
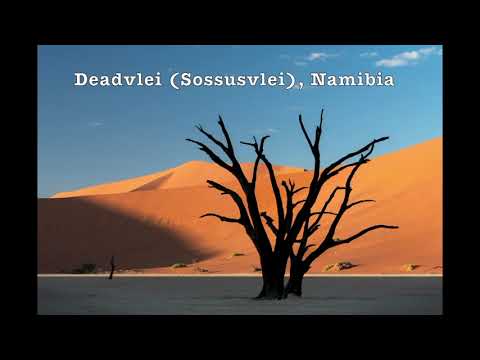
Below is a short video of Deadvlei to help you think about how you might want to shoot it.
My Camera Gear Used at Sossusvlei
I use Sony a9 cameras coupled with a variety of lenses when shooting Sossusvlei. The Sony a9 has a 24MP sensor, and I shoot predominantly in Aperture Priority mode.
The lenses I used are:
- Sony 24-105mm f/4.0
- Tamron 28-75mm f/2.8
- Sony 70-300mm f/4.5-5.6
- Sony 200-600mm f/5.6-6.3
I’d estimate that 95% of my images were taken using wide-angle lenses. You can see that I tend to favour zoom lenses over prime as they offer me more flexibility when composing my images.
I can then avoid sacrificing the megapixels during any cropping of the image.
Tripod Use
I often use a tripod in low light conditions as this will help steady the camera/lens and allow a longer exposure without the worry of the camera moving, resulting in a blurry image.
I carried a tripod with me on the first morning’s visit to Deadvlei, but I did not require it as there was plenty of light in the sky by the time I arrived. To be on the safe side, though, I set my minimum ISO a bit higher around sunrise to combat any potential slow shutter speed in the deep shadows.
If I were contemplating photography in sub-optimal lighting conditions (well before dawn) or a long exposure shot, then I would certainly consider using a tripod.
📸 Curious about the gear behind the photos?
Take a peek at my photography essentials here.
What to Avoid at Sossusvlei To Capture Your Best Images
From my experience, AVOID these things:
- Changing lenses: Avoid changing your lenses on cameras in the open air due to the high dust level.
- People: (as much as possible) on Deadvlei – they might unintentionally walk into your shot.
- Only Taking One Lens: I suggest a wide-angle lens and a zoom 70-200mm or equivalent – a zoom focal length lens gives a different perspective and better subject-to-background separation.
- Car troubles: Avoid becoming bogged in the 5 km drive over soft sand between the 4×4 Sossusvlei carpark and Deadvlei carpark by deflating the 4×4 tyres to at least 1.5 bar.
- Missing out on Deadvlei: If you’ve arrived at the 4×4 Sossusvlei carpark in a 2×4, take a 4×4 shuttle bus to the Deadvlei carpark.
- Taking a 2WD to Big Daddy Carpark: Only a 4×4 can reach Sossusvlei carpark.
- Wildlife on the Road: Watch out for animals on and close to the road when driving at dawn and dusk.
- Climbing or touching Deadvlei Trees: Climbing on camelthorn trees in Deadvlei and Hiddenvlei is illegal.
Tamron 28-75mm @ 50mm, f/8
Wildlife You May See at Sossusvlei
You may encounter Oryx, bat-eared foxes, zebra, ostriches, hyenas and many bird species. We saw Oryx inside the park and zebra and bat-eared foxes outside the park.
Beyond the dunes and ancient trees, discover the smaller inhabitants of Namibia’s deserts on a Living Desert Tour in Swakopmund.
Sony 70-300mm @ 300mm, f/5.6
If you’re intrigued by the creatures of the desert, there’s more to discover in Namibia. An experience we treasured was encountering the fascinating desert elephants, found in the arid regions of Damaraland and the Kunene.
These elephants have uniquely adapted to life in the desert. If you’re keen to learn about these remarkable animals and where to find them, dive into our detailed guide on Namibia’s Desert Elephants. It’s an unmissable experience for wildlife enthusiasts and photographers alike.
The desert isn’t the only place for unforgettable wildlife encounters. Dive into our stories of close-up animal experiences from around the world.
How to Photograph Sossusvlei – That’s a Wrap
You’ve navigated the early mornings, mastered the art of capturing light and shadow, and hopefully, have a collection of stunning images to show for your efforts.
For the Journeying Duos: If you’re sharing this journey with your partner, cherish the moments of awe and the teamwork behind each photo captured.
Travelling and photographing together can strengthen bonds and create shared memories that last a lifetime. For tips on making the most out of your coupled travel adventures, check out our essential tips for couples travelling together.
Remember, photography in Sossusvlei is as much about the experience as it is about the final image. Embrace the serene beauty, the silence of the desert, and the unique stories that each dune and tree tell.
Final Thought: As you pack up your gear, take a moment to reflect on the journey. The best photos aren’t just made with a camera; they’re created with patience, planning, and a deep connection to the environment.
Sossusvlei is a place that demands and deserves this kind of attention. So, when you look back at your photos, remember the sun’s warmth, the feel of the sand, and the grandeur of the landscape. These memories are your true souvenirs.
Safe Travels: I wish you luck on your photographic journey. May the light always be in your favour and your travels safe and inspiring!
💡If you are heading north after Sossusvlei, towards the Zambezi Region of Namibia, consider unwinding at the tranquil Ndhovu Safari Lodge, ideally situated on the banks of the Okavango opposite Bwabwata National Park.
Pin and Save for Later
PLANNING YOUR TRAVELS?
These are the travel resources we recommend and use when planning our trips.
- 🚘 Car Hire: We use DiscoverCars.com
- Motorhome/Campervan Rental: We highly recommend the Motorhome Republic
- 🛏 Book Accommodation: We use Booking.com to find accommodation that suits our budget
- 🐶 Pet Sitting/Pet Sitters: Check Out TrustedHousesitters here (Use our Discount code: LIFEJOURNEY25 for 25% off. )
- Activities and Experiences: Get Your Guide and Viator
- Travel Insurance: Safetywing or World Nomads
- 🥾 Travel Gear and Accessories: Check out our top picks here — Lifejourney4two page on Amazon
For a more thorough list, visit our Travel Resources page here.
Outstanding!
Thanks so much! 🙂