
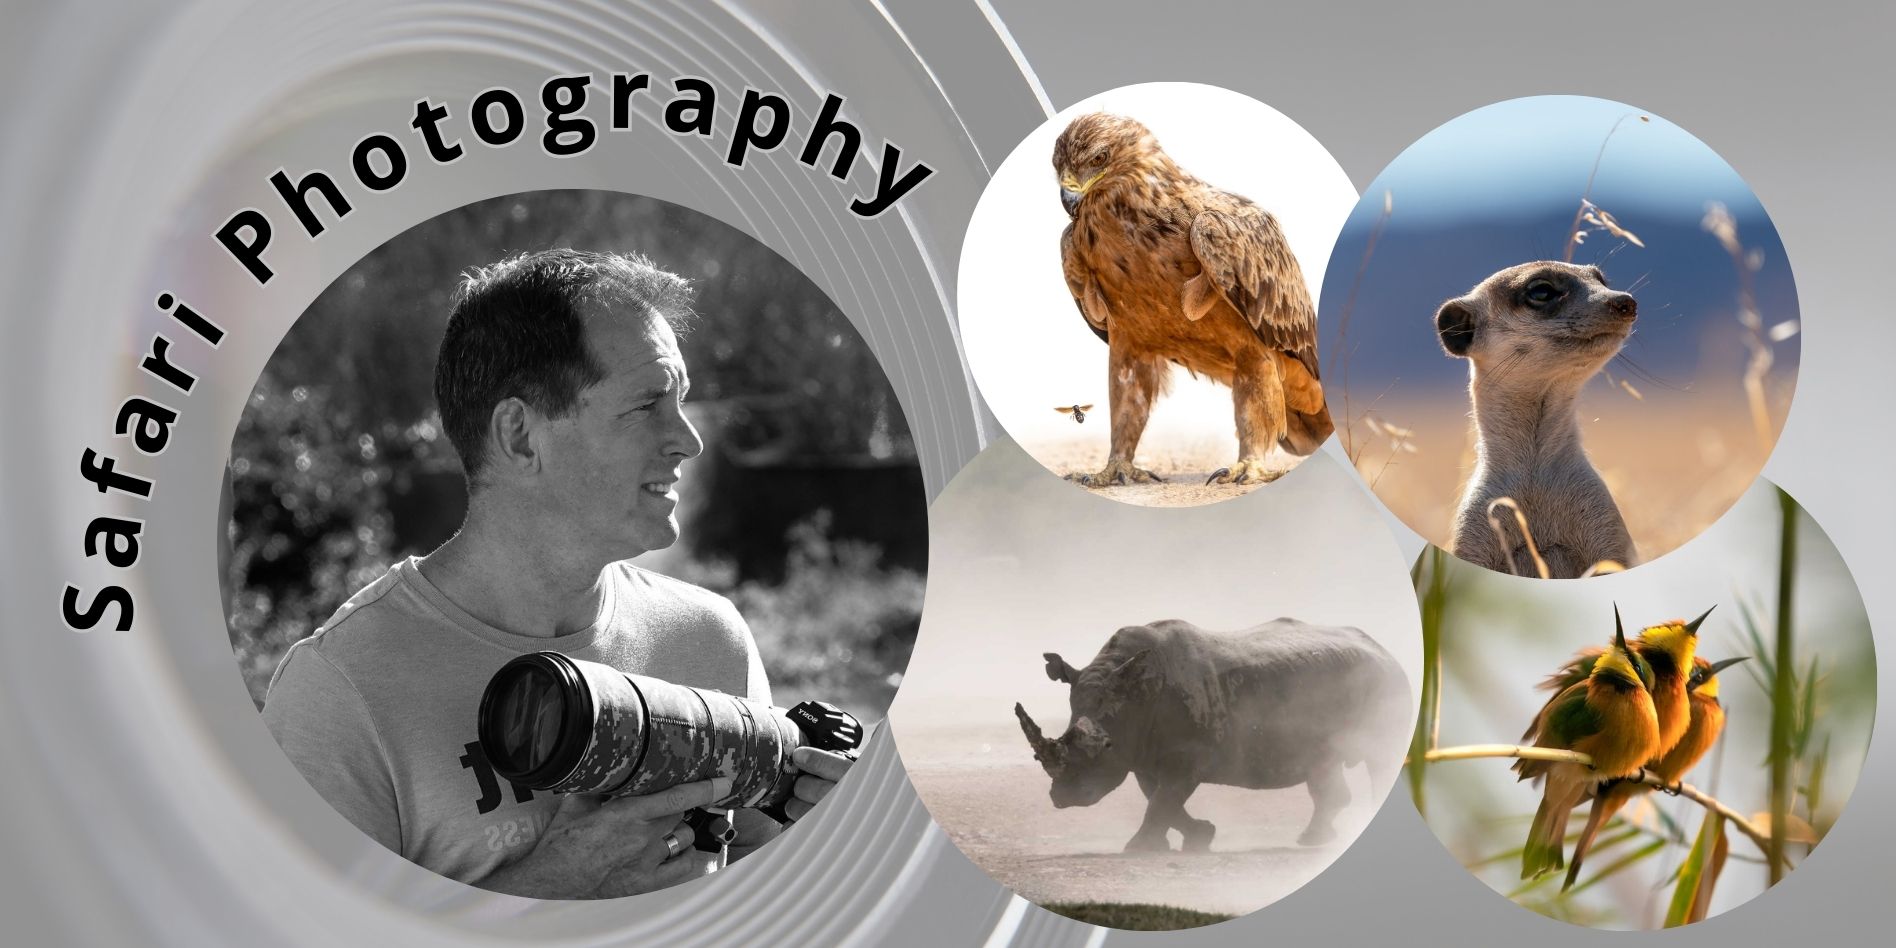
These safari photography tips are crafted to ensure you capture those breathtaking moments on your safari adventures. Whether amidst the vast savannahs or the dense African bush, each photograph tells a story of life in the wild.
The very idea of a ‘safari’ sparks images of exciting encounters in far-off places. Imagine this: you’re right there, in the heart of the wilderness where the adventure truly begins, and nature shows its true colours right through your lens.
Our extensive journeys across Southern Africa have sharpened our skills in wildlife photography. Often, the magic of a safari shot lies in a fleeting instant—a sudden movement, a rare interaction. It’s moments like these that require you and your photography gear to be at their best.
Knowing where to position yourself and how to adjust your camera settings can make all the difference. Let’s explore these tips to turn your safari snaps into stunning captures.
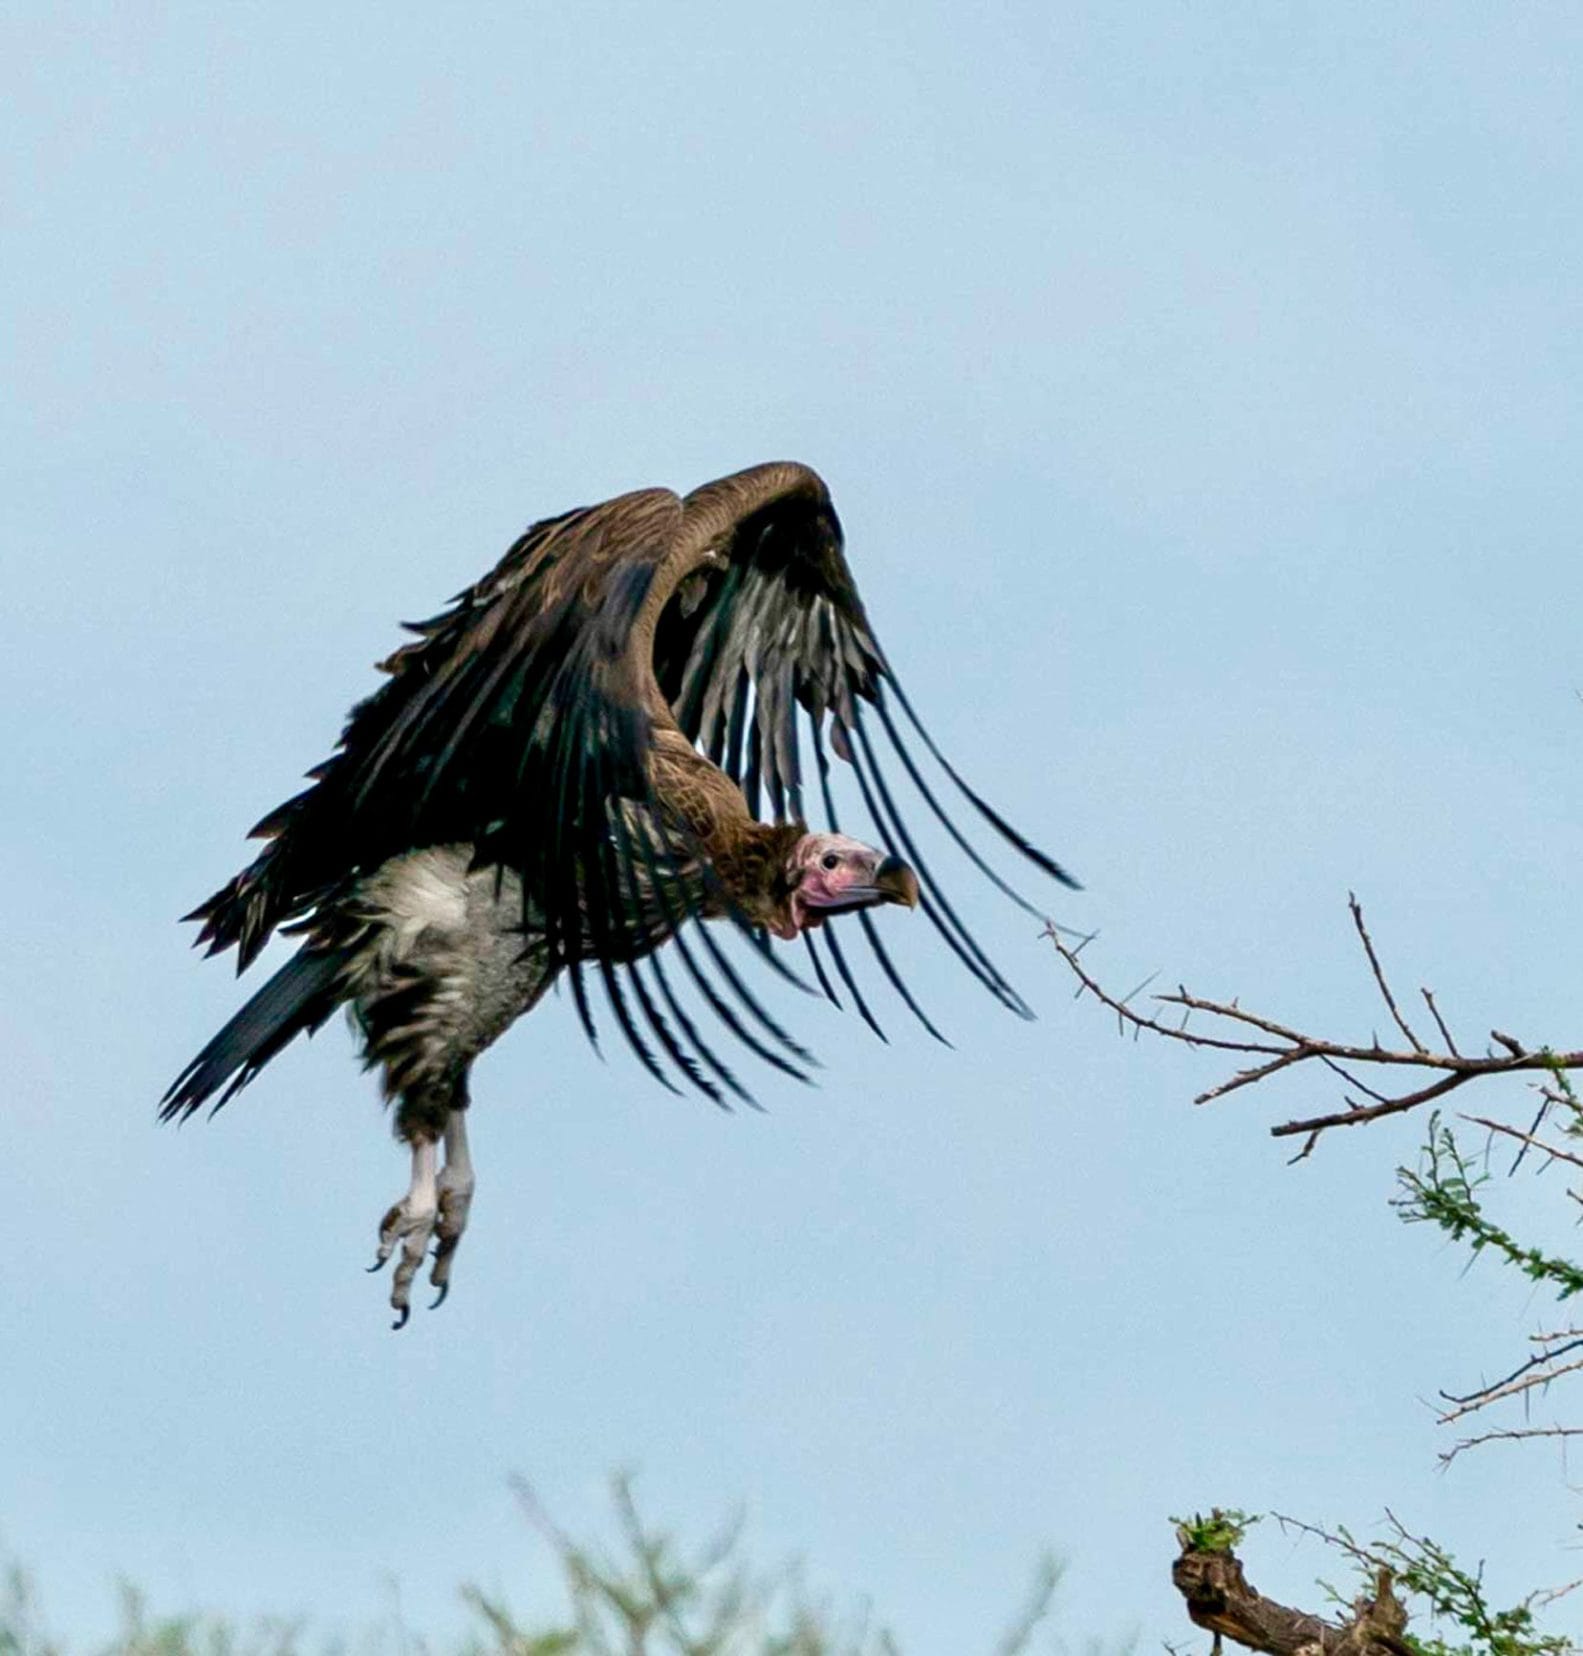
(Sony 200-600mm, 1/1000, 600mm, f/10)
A safari can be undertaken in many places, but the most widely recognised is an African safari experience. We have been road-tripping in Africa, on and off for the past few years, in our own Hilux 4×4 bush camper, so we certainly know a thing or two about safari photography in Southern Africa.
Learning from these experiences, I’m able to share these essential African safari photography tips.
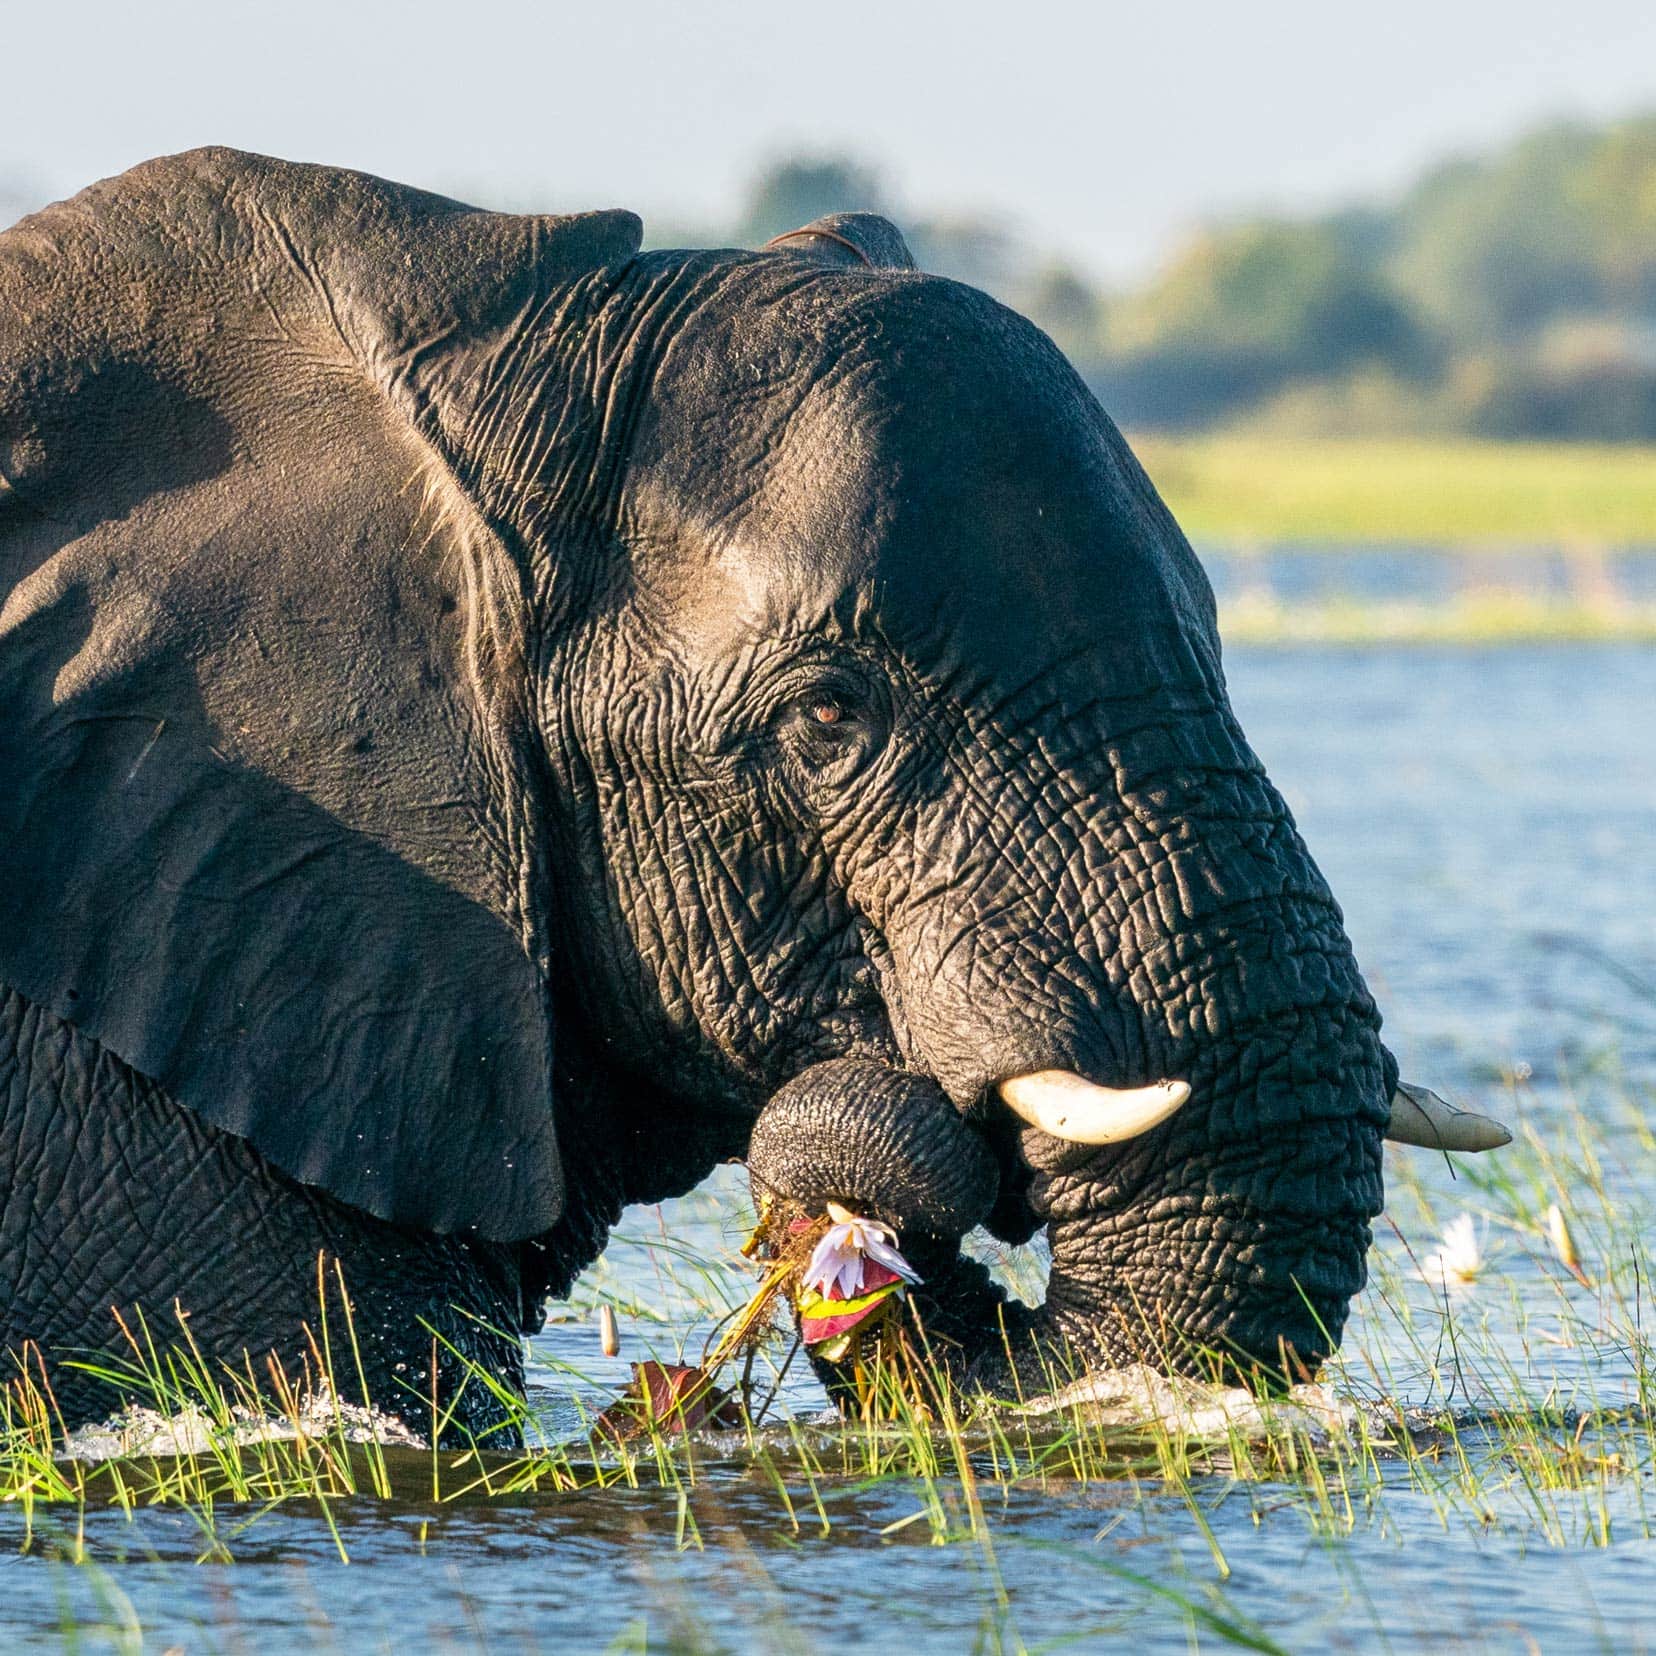
(Sony 200-600mm, 1/1000, 268mm, f/8)
Quick Safari Photography Guide
- Best Locations & Times: Identify the top spots and ideal seasons for wildlife photography, such as the zebra migration at Nxai Pan National Park.
- Gear Essentials: Choose the right camera and lenses (e.g., Sony 200-600mm) for capturing distant and fast-moving wildlife.
- Key Camera Settings: Use burst mode and fast shutter speeds for clear, sharp images; adjust ISO settings as needed.
- Lens Recommendations: Opt for telephoto lenses with image stabilization to get close-up shots from a safe distance.
- Shooting Tips: Adapt to safari conditions with various shooting modes and focus techniques.
- Editing Advice: Shoot in RAW for flexible post-processing; keep edits minimal to maintain natural colours.
- Must-Haves: Always have spare batteries and memory cards on hand, and ensure your equipment is protected against the elements.
Understanding Photography Tech Talk
Embarking on a safari photography adventure can mean bumping into a lot of technical talk. Let’s break down some of the jargon to help you feel more comfortable:
- Auto-Focus: This is your camera’s way of making sure photos come out sharp, not blurry, by automatically adjusting the lens.
- Burst Mode: A camera feature that lets you take several photos in quick succession with one press of the button—perfect for capturing fast-moving wildlife.
- ISO: This controls the camera’s sensitivity to light. Higher ISO numbers mean the camera can see better in low light, but it might make the photo grainy.
- Shutter Speed: This is how fast your camera takes a photo. Very quick shutter speeds can freeze fast action, while slower speeds can create a blur effect, showing motion.
- Focal Length: Measured in millimetres, this number tells you how zoomed in your photos will be. Higher numbers bring distant animals up close.
Explore More with Our Detailed Guide:
I’ve divided these photography tips into sections to make them easier to navigate. You can jump to any particular section by clicking on the link.
- Deciding your safari location
- Choosing the right safari photography equipment
- Important camera settings
- Important lens settings
- Camera accessories and extra items
- Buy or hire safari photography equipment
- Photography equipment insurance
- Best time for safari photography
- Finding game on a safari
- How to photograph animals on a safari
- What to wear on a safari
- Shooting video
- Editing your safari images
So, let’s get started and dive into these Essential Safari Photography Tips.
Planning a Trip to Southern Africa?
- 🚗 Hiring a car? We recommend getting a quote from DiscoverCars
- 🚐 Hiring a campervan? We recommend Motorhome Republic
- ⛑ Arranged your travel insurance? Compare quotes from World Nomads & Safetywing
- 🪪 Order your International Driver’s Licence online here
- 🏩 Booked your accommodation? We use Booking.com to find the best deals
- 🐾 Is someone pet-sitting for you? 🐾 We use and love TrustedHousesitters
- (Get 25% off at checkout for new memberships with our discount code: LIFEJOURNEY25)
1. Decide on Your Safari Location
Firstly, you’ll want to decide where to go before starting any detailed safari planning. We use a special off-road paper map from Tracks4Africa to mark all the locations we want to visit, giving us a birds-eye view of our itinerary.
Route planning like this not only helps with visualizing driving distances but also plays a crucial role in managing time effectively during your journey.
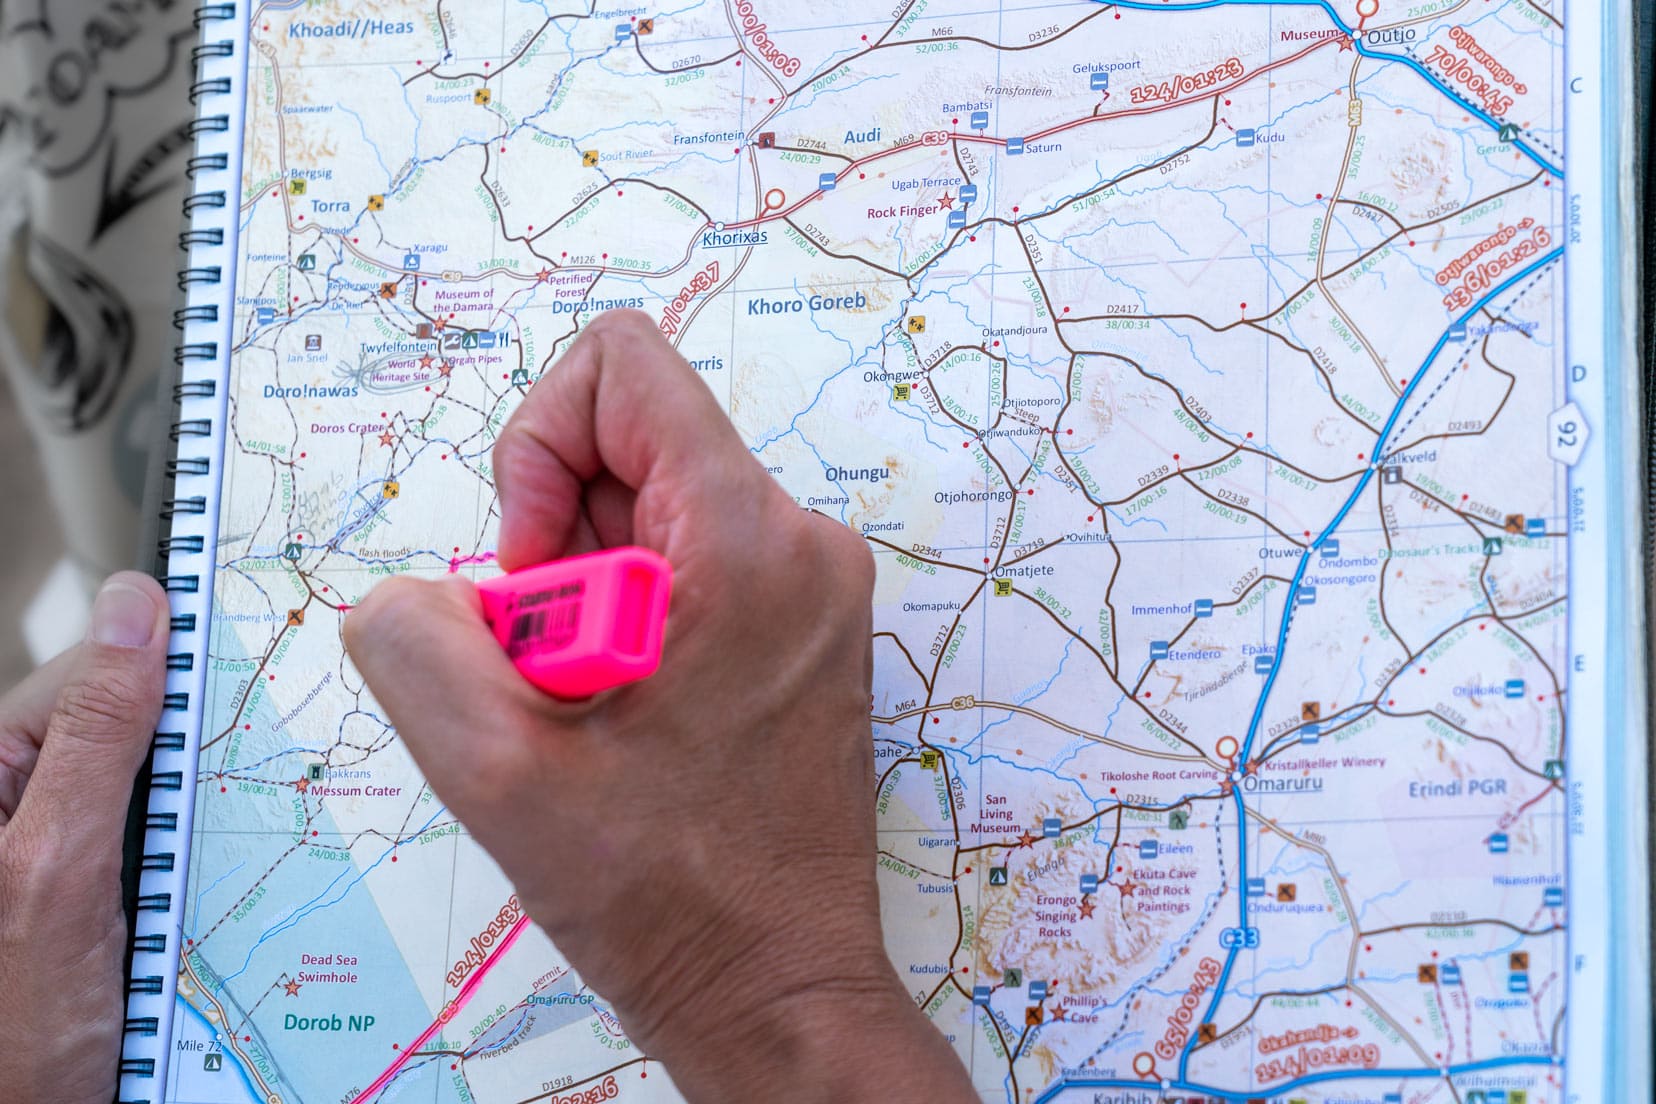
Have you allowed enough time to see all these places? Ideally, it’s better not to rush from one location to another, but sometimes schedules are tight, and a faster pace is unavoidable.
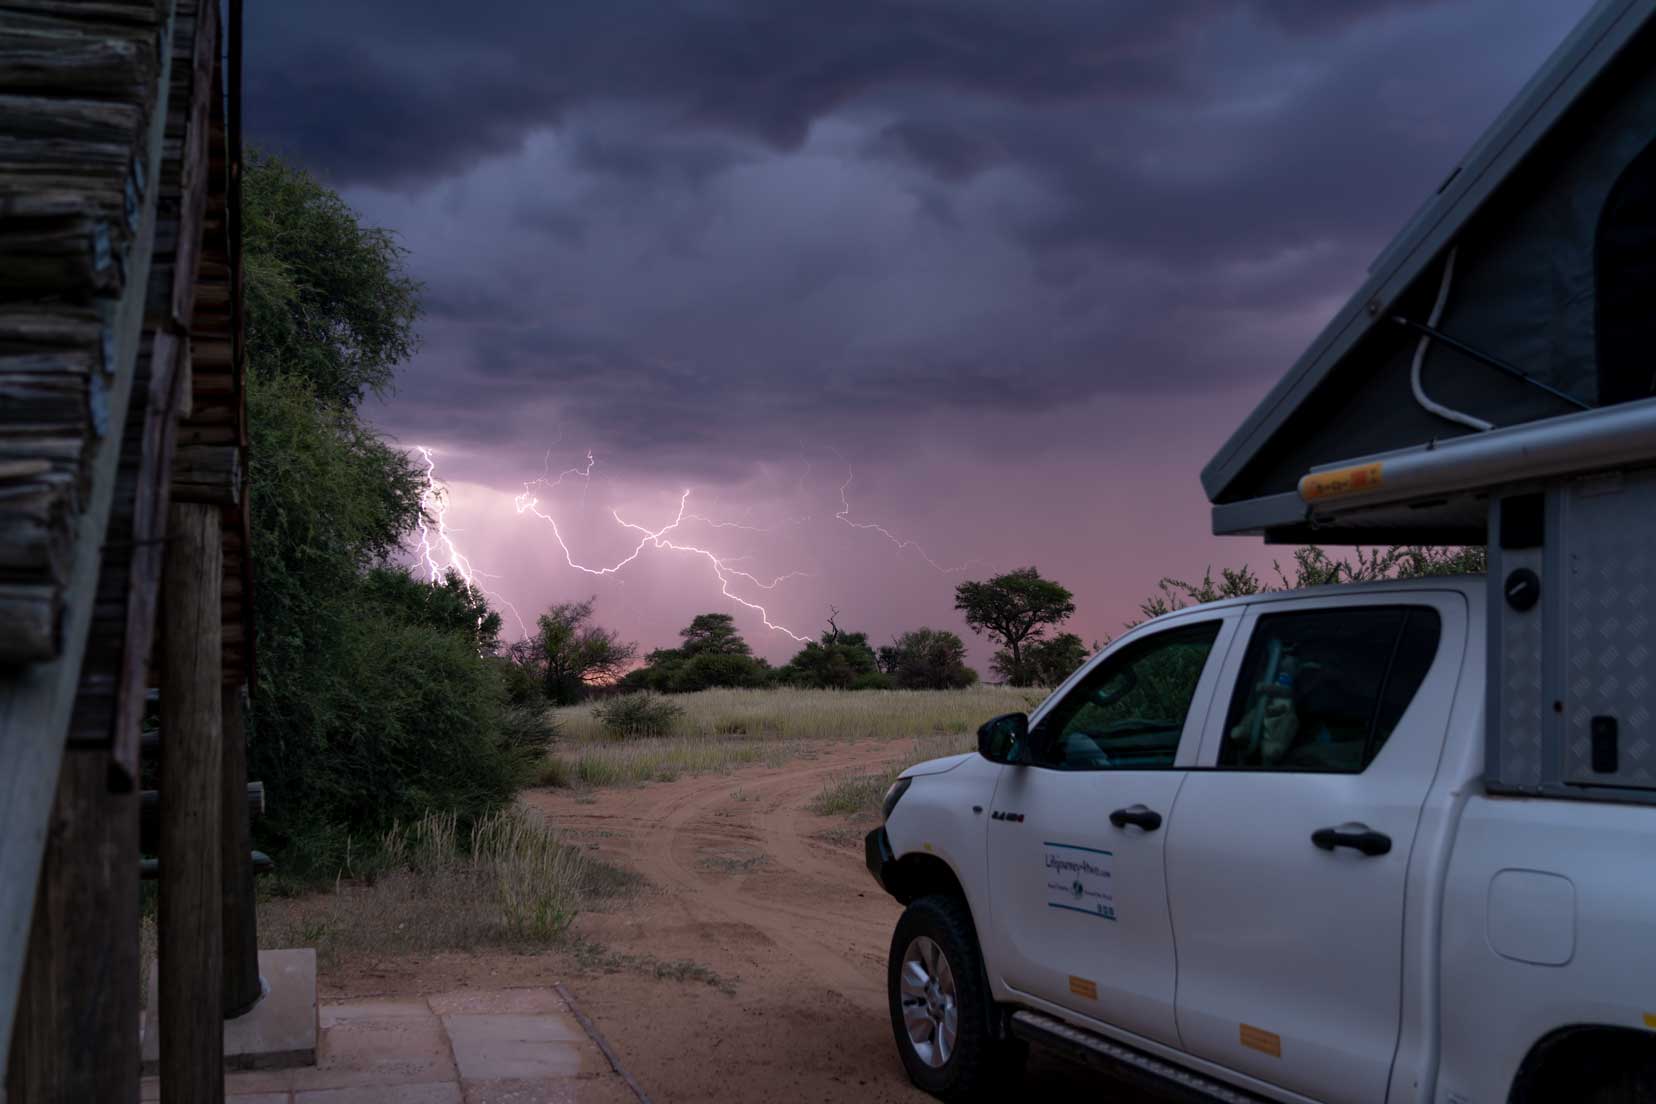
More time in a place not only means more opportunities for great safari photos but also gives you flexibility when wildlife proves elusive. This often coincides with rain or storms.
If you’ve factored in extra time, a delay won’t disrupt your plans too much, and you’ll have another chance at spotting wildlife.
(Tamron 28-75mm, 10s, 31mm, f/4.0)
2. Planning Your Safari
Once you’ve chosen your safari locations, it’s crucial to plan your itinerary. Whether you’re going on a road trip or a more structured safari, preparation is key.
The Time of Year to Plan Your Safari
Timing your safari is crucial for specific wildlife sightings. For instance, to witness the zebra migration at Nxai Pan National Park, we timed our visit precisely, enhancing our experience at this and other stops on our Botswana camping safari.
Wildlife and Weather Considerations
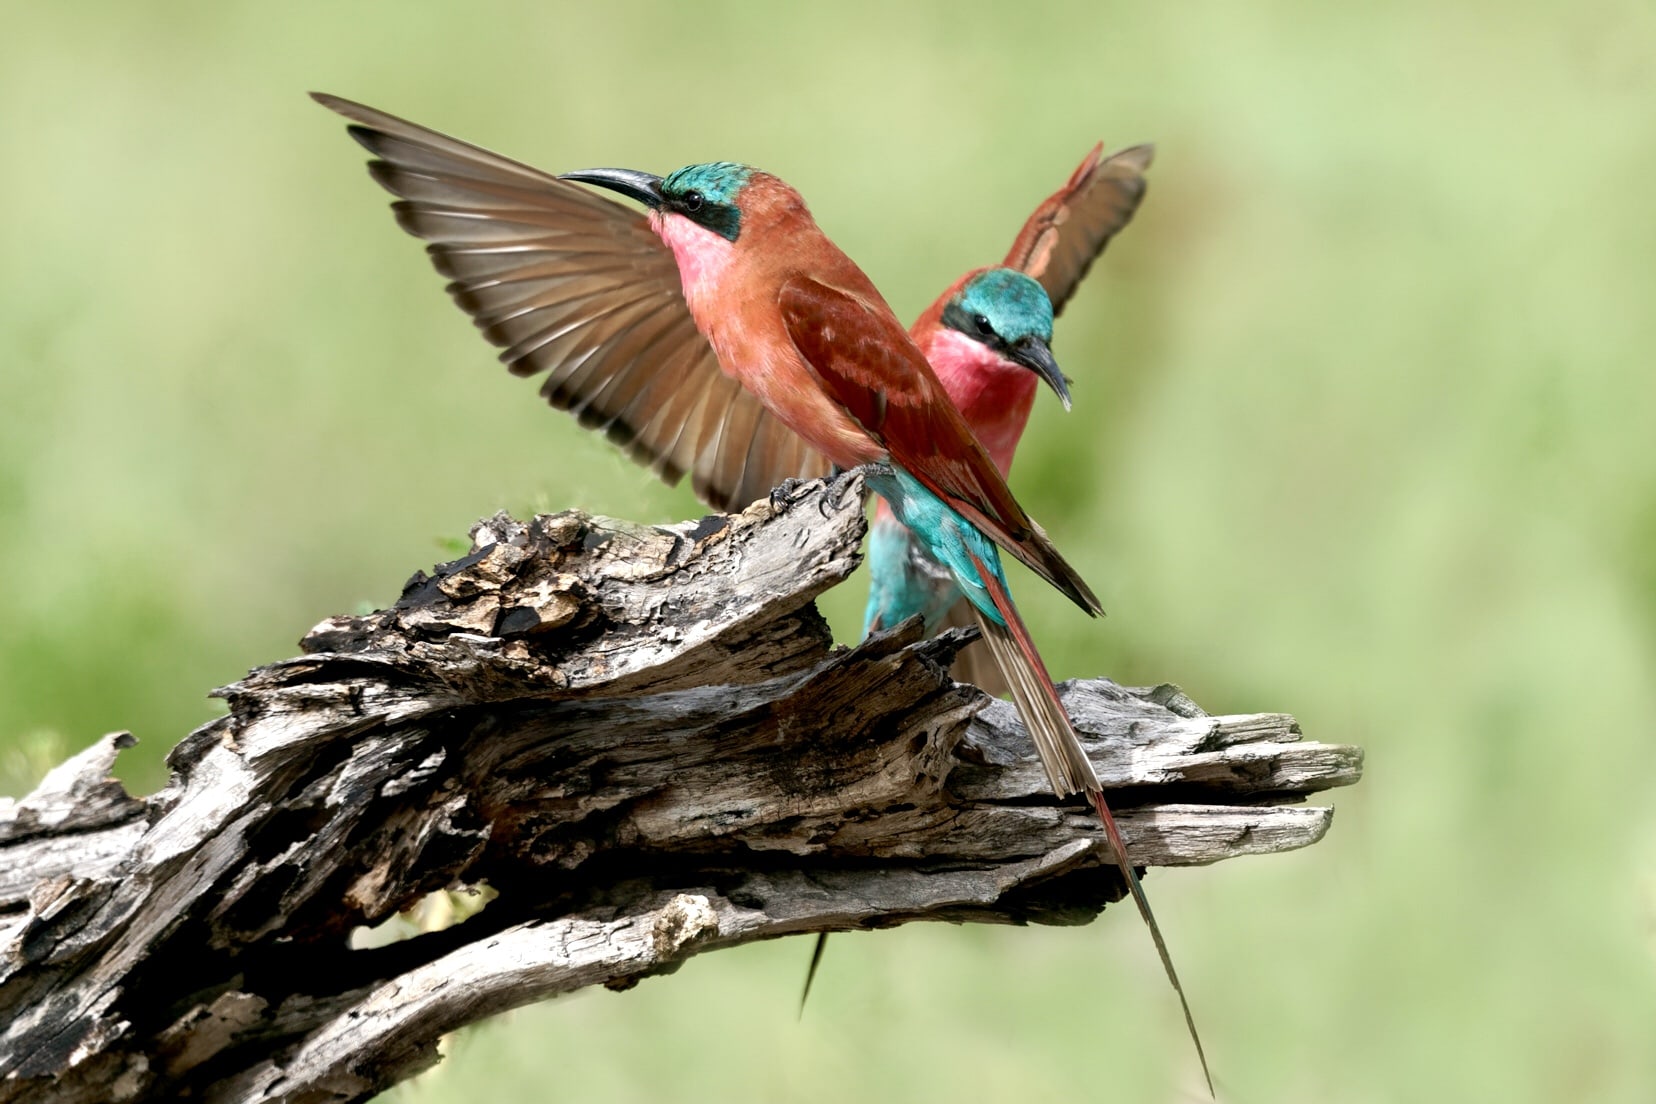
Embarking on a summer safari itinerary in Botswana enabled us to see migratory birds like the vibrant Southern Carmine Bee-eaters in Savuti, Chobe National Park. Correct timing helps avoid the rainy season, which can affect your accessibility to remote areas.
(Sony 200-600mm, 1/2000, 600mm, f/8.0)
Choosing Your Safari Parks
Botswana’s unfenced parks offer unforgettable experiences, with wildlife wandering freely through the camps. It’s also worth mentioning that Kruger National Park, South Africa, must be on your list for abundant and diverse wildlife sightings.
Ensuring Accessibility
Verify that your destinations are accessible during your visit. In Africa, the wet season can result in flooding and the closure of many tracks and roads for months on end. This means that reaching those remote campsites may be a mix of driving and flying.
Planning Your Transport
Decide if you’ll self-drive and hire a vehicle or join a guided tour. Safari vehicles vary from fully enclosed with air conditioning to open types for a closer nature feel. If you going on organised safaris, check with your accommodations for the available options.
Securing Accommodation
Book your accommodations well in advance, especially in popular locations. Choices range from campsites to luxury safari lodges.
Remember, detailed planning ensures you maximize your time and opportunities for exceptional safari photography.

(Tamron 28-75mm, 1/50, 28mm, f/9.0)
3. Choose the Right Safari Photography Equipment
Safari photography is mainly about photographing wildlife, the big and the small.
A safari presents unique challenges, such as unpredictable wildlife behaviour and varying lighting conditions which demand specialised gear. Opting for the appropriate camera body with features like high-speed auto-focus, burst mode, and weather sealing ensures that fleeting wildlife encounters are captured with precision and clarity.
Camera and Lens Combinations
Choosing a camera for a safari might seem daunting, but I have broken down some options below to give you a better idea of what you might need for the pictures you want to take.
There are two options you can consider.
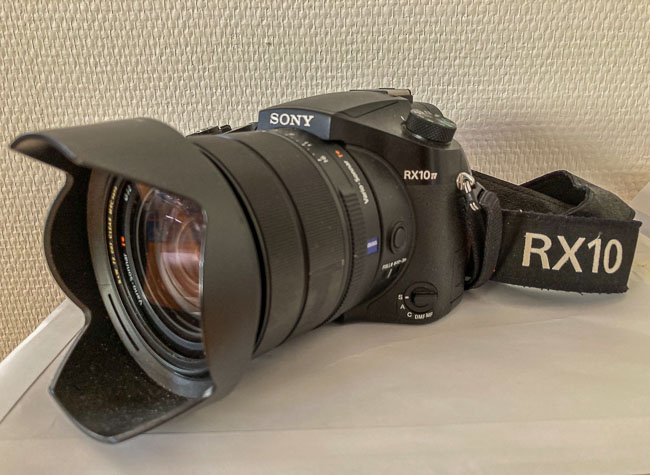
Option 1: Bridge Camera
The bridge camera is lightweight and versatile. It has an integrated zoom lens (not an interchangeable lens).
For many years my wife, Shelley, used the lightweight bridge Sony RX10IV camera for wildlife photography.
This is a great all-in-one camera for the person who doesn’t want to carry around separate lenses.
The Sony RX10IV is an affordable camera with an equivalent zoom of 24mm to 600mm. It shoots at a maximum of 24 frames per second with full autofocus and a 20 MP sensor.
It’s a real performer, ideal for capturing detailed images of wildlife without the bulk of additional lenses.
Option 2: Camera With Interchangeable Lens
The second option requires you to choose a camera body and also the lens or lenses to attach. This option gives you the most flexibility to choose exactly what you want. For example, you can choose to have that expensive 600mm lens with a fantastic action camera of your choice.
Choosing the Right Camera
When shooting wildlife, you’ll want to use a camera that can shoot in burst mode at relatively high frame rates to capture the action sequences.
More frames per second equals more opportunities for that one-in-a-million shot, capturing that perfect moment in time.
Ensuring your camera has a robust autofocus system is also crucial, as it helps keep your subjects sharp even in dynamic, fast-paced environments.
(Sony 200-600mm, 1/500, 600mm, f/6.3)
I recommend an action camera with a minimum frame rate of 8 frames per second (fps) or one that can capture at least 8 images per second. You’ll need it, especially when shooting birds-in-flight (BIF).
Our Sony a9s are action cameras and can blast away at a maximum of 20 fps on a silent, electronic shutter with black-out-free shooting (uninterrupted viewing of the subject when shooting). Shooting on a silent shutter will not disturb the wildlife.
This camera is perfect for action safari photography.
Along with the frame rate, the camera’s auto-focus system is also important. More auto-focus points on the camera sensor equate to more opportunities for the camera to grab focus on a subject.
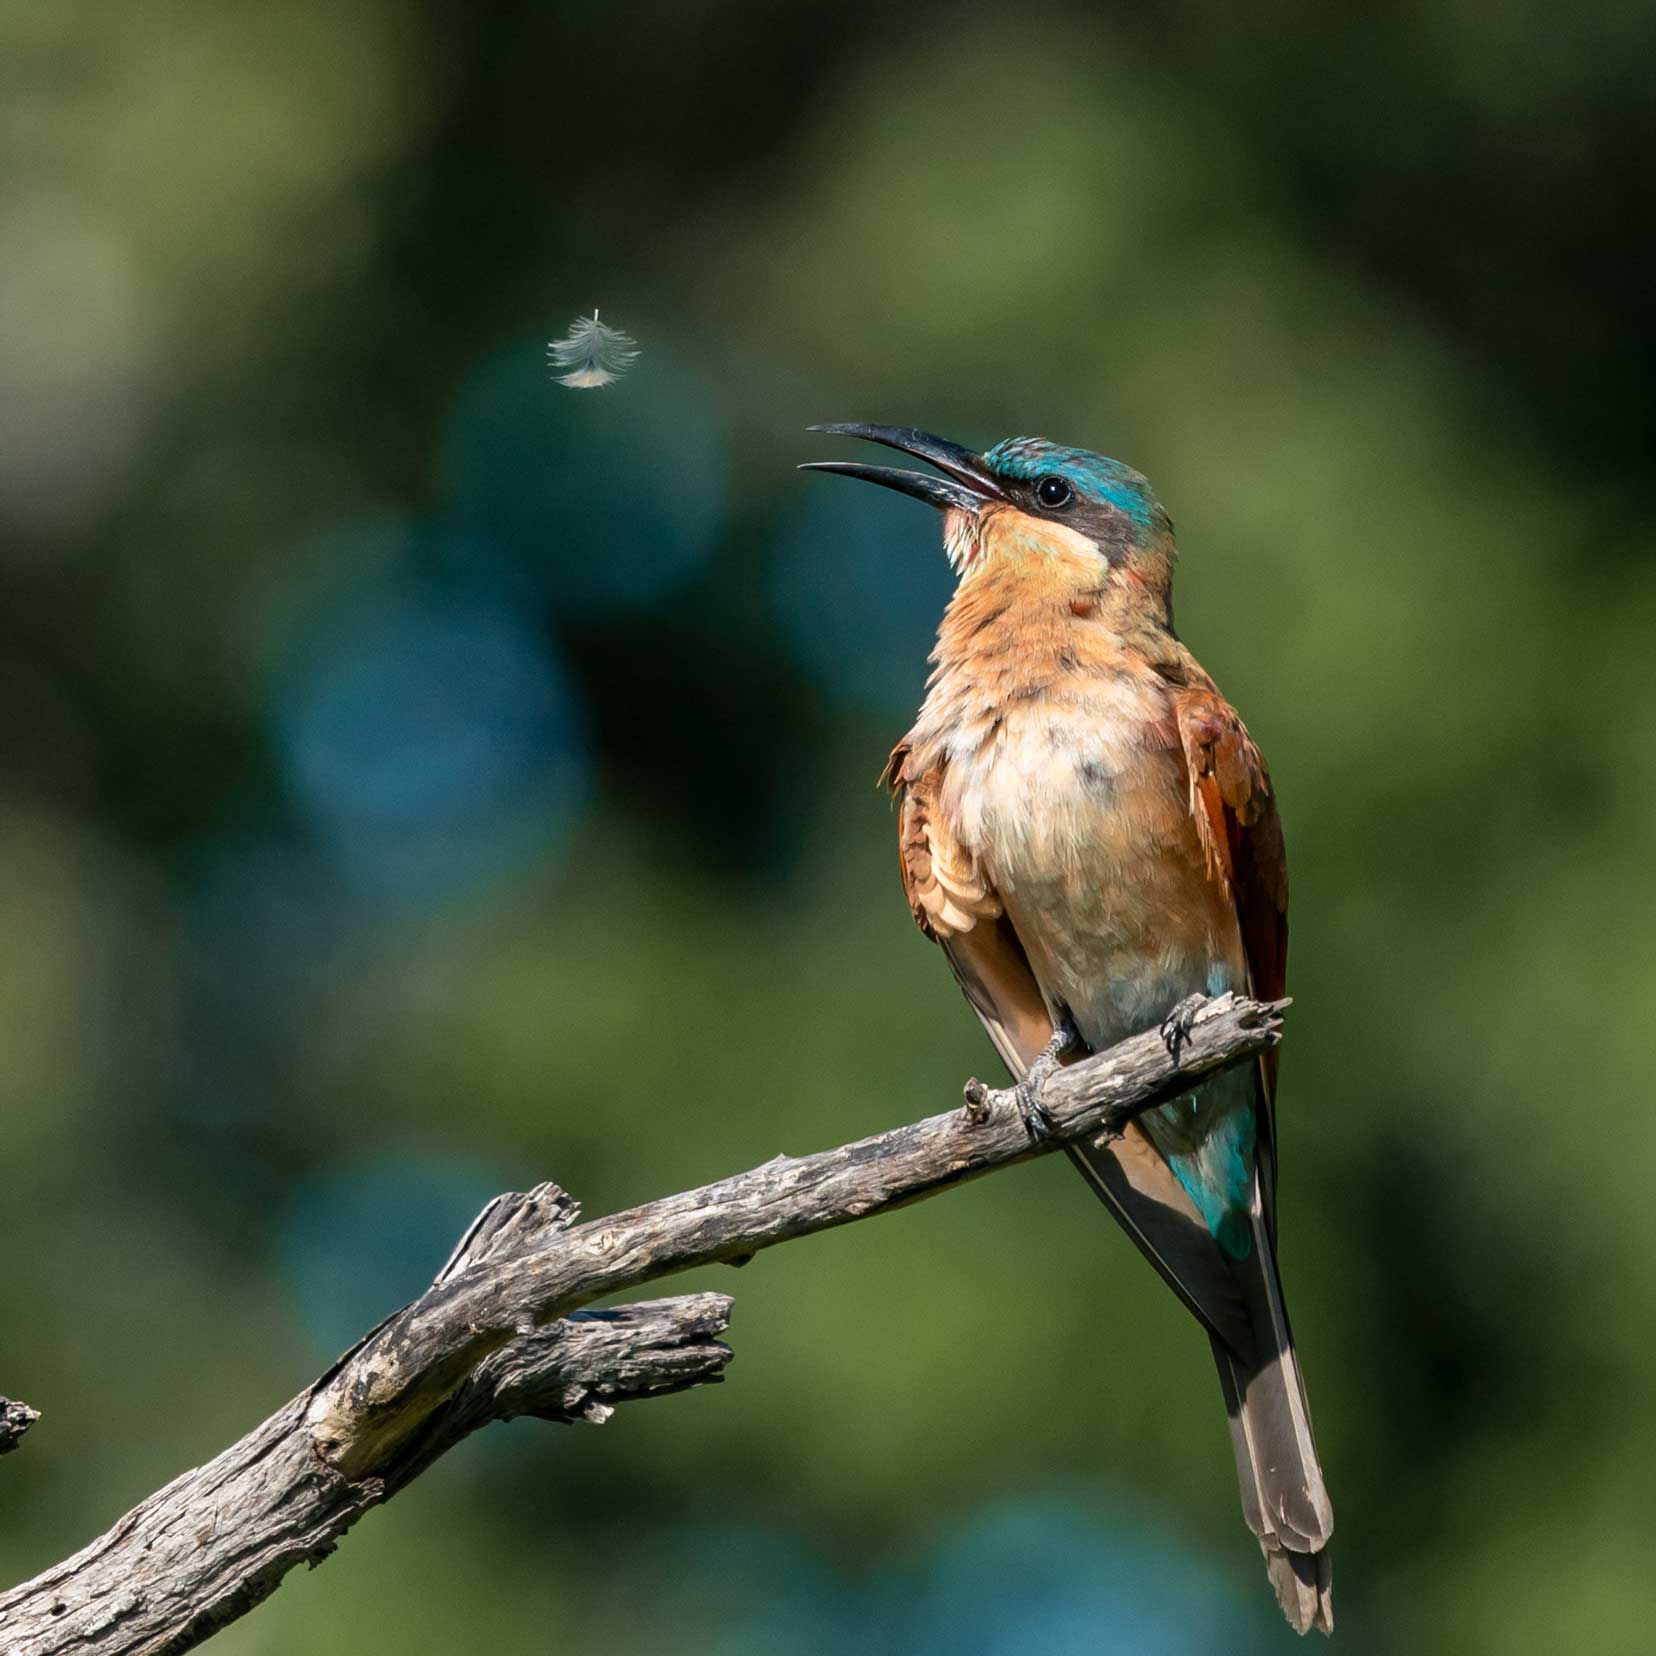
The image below of the Southern carmine bee-eater was taken out of my driver’s side window in Savuti, Botswana.
There’s a bit of a story to this one, and you can see the video here.
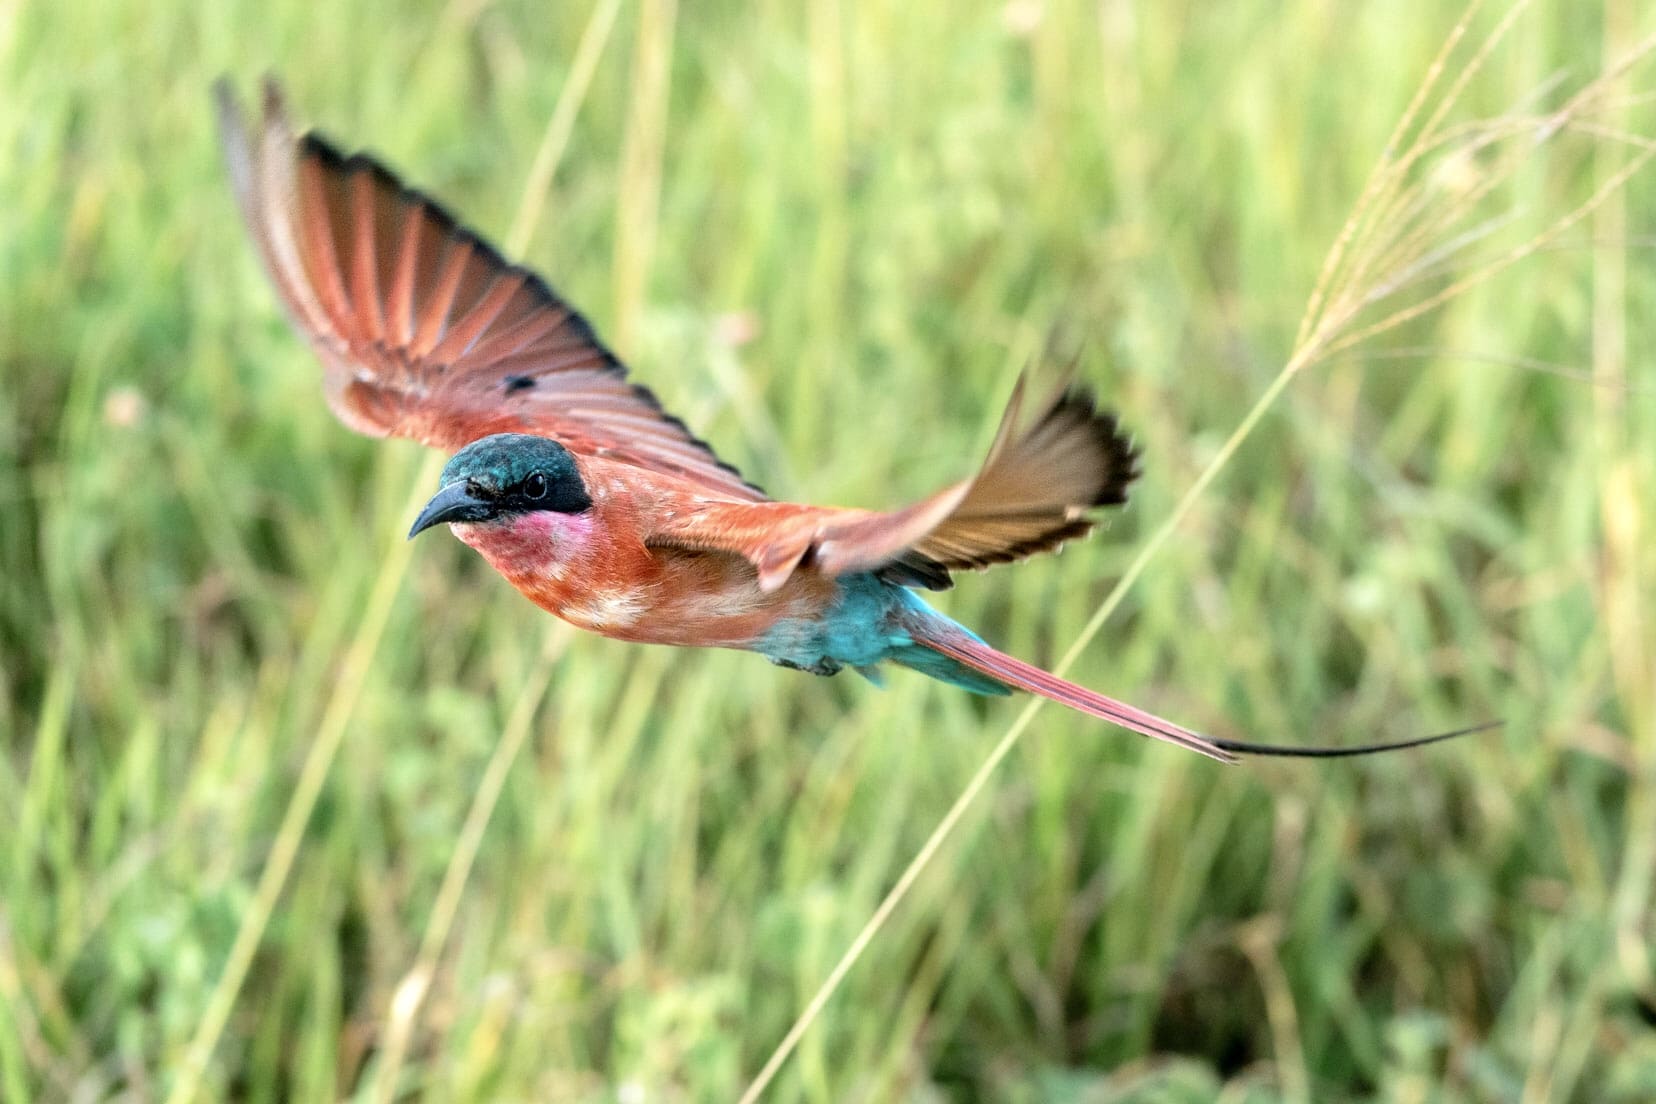
(Sony 70-300mm, 1/2000, 70mm, f/5.6)
I was driving on a dry floodplain track, holding the Sony a9 with a 70-300mm lens in one hand and the other on the steering wheel, shooting the southern carmine bee-eaters.
This particular bee-eater was one of a few that joined us.
They drifted away from the window and then came back, sped up and slowed down. I had to use a wide auto-focus area, or I would have had little chance of grabbing any shots.
It was a magical experience.
On our Sony a9, when a wide auto-focus area (AF) is selected I have 693 AF points covering 93% of the sensor available to capture focus. It’s a fabulous action camera for safari photography.
Choosing the Right Lens
Wildlife, for the most part, is not habituated or accustomed to human closeness. This means wild animals will feel comfortable keeping a good distance from you. So, to get the best photos up close, you’ll need a camera with a zoom and telephoto lens.
These types of lenses will get you right up to the action without physically being close. This is great because you don’t have to be too worried about scaring the wildlife away with your presence.
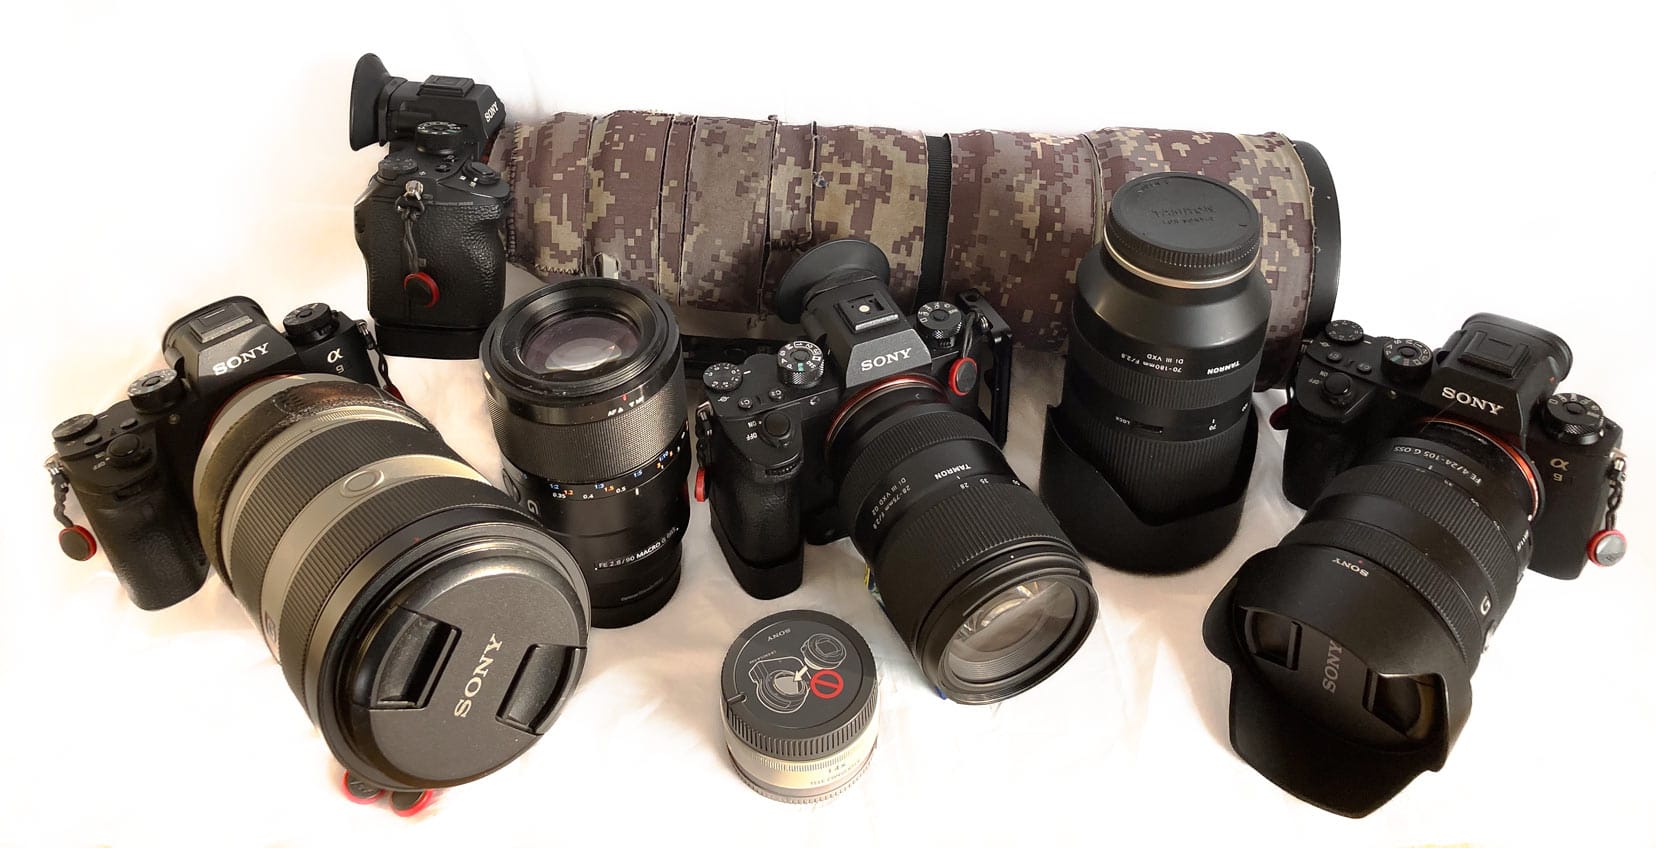
I travel with a Sony 200-600mm and a Sony 70-300mm lens on their respective Sony a9 cameras. This way, I have a range of focal lengths covered and it provides me with more safari photography opportunities.
Shelley also has two Sony a9s, one with a 100-400mm lens and the other with a 24-105mm lens.
Between us, we are ready to shoot action or landscapes with any lens combination at a moment’s notice.
And speaking of being prepared, don’t miss out on our specially curated safari and travel gifts — perfect for enhancing your safari experience or gifting to your fellow adventurers. The little things can make a big difference on such a wild journey!
If you like photographing wild birds, I recommend choosing a lens with the longest focal length, ideally 600 mm.
Lenses don’t come cheap when new, but you can always consider buying second-hand or consider hiring a lens.
A long lens (e.g., 600mm focal length) will allow you to zoom in on the subject and fill the frame. Using a shorter lens means you won’t zoom in as close and will then need to crop the final image to have an equivalent view. Less pixel information means less detail.
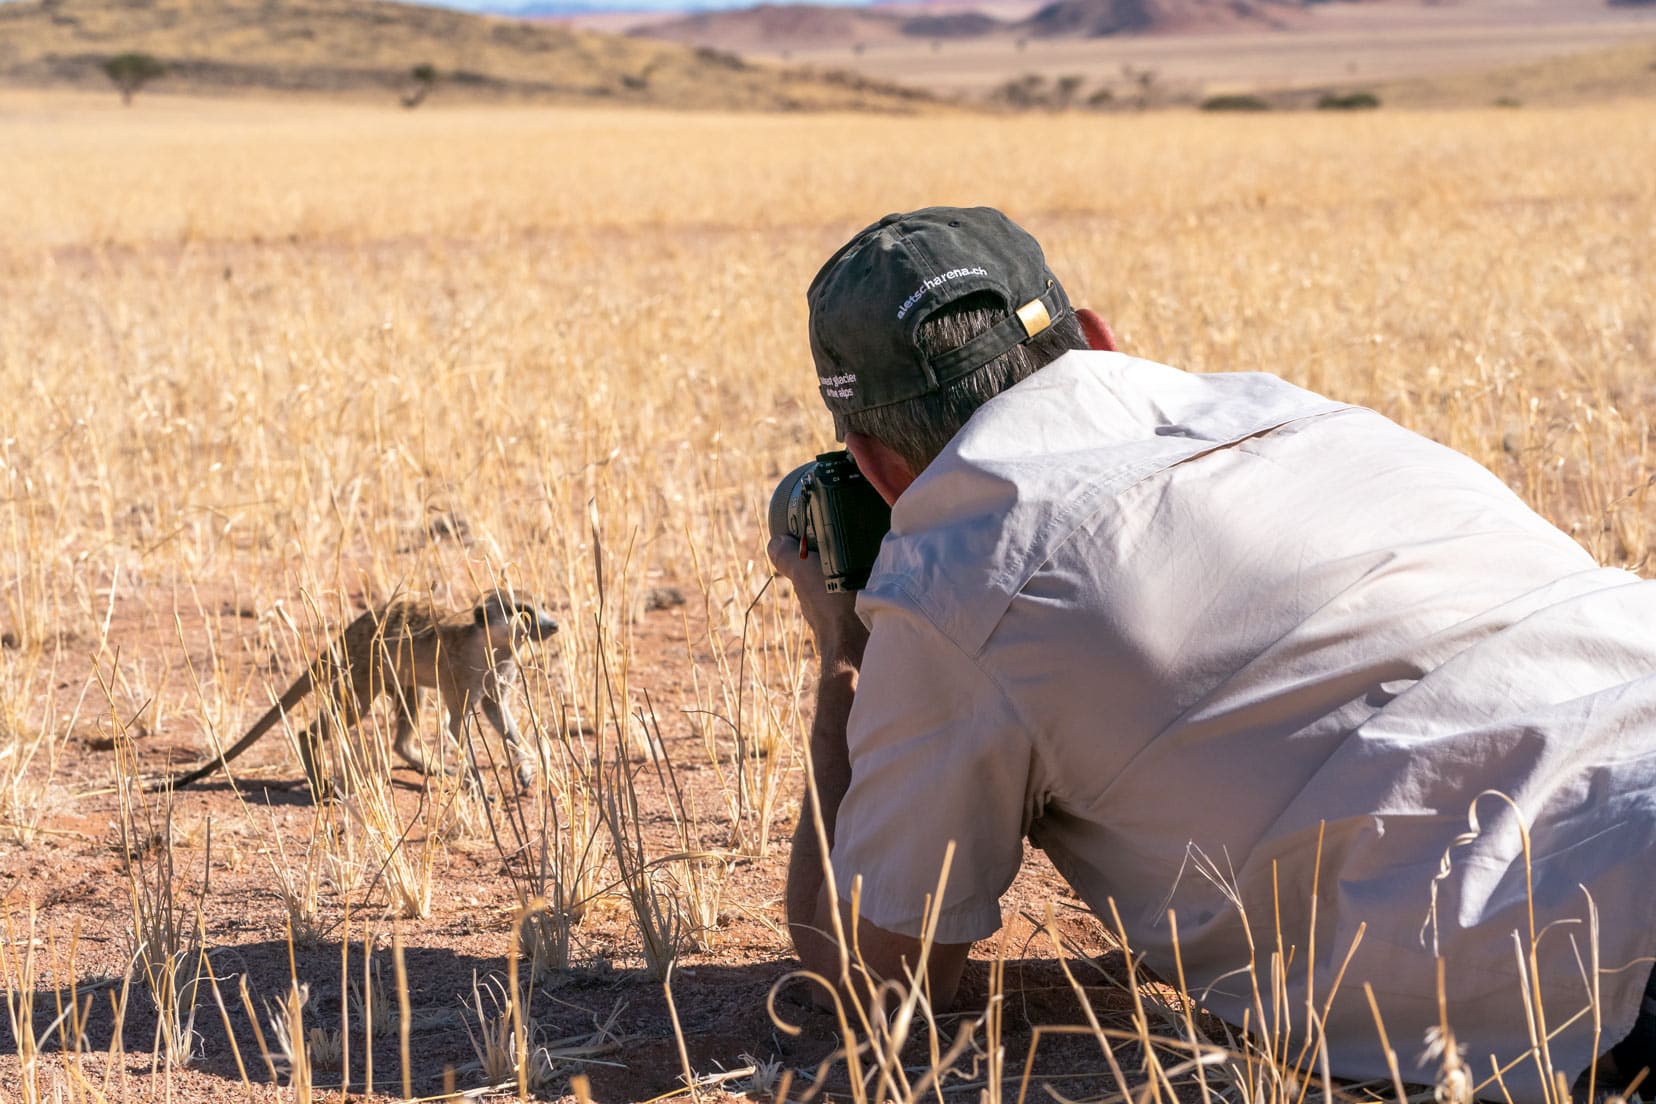
Why choose a zoom lens over a prime lens?
Being able to adjust the lens focal range on a zoom lens when composing an image gives the flexibility to either include or avoid certain elements within the frame.
This is especially helpful when you want the image to tell a story in your pictures on safari.
In the image below, I used a 70-300mm lens. Even though I could have zoomed in on the meerkat’s cute face, I wanted to include a bit of the landscape so the image could tell the story.
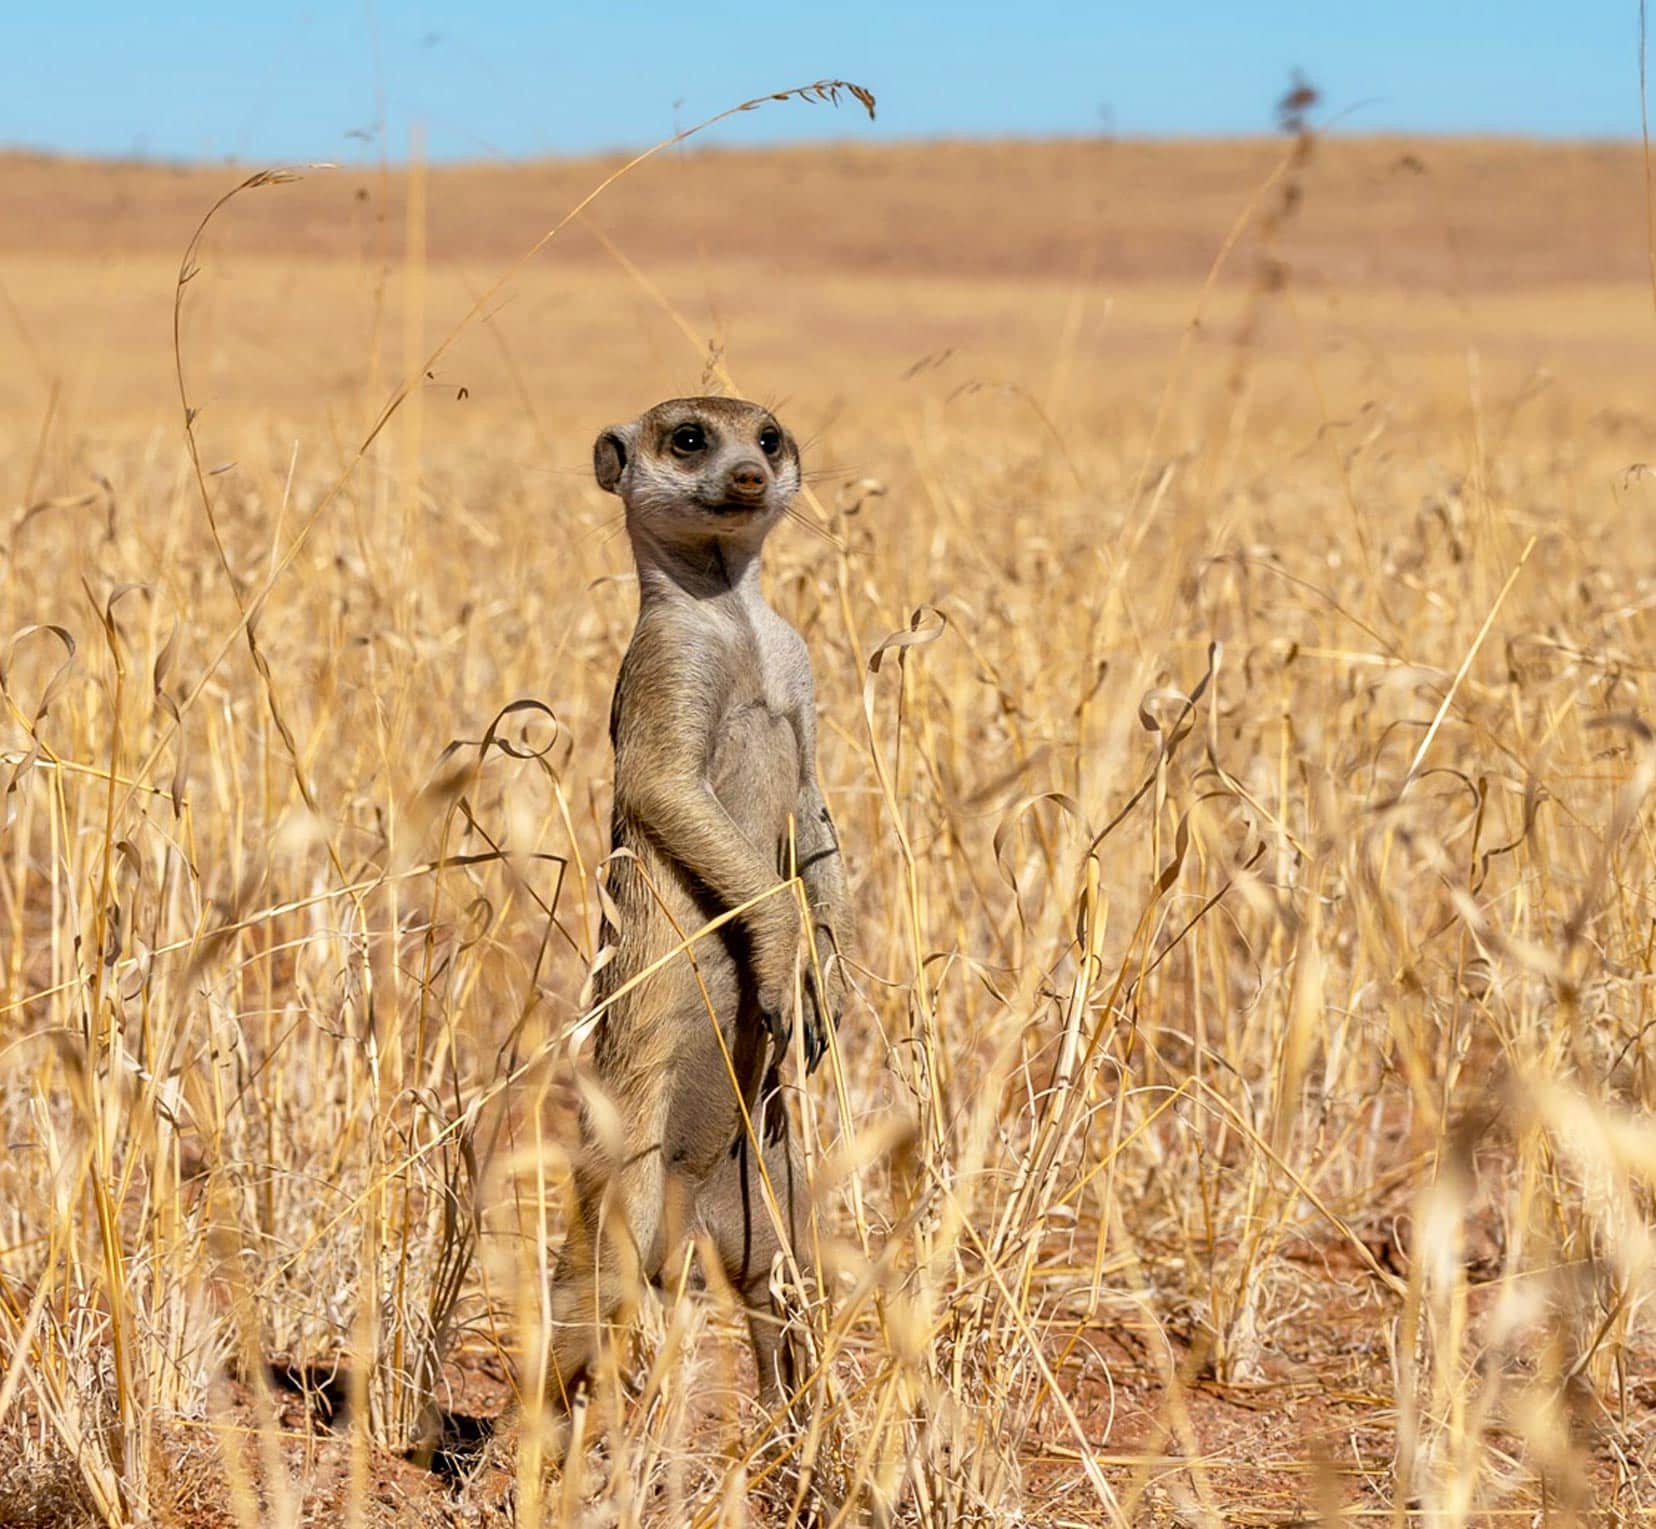
(Sony 70-300mm, 1/1000, 70mm, f/9)
When on a guided safari, the driver will position the vehicle where he thinks you have a good view of the wildlife. This often is not the best spot from a photographer’s perspective.
The sun’s position could be wrong, the subject may be partially obstructed, or the composition is challenging. You have to work with what you have, but using a zoom lens and not prime will give you more options to get what you want.
4. Important Safari Camera Settings
You don’t have to be an expert with a camera to be able to pull off some amazing shots, but it does help to have a basic understanding of the key camera settings to set you up for a win.
Below are some pointers/tips for taking sharp, in-focus safari photos.
Shooting in Burst or Continuous Mode
The burst or continuous mode setting governs the frame rate at which the camera shoots. Normally, there are 3-speed settings (Low, Medium, and High). Shooting on High provides the most opportunities to capture a scene and is especially needed when shooting fast-action wildlife.
My Sony a9 is set to ‘high’ continuous burst mode for fast action, giving me 20 fps (frames per second compressed files) using the electronic shutter.
I’ll reduce this for slower-moving targets to 10fps (medium setting) or 5fps (low setting).
Auto-Focus Capability
The camera you choose should have excellent auto-focus tracking performance, giving the best possible chance of locking onto the subject. To benchmark our camera against what you may be considering, my Sony a9 action camera has 693 auto-focus points covering 93% of the sensor.
The image below was taken with the Auto Focus area setting at wide. Sometimes, you only have time to point and shoot and trust that the camera will take care of the rest… it did.
(Sony 70-300mm, 1/1000, 300mm, f/11)
Use a Fast Shutter Speed
Shutter speed is adjustable, and depending on the speed of the subject, I will adjust my shutter speed to suit.
Setting a fast shutter speed will help to avoid the blur of a moving subject in an image. It will also help reduce camera shake whilst the shot is being taken.
For a fast-moving subject, when using my Sony 200-600 lens, I’ll set the shutter speed to 1/2000s or 1/4000s for bright, daylight shooting. For a slower-moving subject, I’ll lower this setting to 1/1000s.
Using Auto ISO
The ISO setting is a camera setting adjustment that allows you to introduce brightness into the image by increasing it or reducing light by lowering it.
Increased ISO is used to boost the shutter speed to avoid blurring of a subject. This could be used for fast-moving subjects or for low-light environments such as sunrise and sunset when hand-holding the camera. I typically use the maximum ISO values between ISO 6400 to ISO 25,600.
The identical images below were shot hand-held at a shutter speed of 1/15s, wide open at f/2.8 with ISO 25,600. The left image has been de-noised with Adobe Lightroom Classic, and the right image has no de-noising.
The left image is a lot cleaner in the darker areas. The trade-off of raising the ISO is the introduction of graininess or noise to the image.
Also, the slow shutter speed captured the motion blur of the centre giraffe.
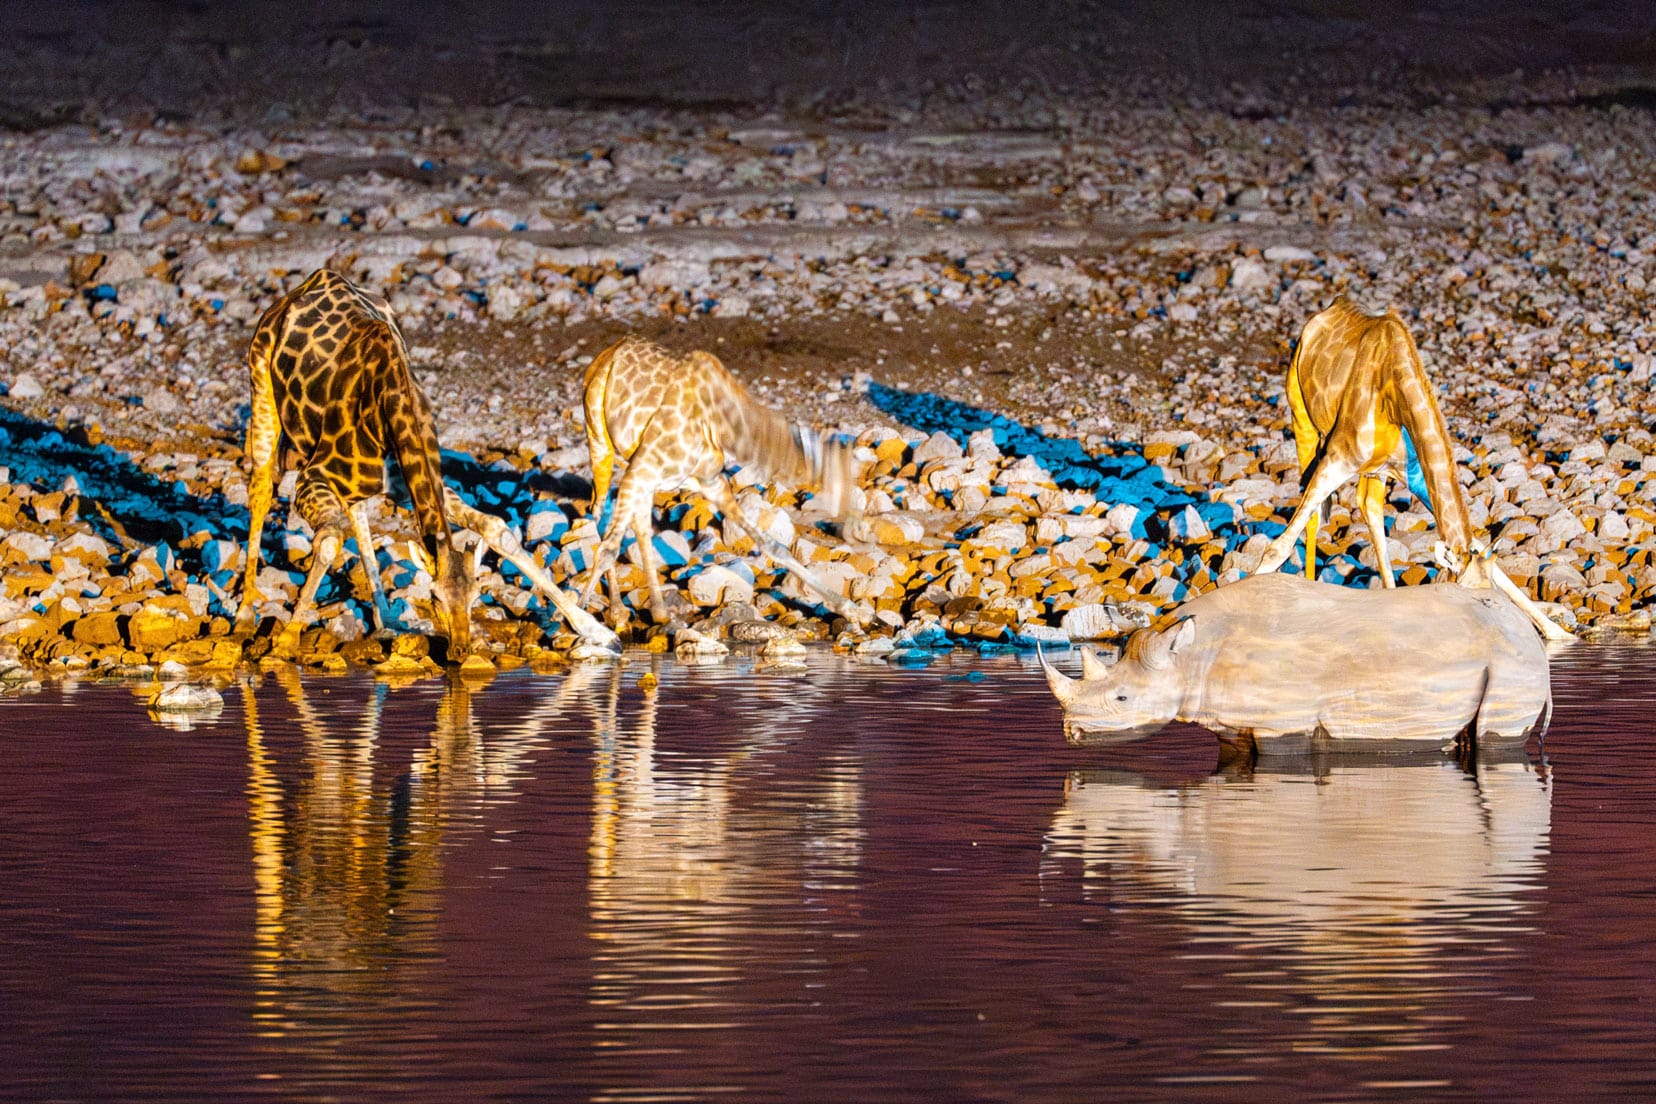
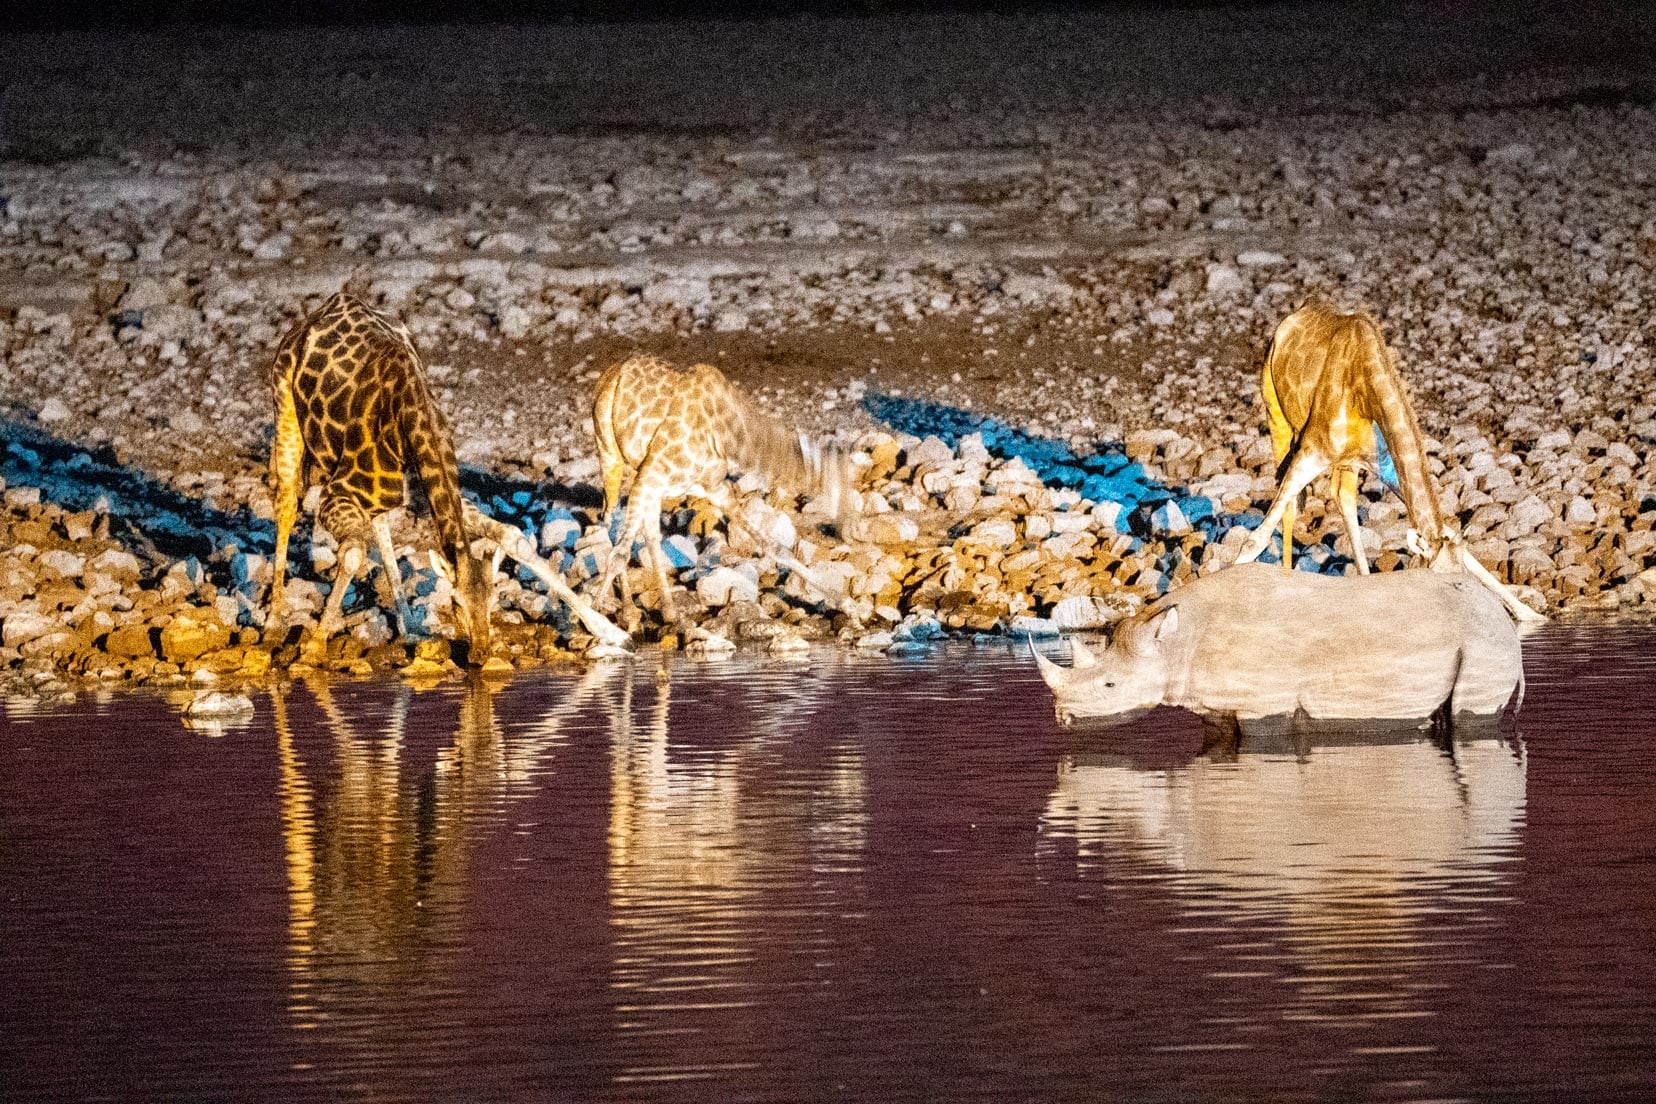
Don’t concern yourself too much about the extra noise. Some great professional de-noising programs are available that don’t cost the earth and provide excellent results.
Personally, I have had great results using the DxO PureRaw de-noising program. Also, the latest version of Lightroom Classic is really good, and its de-noising algorithms have received great acclaim.
You can try DxO PureRaw for yourself with this 30-day free trial without any upfront financial commitment.
Using Auto-Focus and Manual Focus
The size of the auto-focus area can be selected on a camera. For erratic subjects such as flying birds, the wide auto-focus setting works well, whereas a stationary bird perched on a branch would benefit from the use of spot focus.
Why use different focus areas? Sometimes, the auto-focus system will select what it thinks is the correct subject you want to focus on. It’s not always right.
Selecting a small focus area enables the user to target a specific spot for the AF (auto-focus) to lock onto. But even reducing the AF area is sometimes not enough. Now what?
A typical example on safari is where the camera locks focus on the front leaves of a bush instead of the bird further inside the bush.
In this scenario, the auto-focus needs to be overridden. Selecting manual focus and using the manual focus ring enables the focal plane to be pushed back towards the bird.
Some of the newer cameras have integrated animal and bird-eye auto-focus. Selecting this can save a lot of the time-consuming manual focus work, but just be mindful that Eye-AF doesn’t nail focus every time.
Sometimes, a busy background or even an animal’s skin markings is enough to confuse the camera’s Eye-AF. I had this occur when photographing wild dogs.
Expanding on Manual Focus for Dynamic Environments
While auto-focus is incredibly effective for quickly capturing sharp images, there are circumstances on a safari where manual focus can be invaluable.
When dealing with complex scenes where multiple subjects are moving at different distances or when the background and foreground are cluttered, auto-focus might struggle to lock onto your intended subject.
Scenarios where manual focus shines include:
- Low Contrast Situations: In the dim light of dawn or dusk, auto-focus sensors can have difficulty distinguishing the subject from the background. Manual focus allows you to control the focus point precisely, ensuring your subject is sharp even in subtle lighting.
- Shooting Through Obstacles: If you’re trying to capture an animal that’s partially obscured by vegetation, auto-focus may continually lock onto the leaves or branches instead of the animal. Switching to manual focus allows you to adjust the focal plane beyond the immediate obstacles to focus directly on the wildlife.
- Capturing Small or Camouflaged Animals: Smaller creatures or those with camouflage often blend into their environment, making it tough for auto-focus to detect them. With manual focus, you can fine-tune the focus to highlight these subtle subjects.
Tips for Mastering Manual Focus:
- Use Your Camera’s Focus Peaking Feature: Many modern cameras have a focus peaking function that highlights the edges of your subject in colour when they are in focus, which is incredibly helpful in manual mode.
- Magnify the View: Utilize your camera’s ability to magnify the live view image on your LCD screen or electronic viewfinder. This makes it easier to see when your subject is sharply in focus.
- Practice Regularly: The key to mastering manual focus under pressure is practice. Spend time practising on static objects to develop a feel for your lens’s focus ring and how quickly it responds to adjustments.
Incorporating these manual focus strategies can dramatically improve your success rate in capturing well-focused, dynamic images during your safari adventures, ensuring you come home with a collection of vivid, clear wildlife photographs.
Camera Stabilisation
An important setting on the camera is to activate the camera stabilisation. This helps considerably in countering the slight wobbles introduced when hand-holding the camera.
Activating this alone is not enough to counter blur in images. You’ll also need to ensure a fast enough shutter speed.
A rule of thumb for acceptable shutter speed is 1/focal length when hand-holding. When shooting at 600mm, I’ll try for at least a 1/600-second exposure. I’ll reduce this shutter speed when using a stable platform such as a monopod or tripod.
Camera stabilisation is especially important when the attached lens does not have any image stabilisation itself and, therefore, must rely on the camera to provide this.
Capture Images in Raw Mode
The camera allows you to store the images as Raw, JPG, or Raw plus JPG. Make sure you choose to shoot in Raw.
Why Raw?
The Raw file is stored in the camera as an unprocessed, high-quality file that contains a lot more image information or detail than the smaller compressed jpg file. Raw files also contain a much greater colour spectrum and dynamic range than jpg files.
An 8-bit jpg file contains 16.8 million colours, whereas a 12-bit raw file has a huge 68.7 billion colours. This is really helpful when processing the image later when a lot of the bright highlight and dark shadow image detail in a JPG file would otherwise be lost.
(Sony 200-600mm, 1/1000, 600mm, f/9.0)
5. Lens Settings for Safari
Image Stabilisation on the Lens
A lens may or may not have built-in stabilisation with a switch on the lens barrel to turn it on or off. My recommendation is to keep the image stabilisation turned ON.
As mentioned previously, this works with camera stabilisation to reduce hand-holding wobbles.
Lens Auto-Focus (AF) and Manual-Focus (MF)
If the lens has an AF/MF switch, the AF should be selected. Otherwise, the camera will not auto-focus.
Personally, I always leave the lens AF switch to On.
If I need to focus quickly manually, I toggle a camera custom key for AF/MF. Trying to locate the AF/MF switch on a lens barrel is time-wasting, and this is a much quicker option.
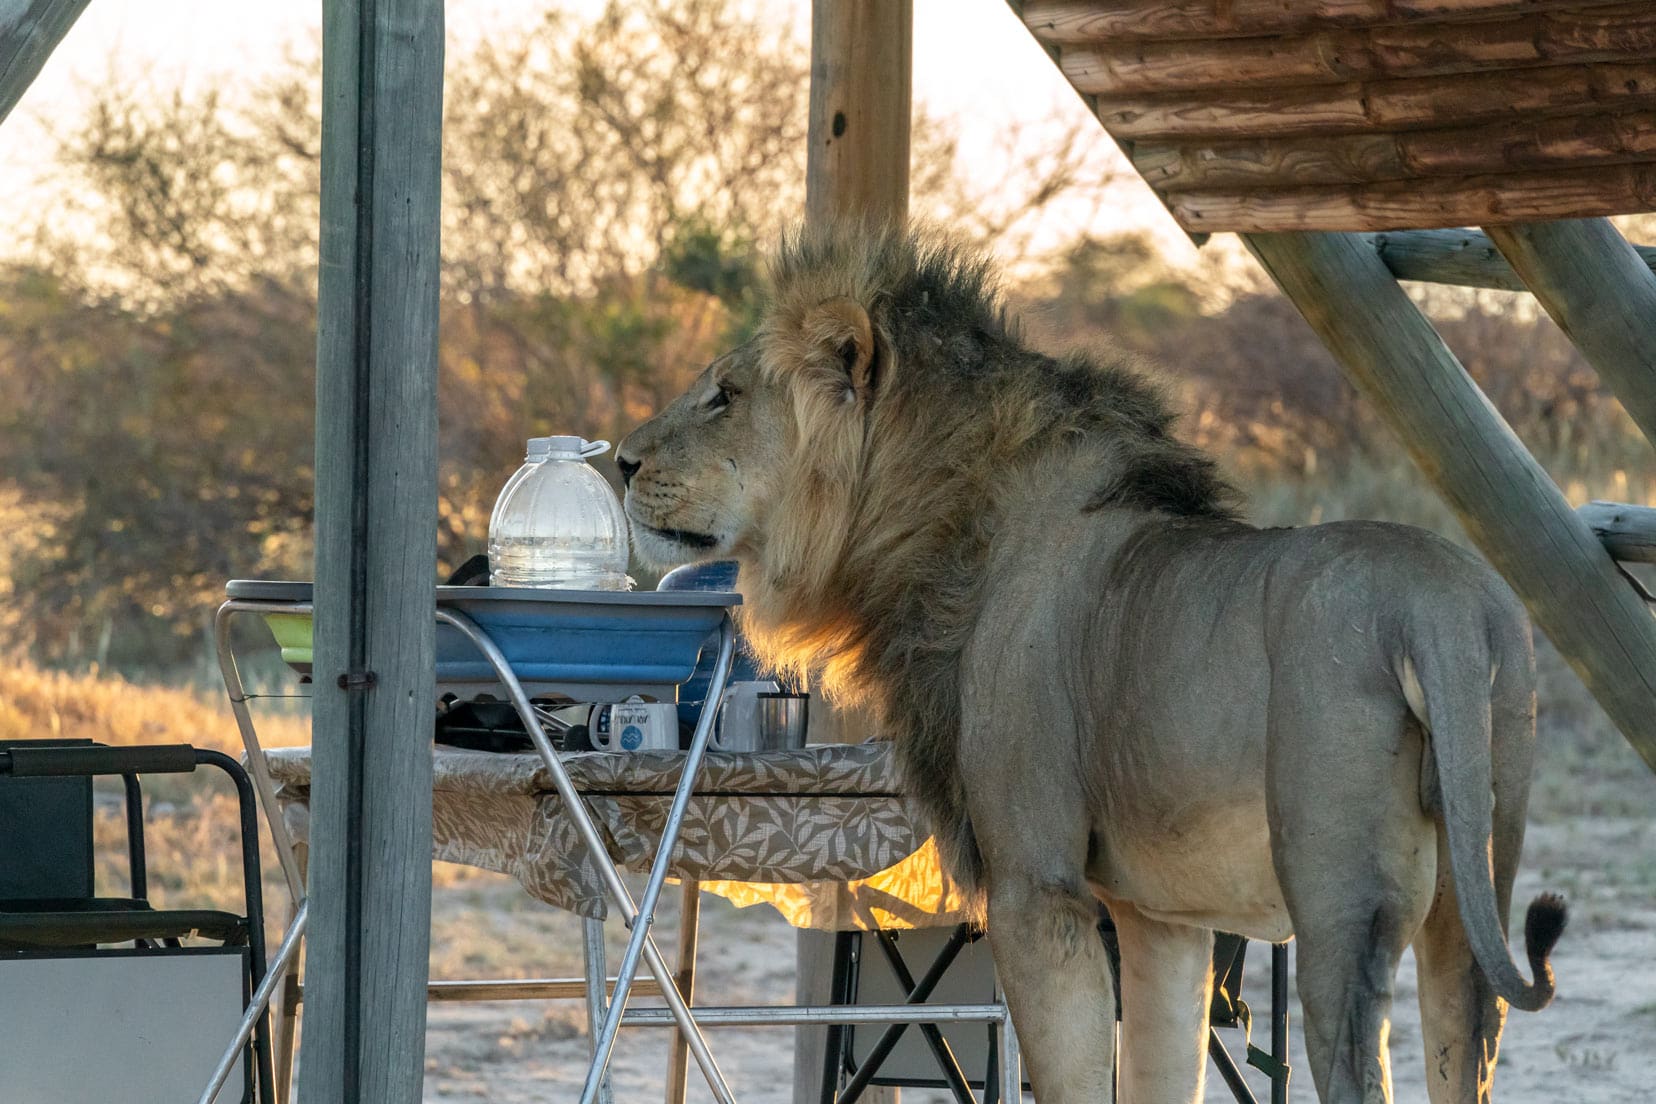
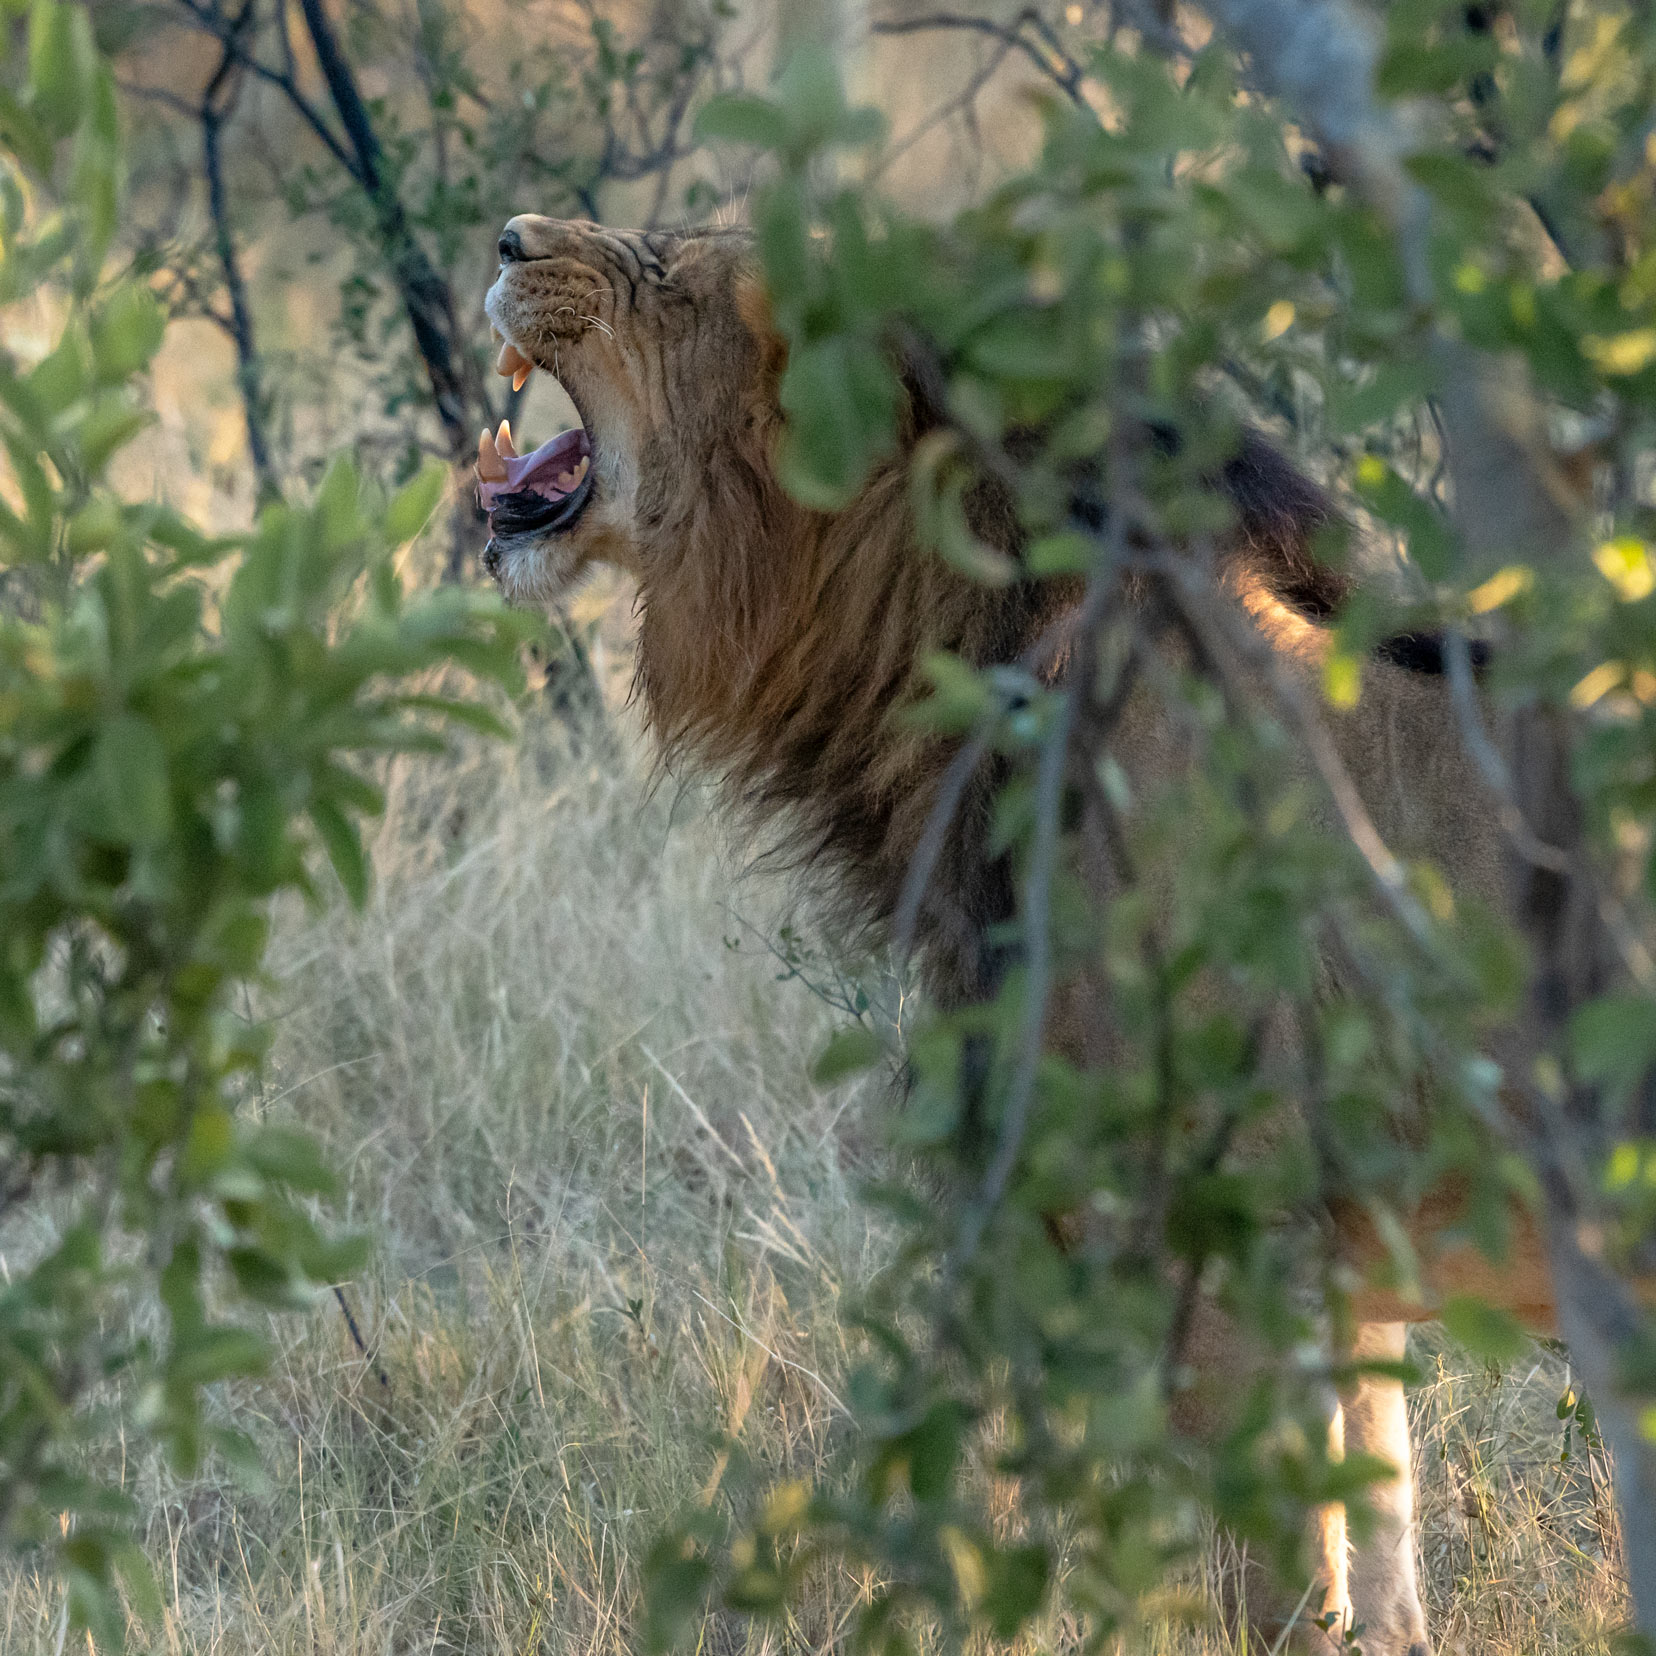
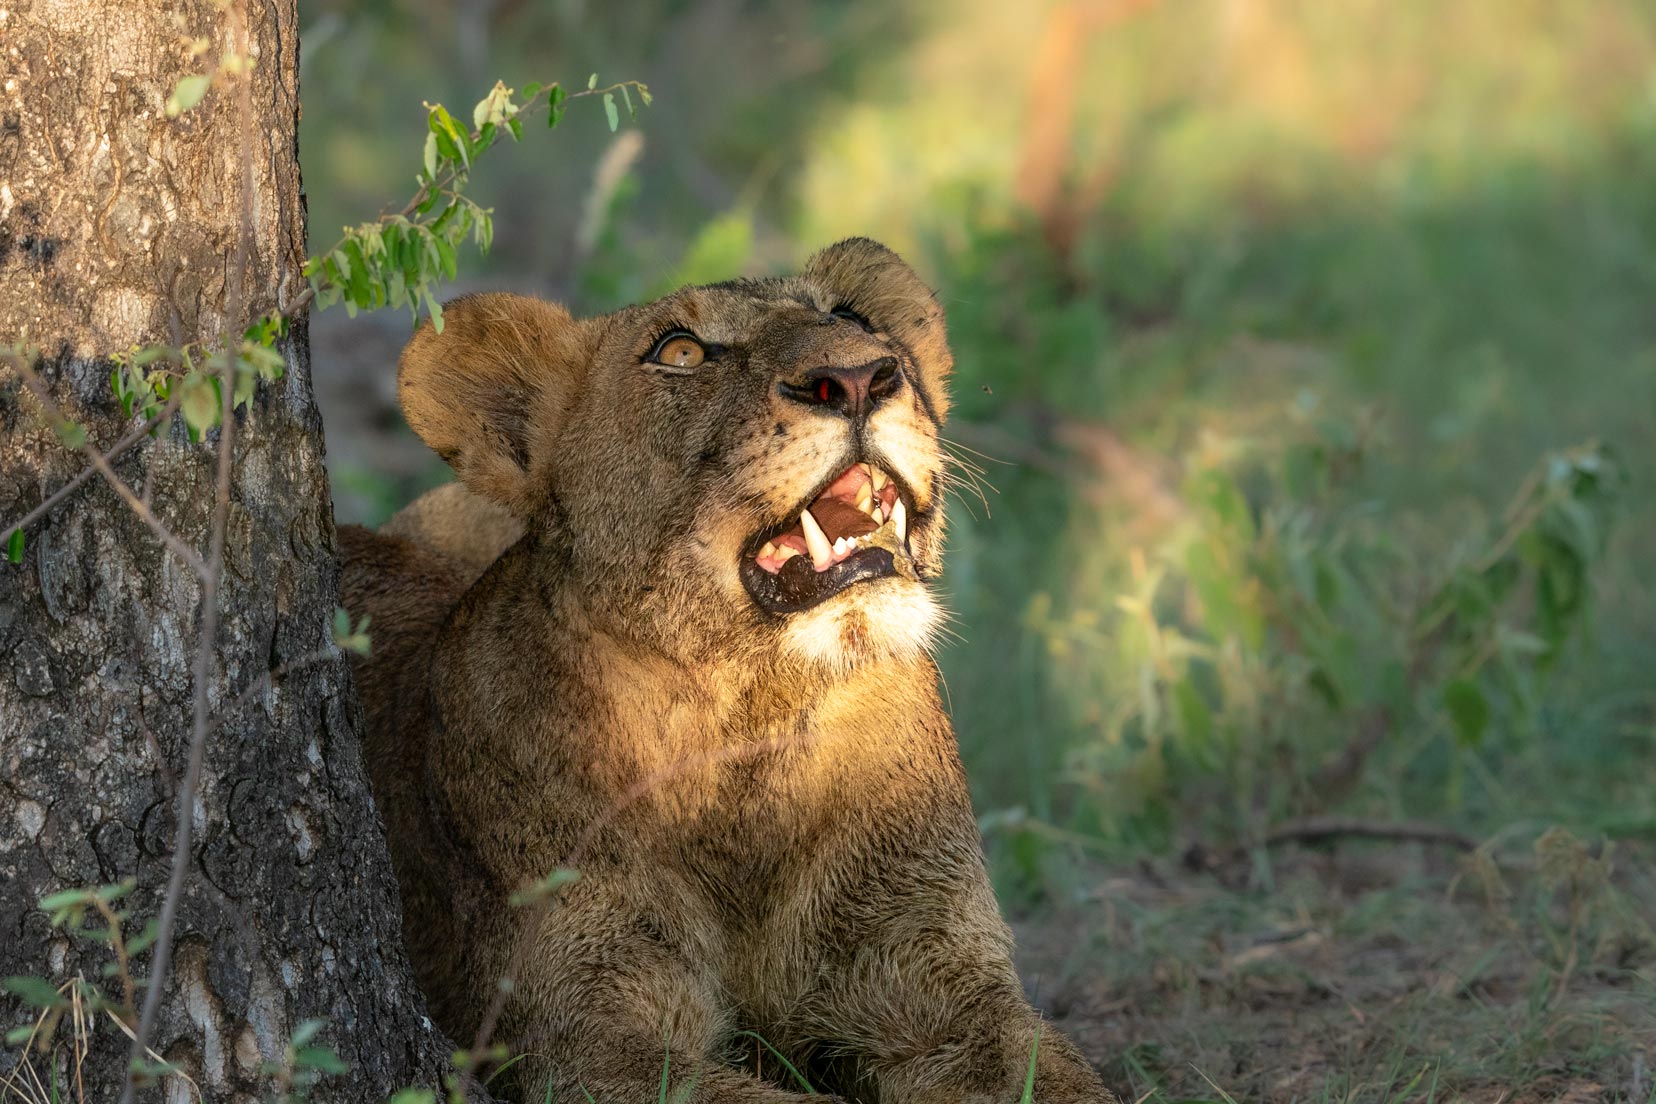
In the image below, the AF focused on the grass in front, so I chose MF to push the focus to the lion.

(Sony 200-600mm, 1/1000, 600mm, f/8)
Focal Range Switch
The different focal range settings tell the camera to look to focus between particular distances from the lens. The purpose is to limit the focal search to that range.
I’ve always found that opening up the focal range to its maximum (the Full setting) has worked well for me, as I would sometimes forget what setting I had the switch set to.
My Sony 200-600mm lens has selectable focal ranges of ∞ 10m, 2.4m to 10m, and Full.
(Sony 24-105mm, 1/250, 39mm, f/11)
6. Safari Camera Accessories and Extra Items
Depending on the type of safari you intend to join (game drive, riverboat cruise or hiking safari), accessories play quite an important part. I run through the most important you shouldn’t be without.
Camera Batteries
There are always a few different brands of camera batteries to choose from with different pricing. I’ve found that sticking with the maker’s recommended battery, although usually the most expensive option, has always been the right decision.
Carrying at least one spare fully charged battery is a smart move. For battery charging on the fly, we use a 12V dual battery charger that connects to the 12V socket in the front dash of our 4×4 Hilux.
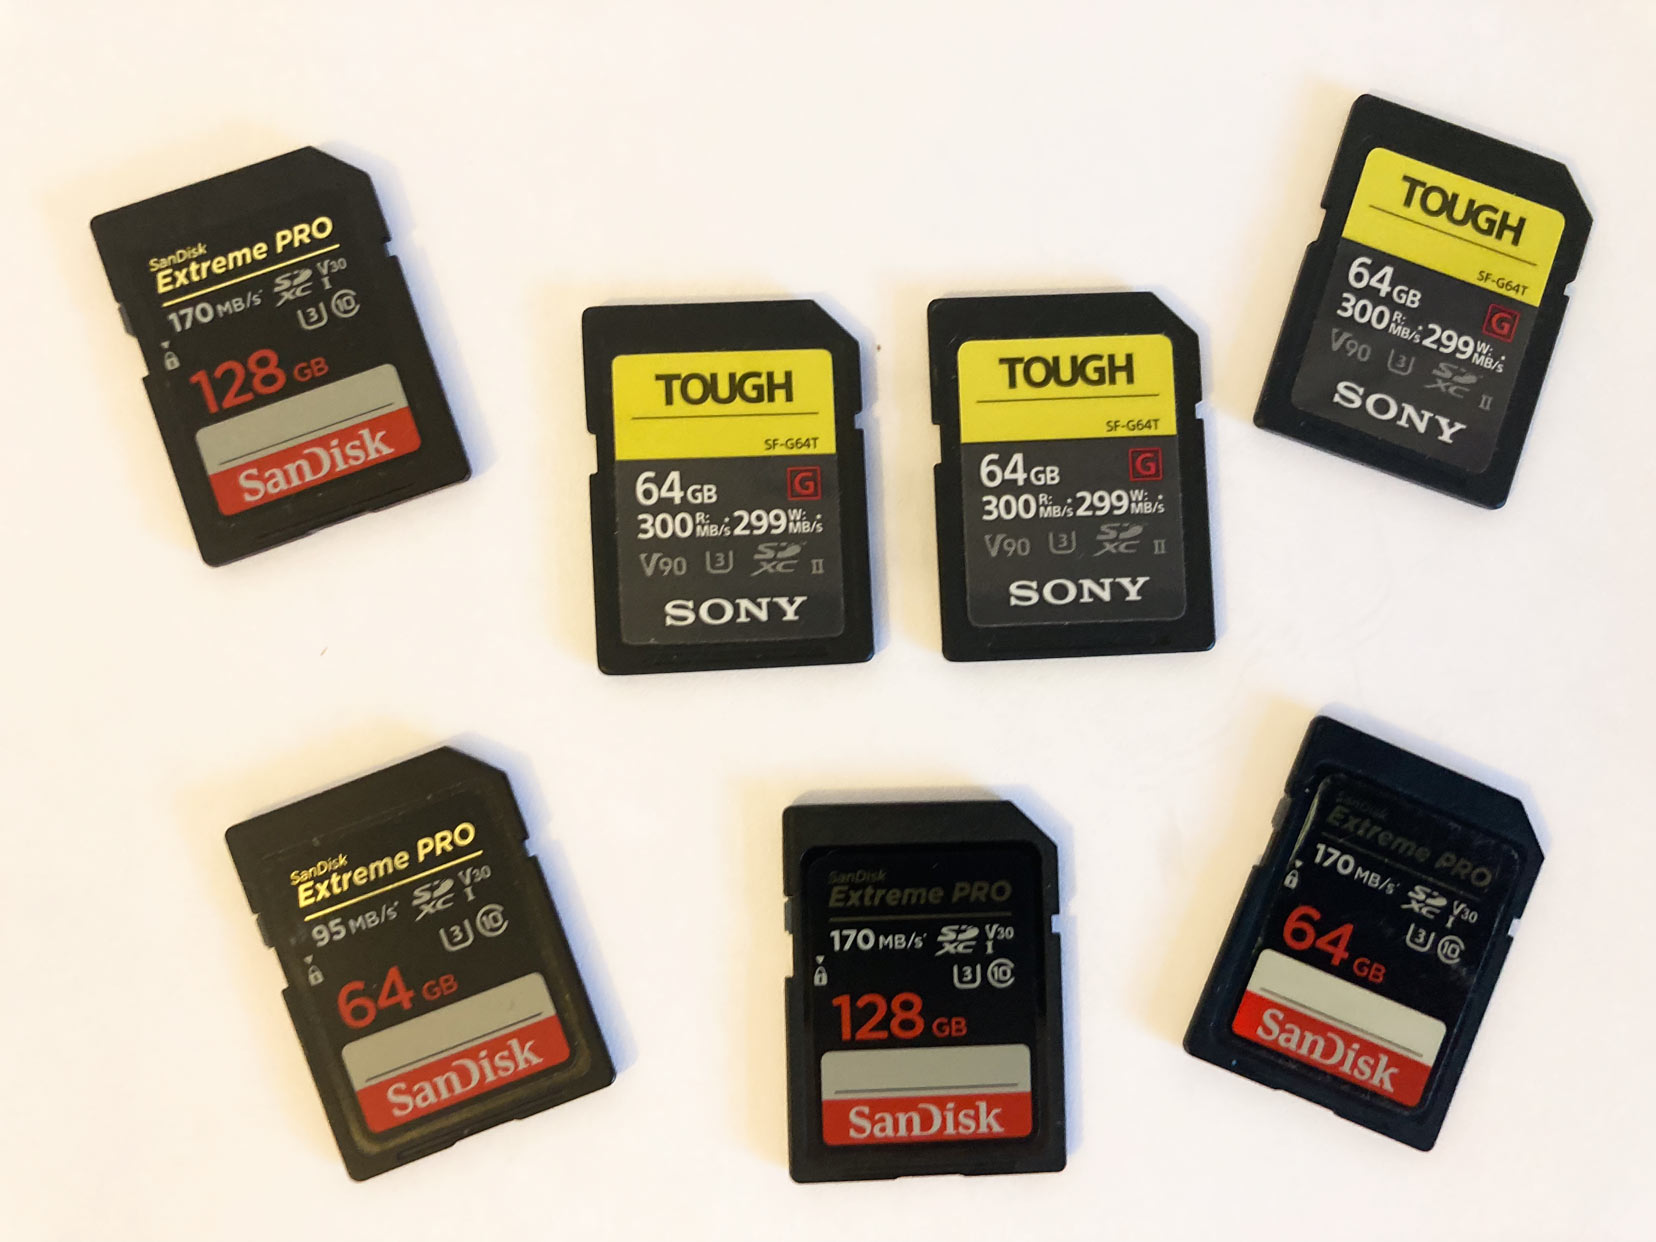
Memory Cards
Using memory cards from trusted manufacturers gives peace of mind that your precious images won’t be lost to a corrupted card.
I use the Sandisk 128GB and Sony Tough 64GB cards in the dual slots of my Sony a9s.
Both memory cards are water and dustproof.
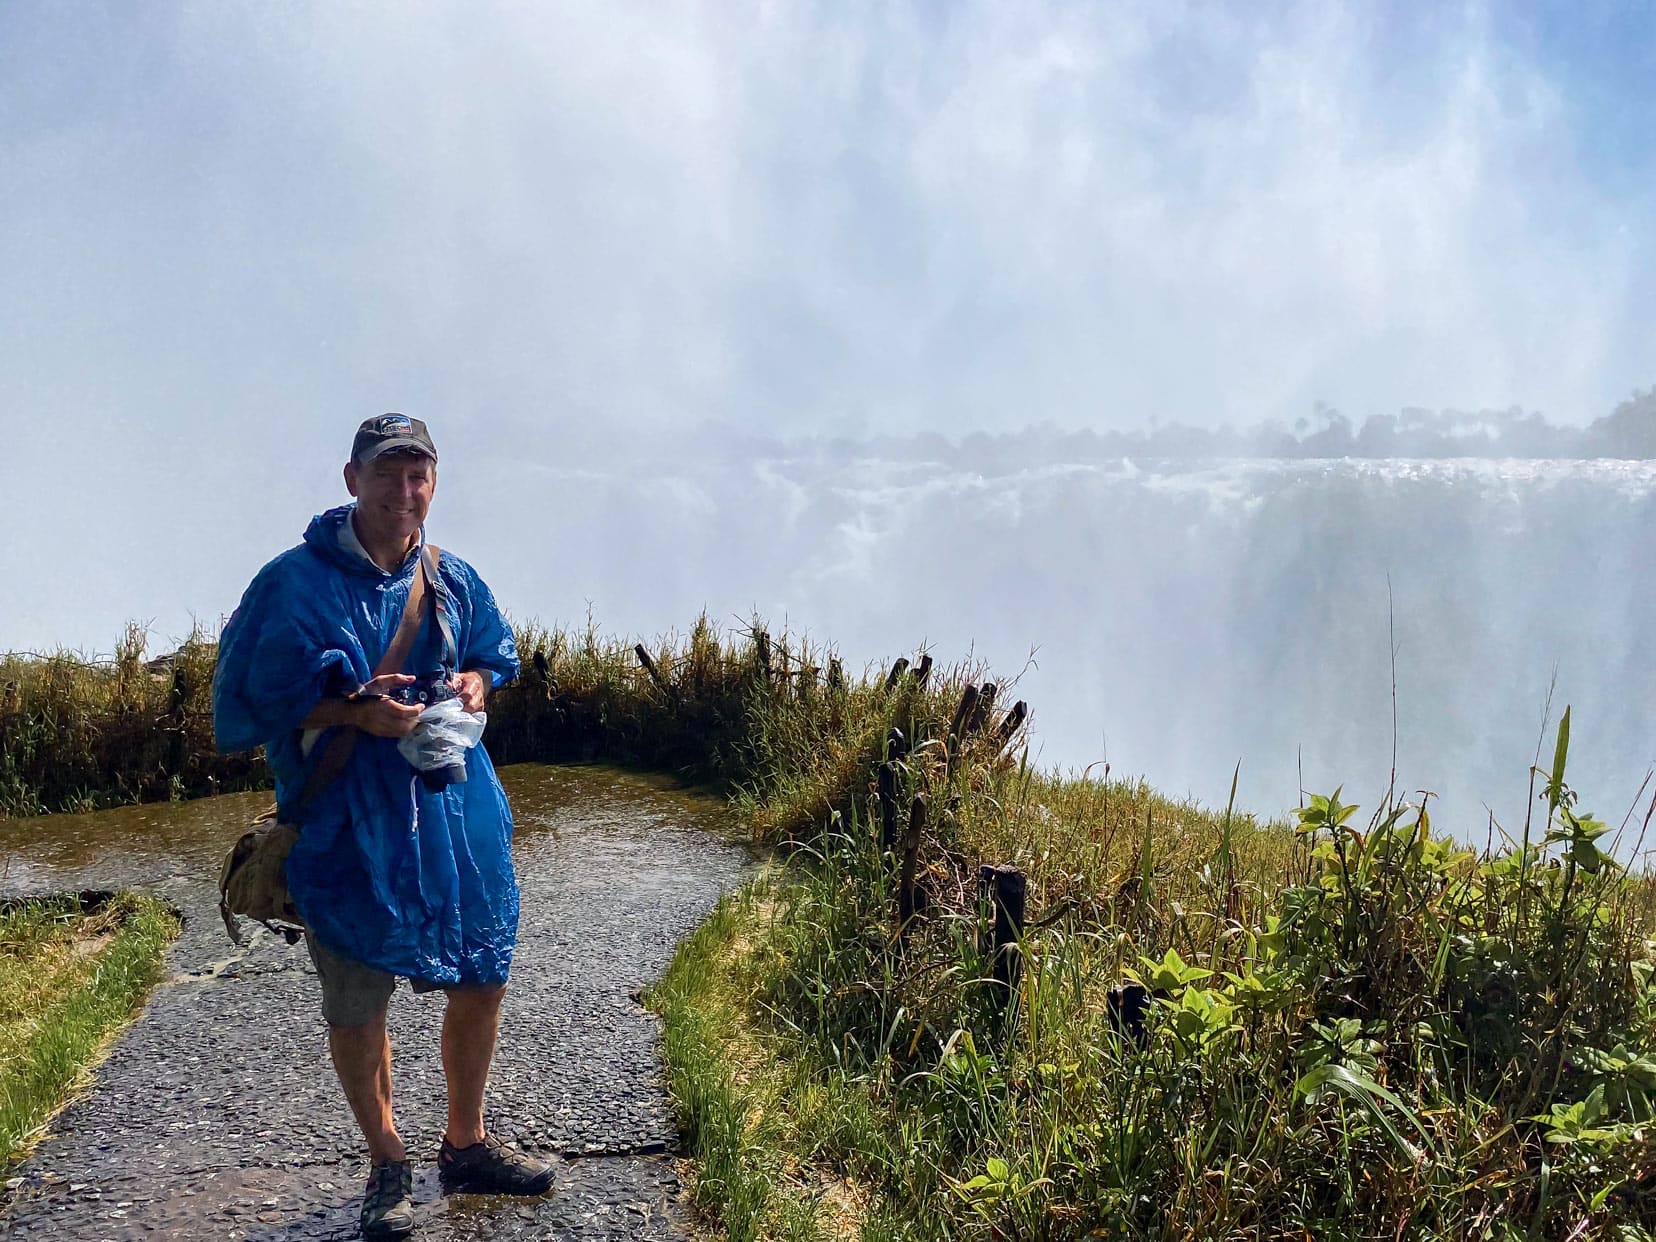
Weather Proof and Cleaning Accessories
Most cameras and lenses have some degree of weatherproofing, but regardless, the more you can protect your gear from the elements, the fewer potential problems you’ll have. Protecting your camera sensor and lens will help to avoid dust, which causes spots on your photos.
Great products like Optech’s rain and wind plastic protectors saved the day at Victoria Falls, Zimbabwe. Drenching spray completely soaked us, but our camera gear survived.
Keeping your equipment clean helps it operate properly and keeps debris off the essential parts of the camera or lens.
You’ll want to invest in:
- An air blower,
- A soft bristle brush,
- Some microfibre cloths, and
- Proper lens cleaner.
Be wary of using your ordinary glasses cleaner as the chemicals might not be suitable for your expensive gear. I always stick with reputable brands of camera lens cleaners.
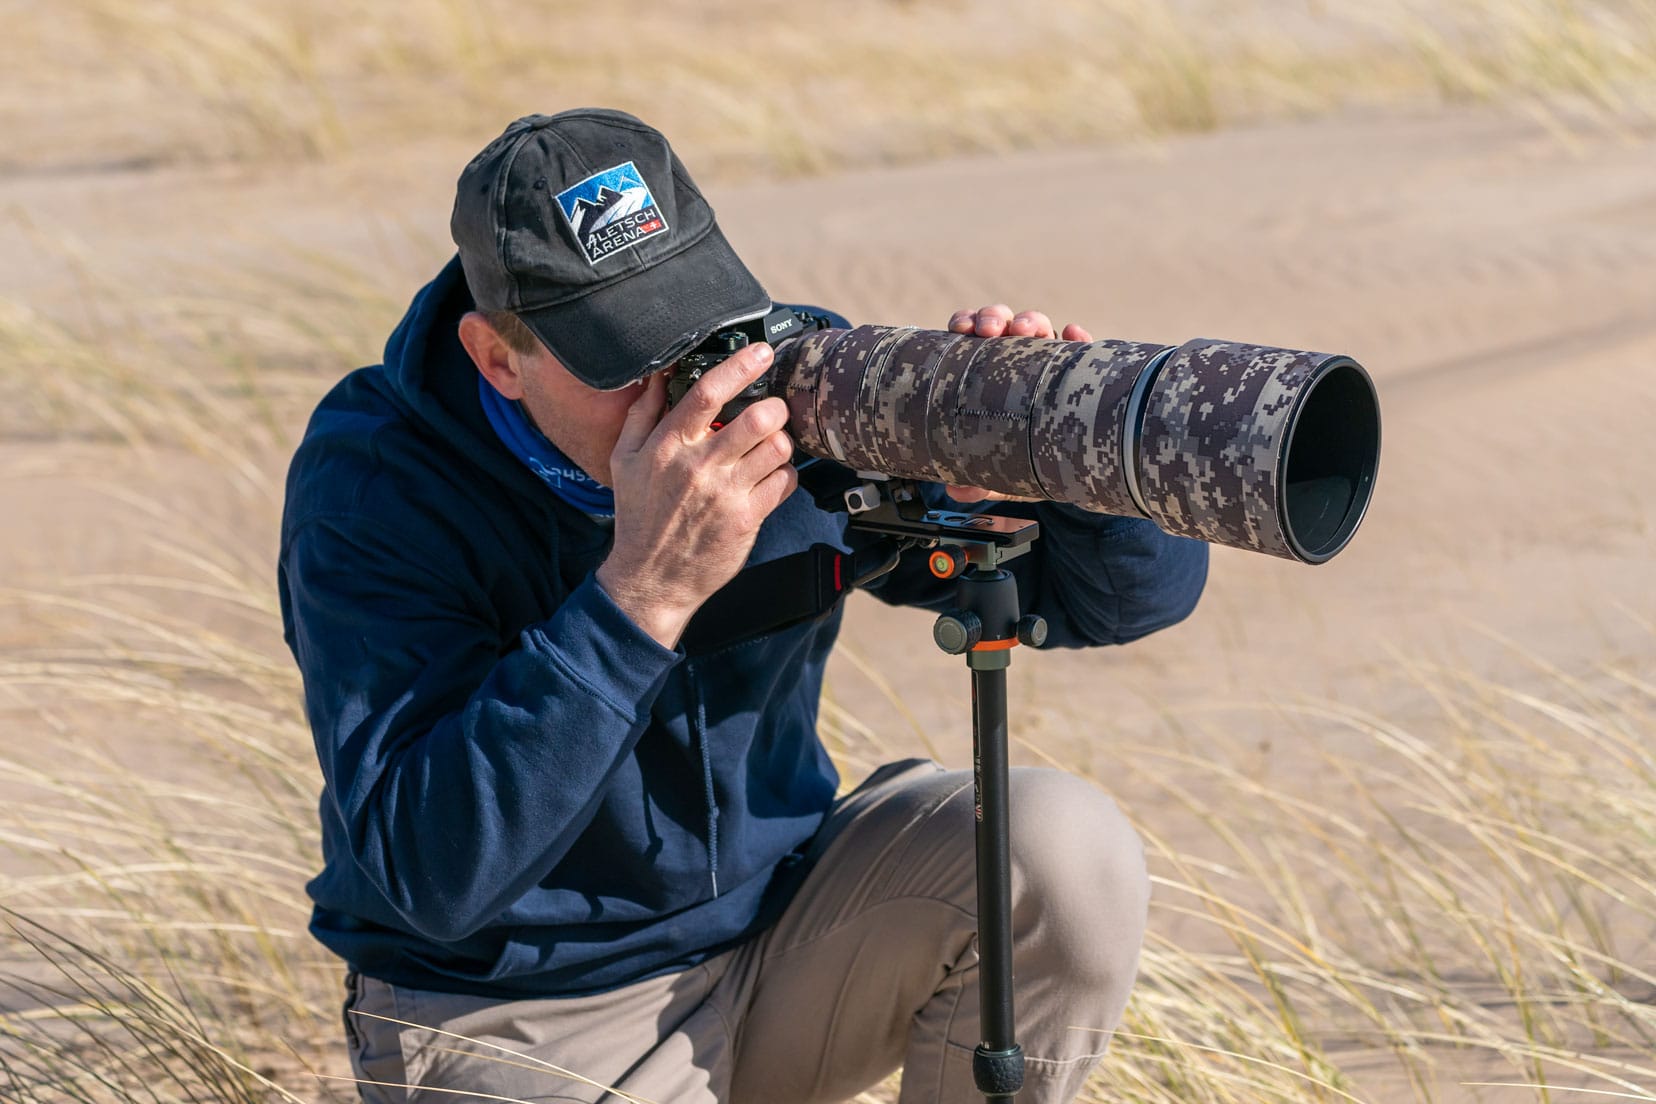
Tripod, Monopod or Gimbal Head
These tripods, monopods, and gimbals provide more stability to avoid camera shake and are especially helpful when taking shots of wildlife, as they can support the weight of long, heavy lenses.
During our Chobe River sunset cruise, we even saw a cruise boat professionally rigged with gimbals for steadying those long wildlife lenses.

(Sony 200-600mm, 1/1000, 200mm, f/9.0)
Gimbal heads connect to a tripod and take the weight by properly balancing the camera/lens level. This offers an unrestricted range of motion for tracking targets and following moving subjects.
Our Manfrotto Travel tripods include an integrated monopod, which is a handy option.
Camera Bean Bag
This small bean bag acts as a steady base for the camera/lens. Bean bags help stabilize the camera and lens and prevent damage when they come into contact with a hard surface underneath.
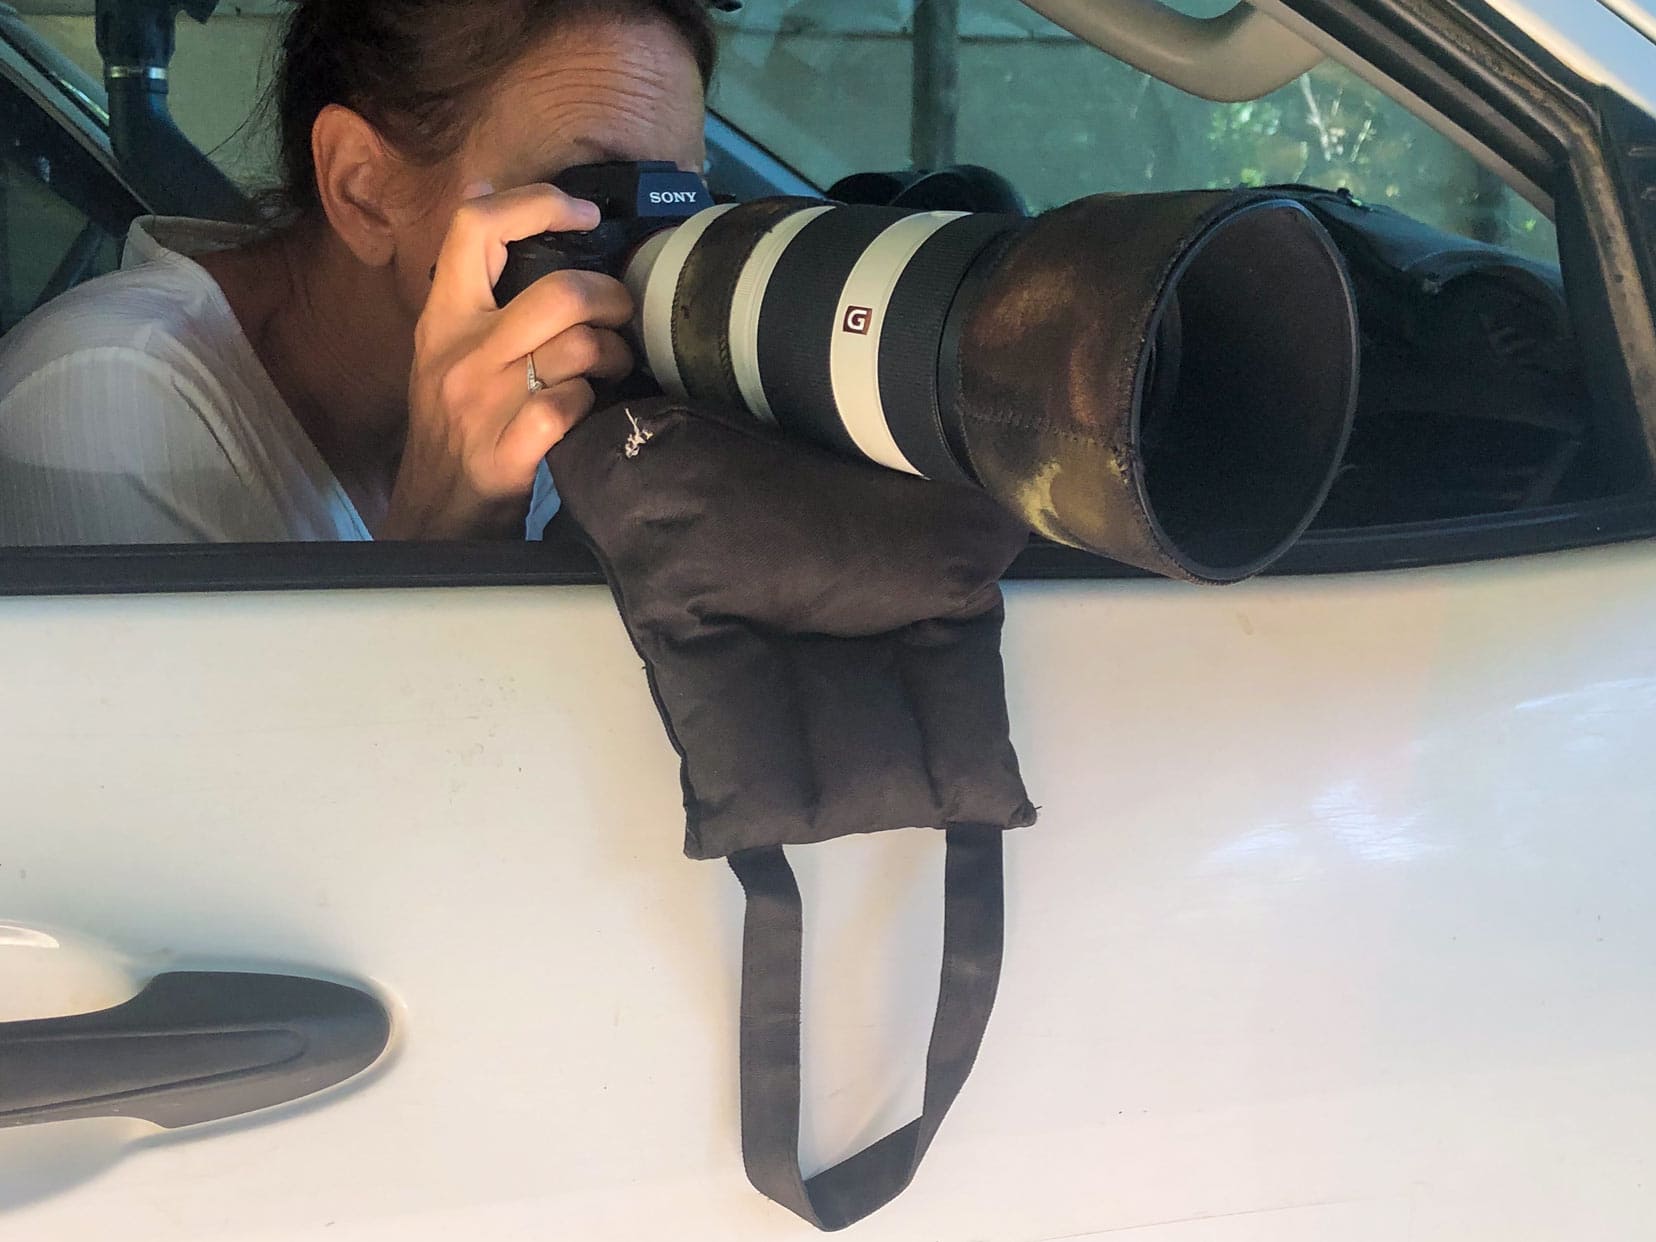
Shelley is always using the bean bag placed on our Hilux’s window sill to shoot stable video, and using this would be one of her top safari photography tips.
Camera/Lens Carrying Strap
Even though a camera has its own carrying strap, this shouldn’t be used when a longer, heavier lens is attached to the camera. Carrying it just off the camera will stress the camera mounting plate.
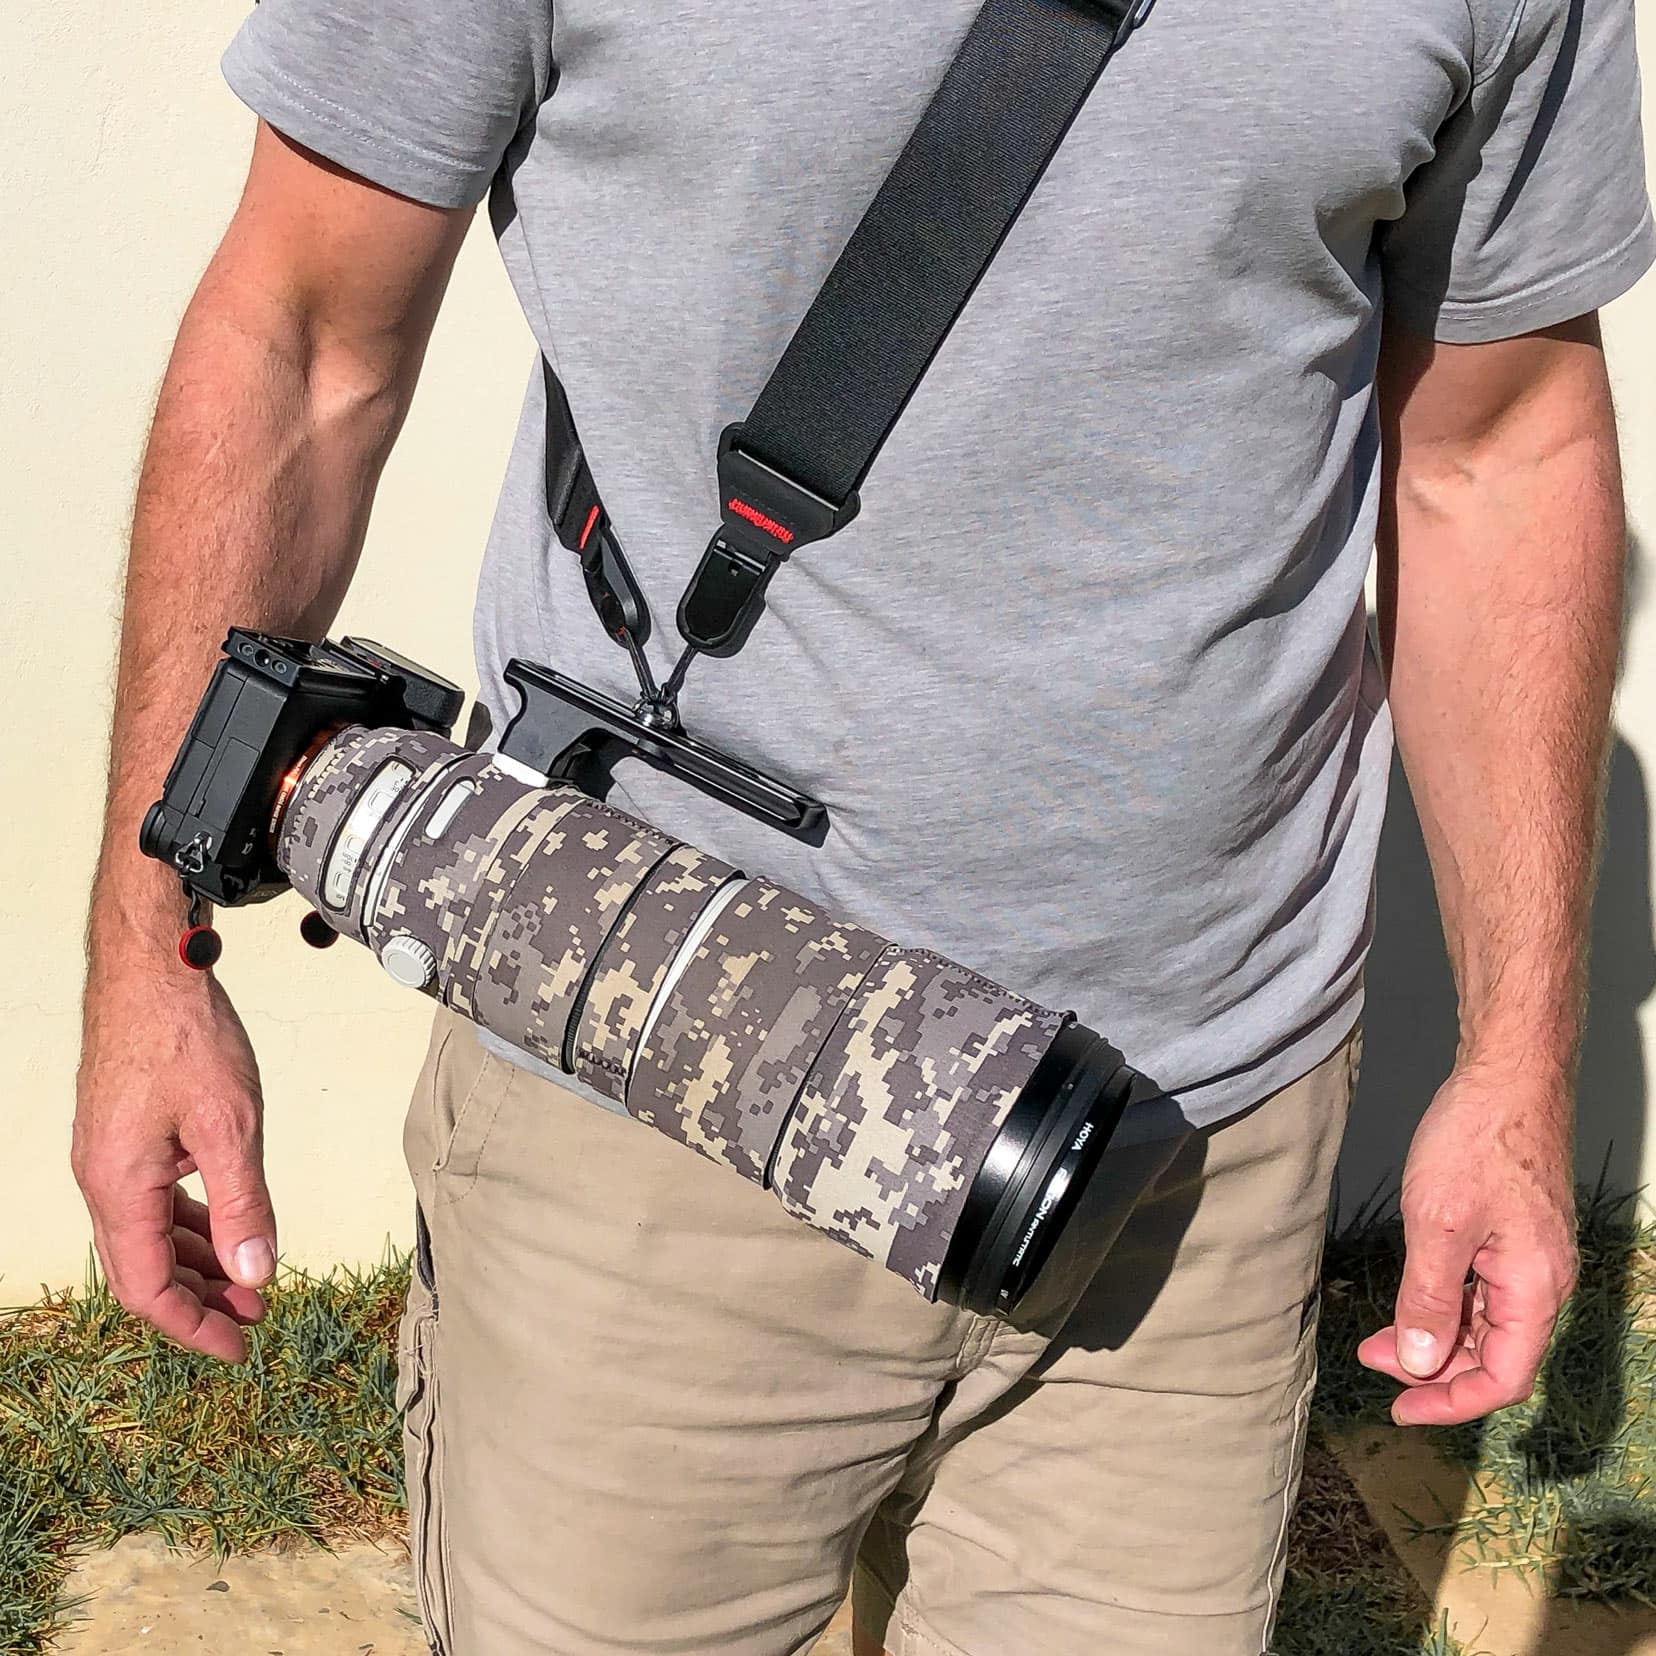
The use of an aftermarket carrying strap (we use the Peak Design Slide and Slide Light straps) enables the heavy lens to be carried easily via quick-release anchor links from the lens footing.
Carrying the lens like this also keeps it pretty well-balanced.
Camera Backpack
A camera backpack is particularly useful for carrying the various camera equipment you’ll have with you.
A word of advice: look for a backpack that is waterproof or at least includes a waterproof cover. Keeping your safari photography equipment dry is important. Electronics and moisture aren’t friends.
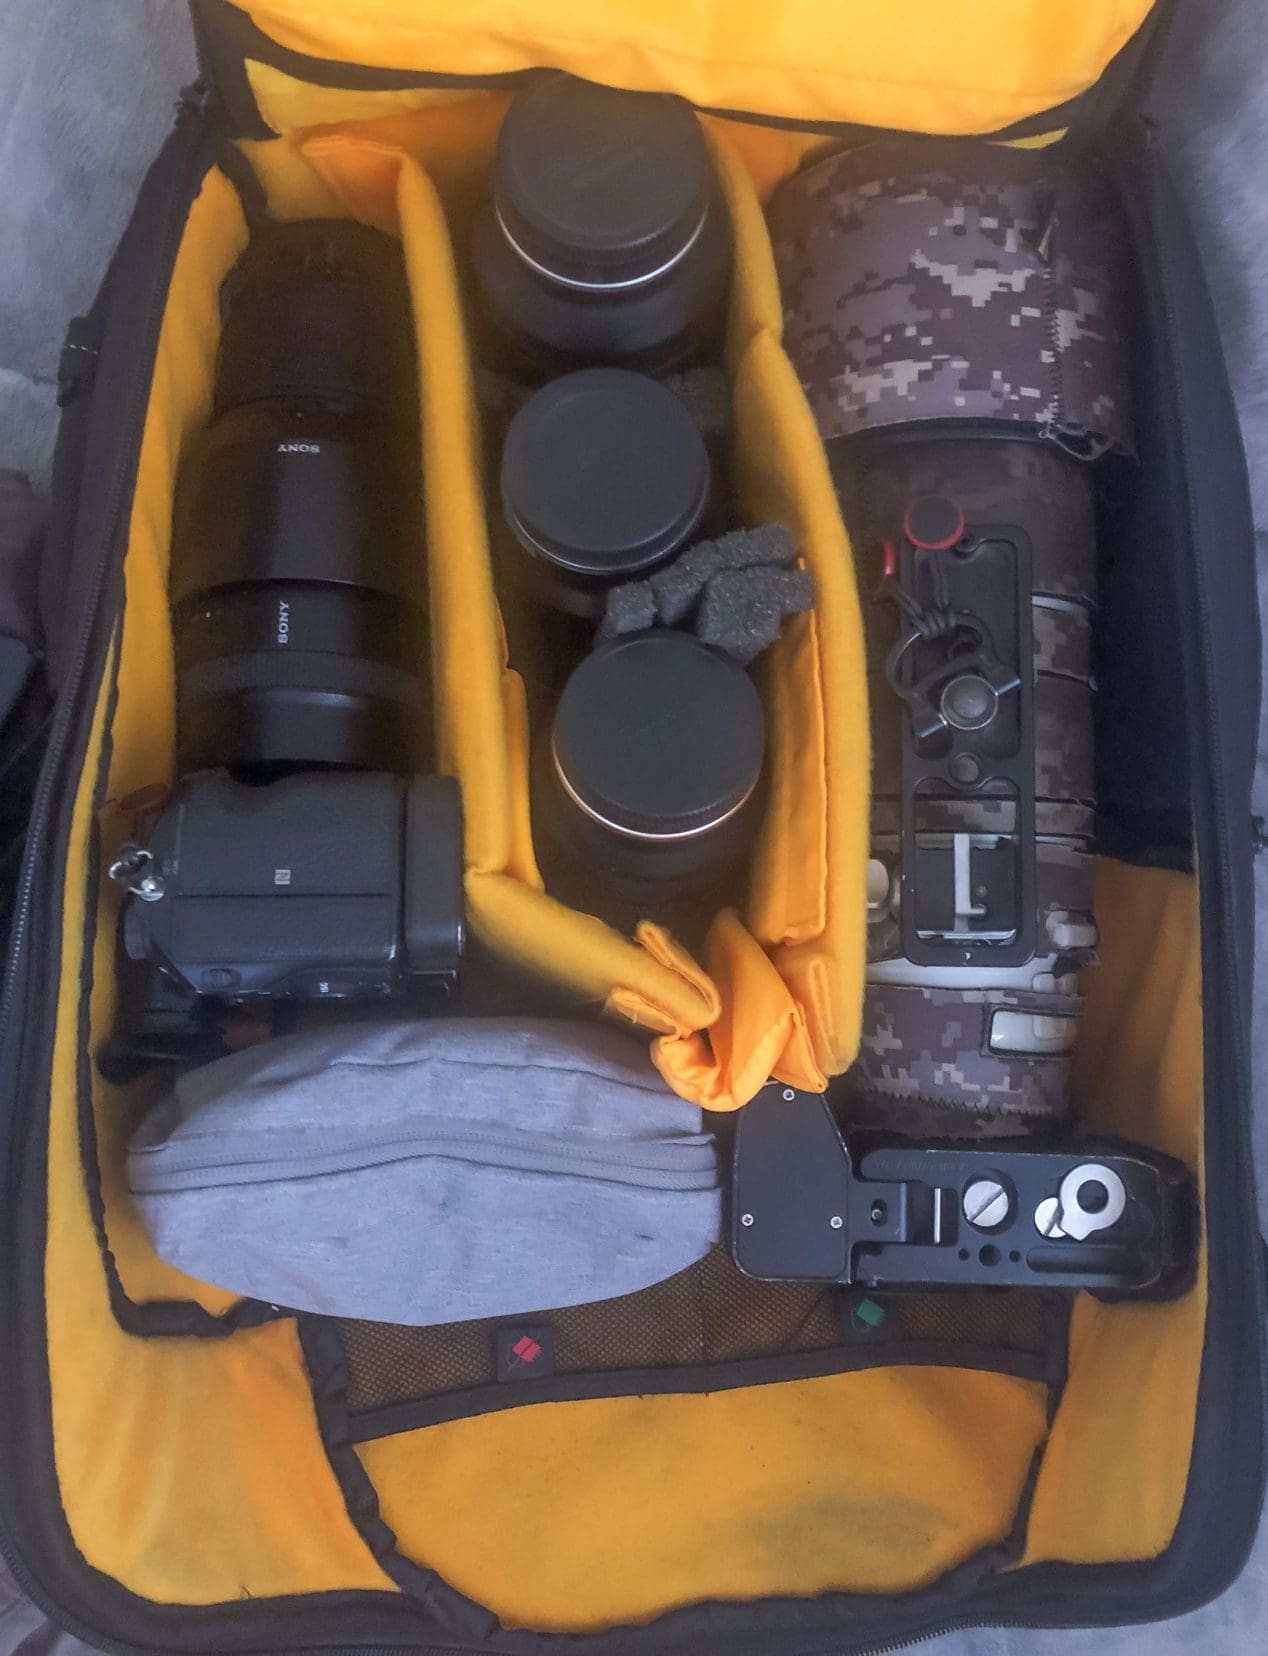
The image above shows my Vanguard Alta Rise 48 camera backpack. Our 2 x Sony a9s are placed inside, Sony 200-600mm, Sony 70-300mm, Tamron 70-180, Sony 90mm Macro and Tamron 28-75mm.
The small grey bag inside the backpack contains extra batteries, a lens cleaning solution, a brush, and a microfibre cloth.
Other backpack features to consider are ample secure pockets, a compartment for a water bottle, and tripod-securing straps.
7. Changing Camera Lenses on Safari
When it comes time to change lenses on safari, you’ll want to take extra special care. The camera sensor and lens opening can be exposed to dust and moisture.
Important steps to follow are:
- Use an air blower to direct air at the camera/lens mount position to remove any existing dust.
- Power off the camera before removing the lens (dust is attracted to a powered camera sensor).
- Face the camera sensor down when changing a lens.
- Use a dust cap on the camera mount and lens openings if exposed for any length of time.
I sometimes find that dust will creep into the camera sensor or the lens opening despite the best care taken. Before jumping to the ‘I now need to clean my camera sensor’ conclusion, use the air blower a few times.
I’ve always managed to remove any dust without cleaning the sensor.
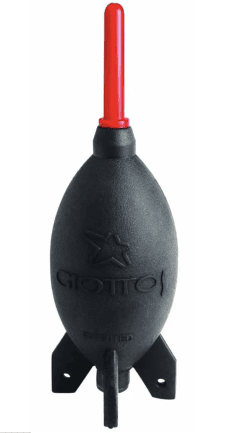
When using the air blower, make sure you turn the camera sensor and lens opening downwards so any dust can fall out and away. I personally use the Giottos Rocket Air, which works great.
I rarely need to swap out lenses as I have two Sony a9 camera bodies using the Sony 70-300mm and Sony 200-600mm lenses during a photography safari.
8. Safari Photography Equipment Insurance
Your photography gear doesn’t come cheap. Having equipment insurance for those unexpected incidents where damage or loss may occur certainly lessens the grief.
When hiring photography equipment, you are likely to be offered some sort of equipment protection plan. However, you may not need this, as you may be covered under your household contents insurance.
Protecting your valuable photography equipment is vital. Find out about the cheeky parrot that damaged our camera in our travel mishaps post and how our insurance saved the day.
For us, as owners of our photography equipment, we’ve elected to take out specific photography insurance underwritten by AON. This insurance has global coverage.
9. Buy or Hire Safari Photography Equipment
You’ve probably realised that an African safari will not be cheap and that you may need some extra photography gear. However, this cost can be kept to a minimum.
If you decide you can’t afford to buy one because that dream lens is out of your budget, then seriously consider hiring what you need.
Photography stores offer equipment hire options, which is a great alternative to buying. You can request quotes online and then pick the best one for you.
This way, you get to use your dream lens without the commitment of ownership.
10. Binoculars For Spotting Wildlife on Safari
Binoculars as a must-have item for any safari.
Although it’s possible to use the camera’s viewfinder instead of binoculars, after a while, this combined weight becomes too much and unsteady, and it just isn’t practical.
A lightweight set of binoculars is a perfect alternative fro spotting wildlife to capture. We use the Vortex Optics Diamondback 10×42 binoculars.
If I had to share a top safari photography tip for your African adventure, it would be for each person to have their own set of binoculars, which is what we do.
This way, each person’s binoculars can be adjusted for that person’s eyes, and they’re ready for immediate use.
11. Best Time of Day for Safari Photography
Safaris are not only limited to daytime activity. Night safaris are an exciting option. I discuss further below.
Daytime Safari
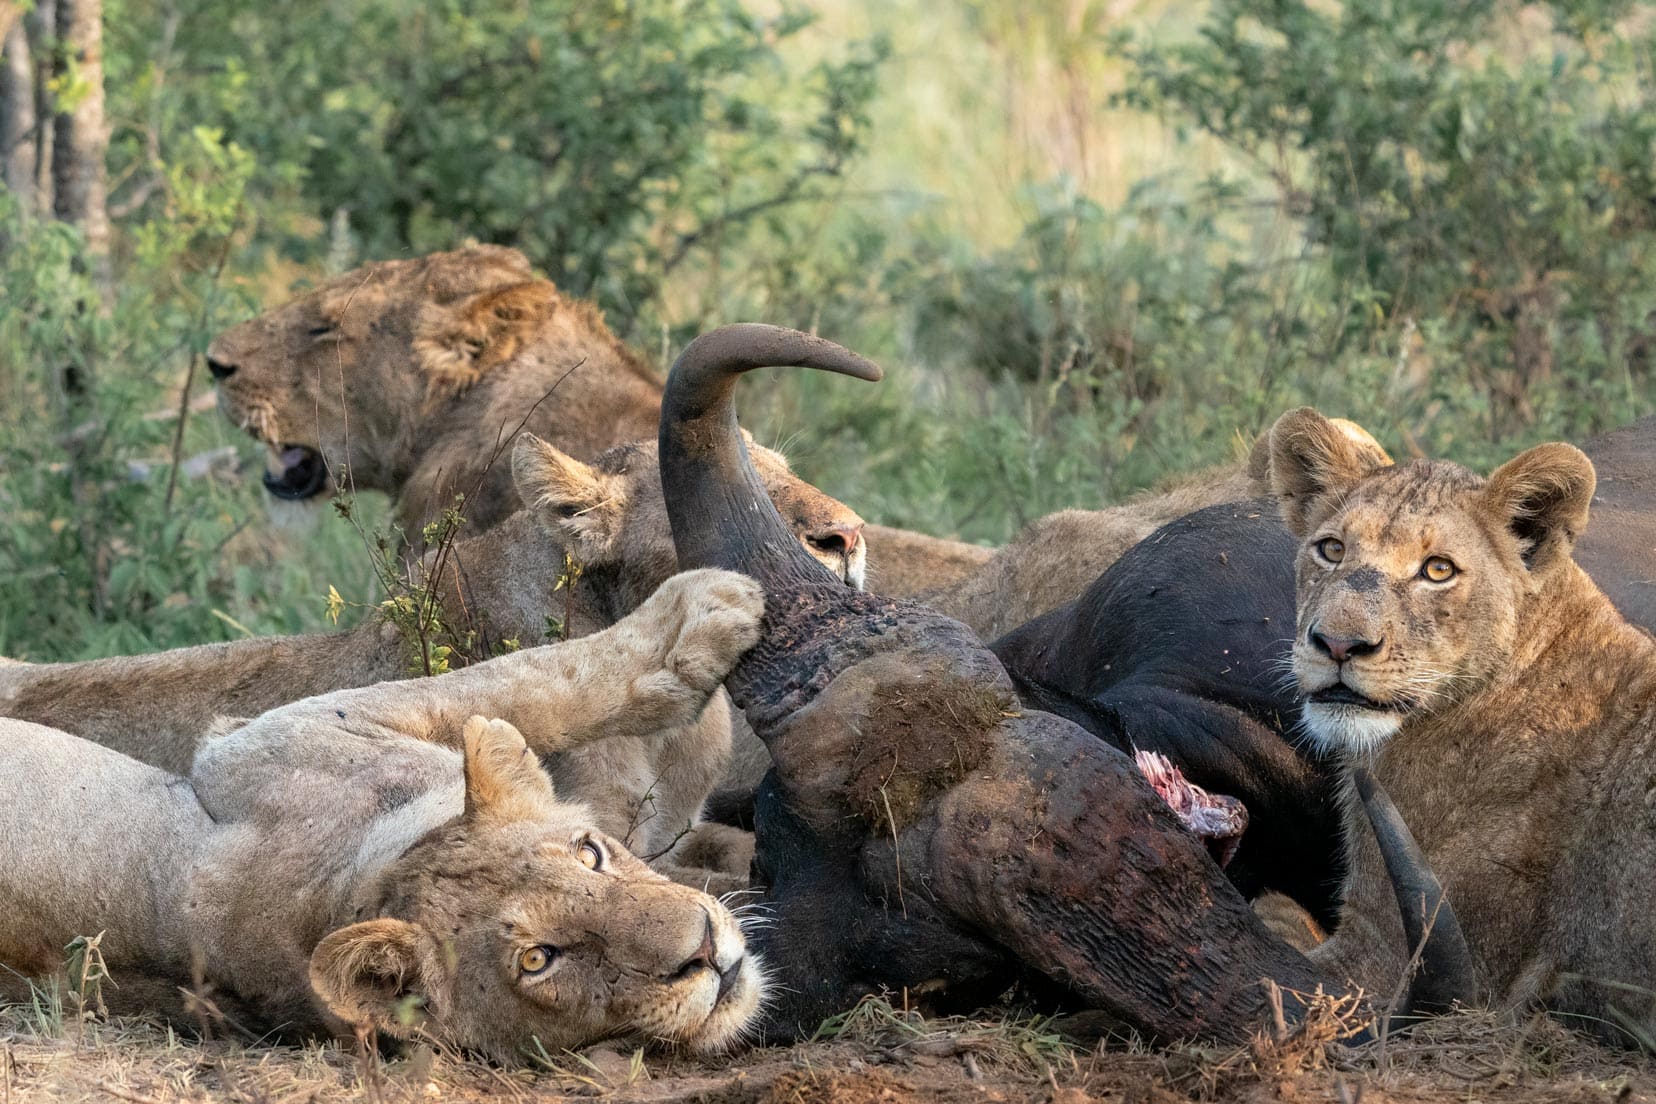
The most diverse sightings of African animals occur in the early mornings and late afternoons.
At both times of the day, you can see:
- Diurnal (daytime) animals such as elephants, rhinos, and wildebeests.
- Crepuscular (twilight and dusk) animals such as cheetahs and wild dogs.
- Nocturnal (night) animals such as lions, hyenas and leopards.
(Sony 200-600mm, 1/1000, 496mm, f/11)
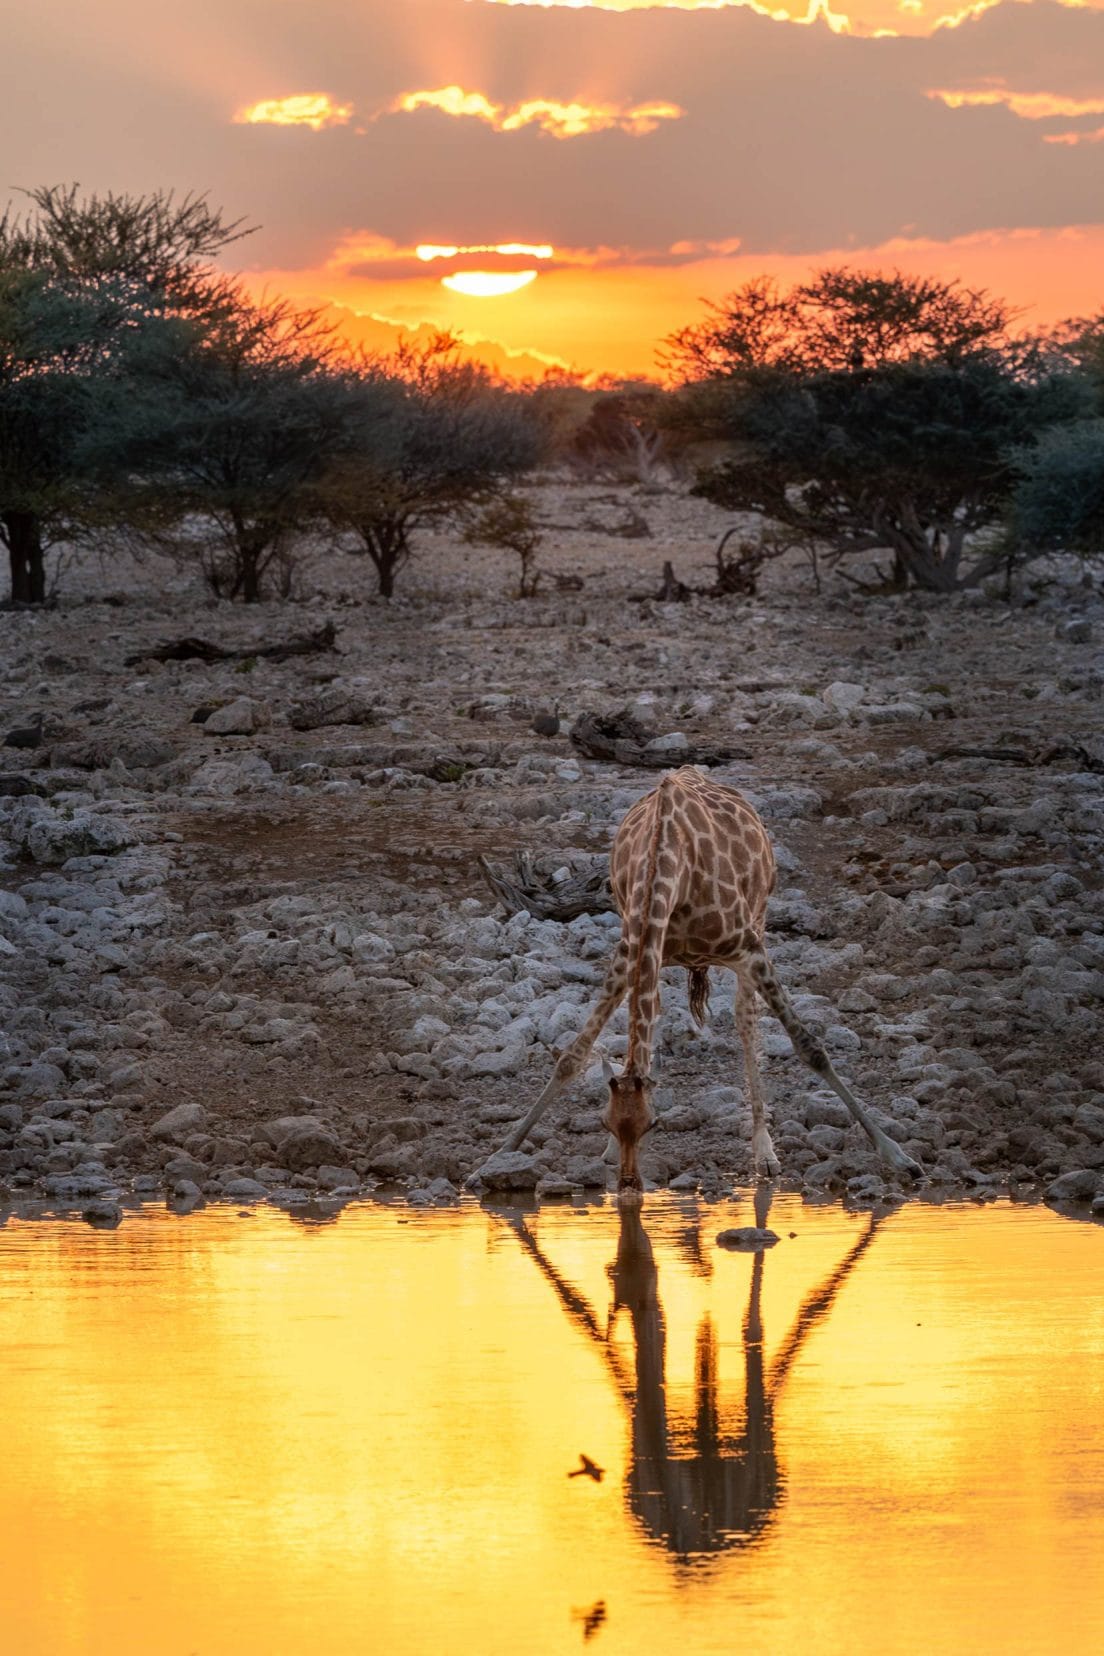
What makes photography special at sunrise and sunset is the warm, soft light full of rich, intense colours, which makes for some beautiful photos on safari.
The trade-off for shooting at reduced light is pushing that ISO up to maintain a safe shutter speed. As mentioned before, fantastic de-noising programs can sharpen an image.
(Sony 200-600mm, 1/800, 365mm, f/9)
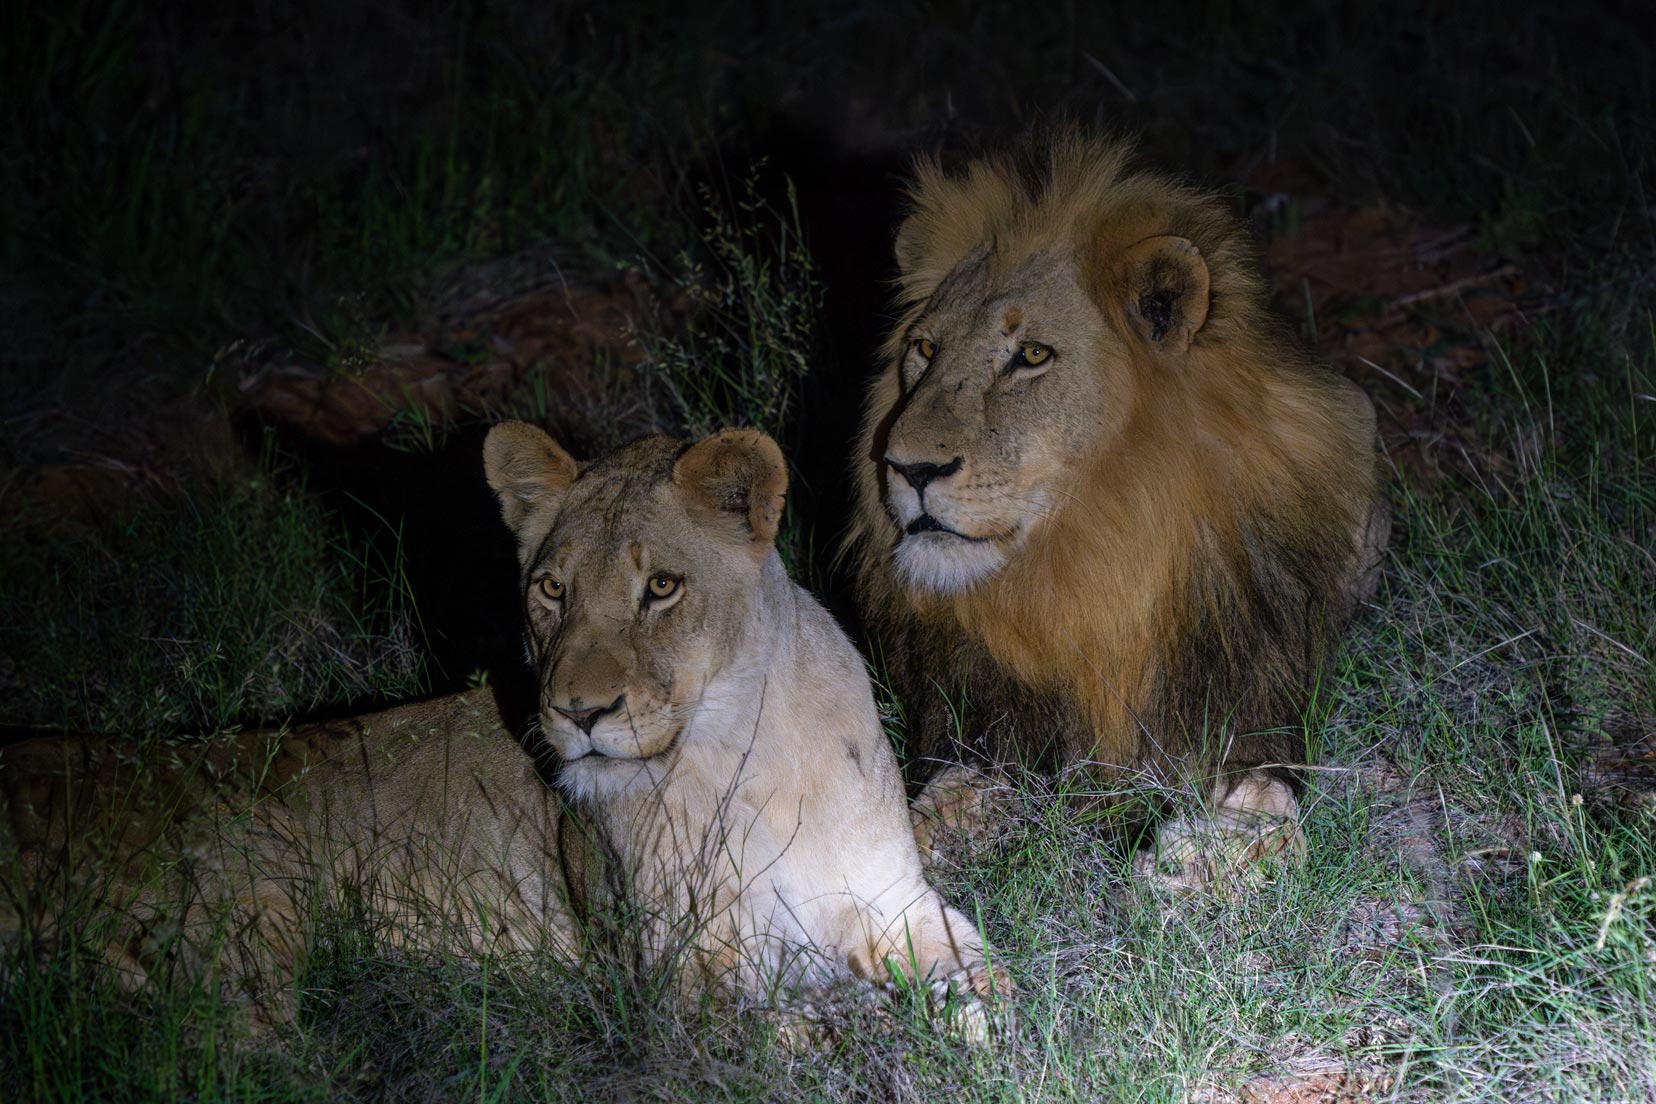
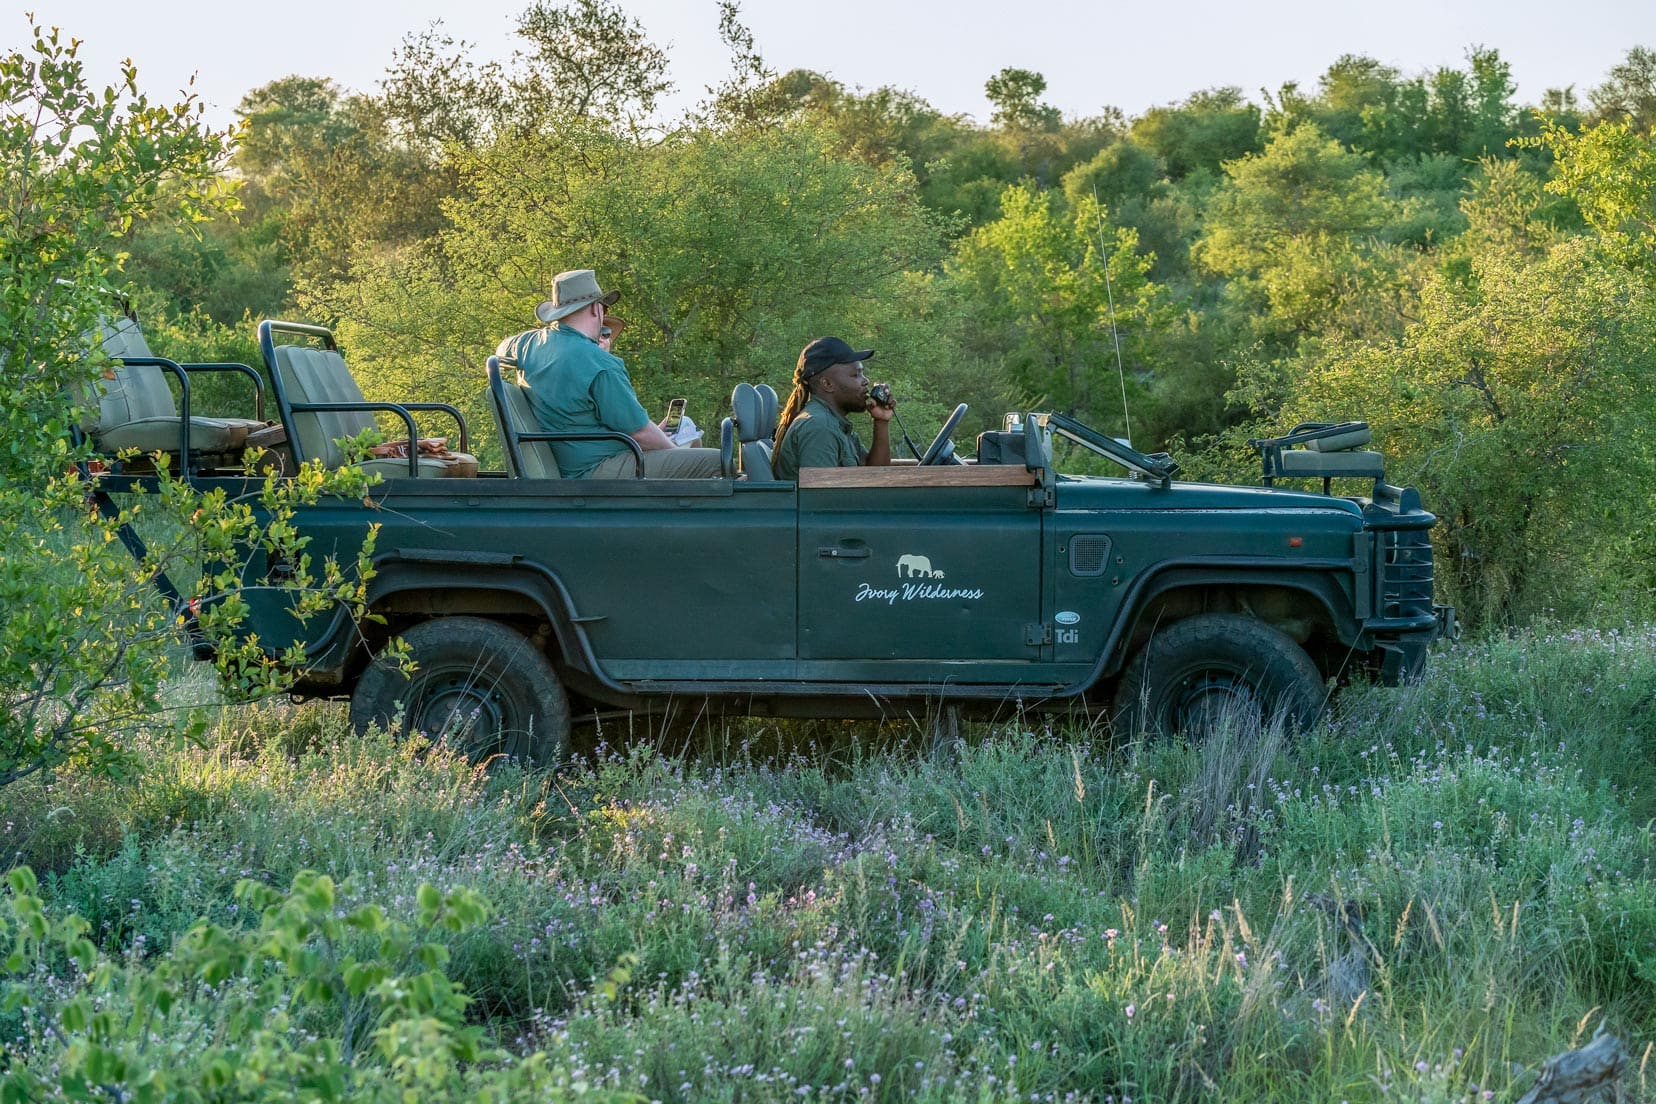
Night-time Safari
Night safaris are a lot of fun. At this time, the nocturnal predators are active and on the prowl. We had some fabulous night safaris when we stayed at Ivory Wilderness River Rock Lodge in South Africa.
(Sony 70-300mm, 1/100, 163mm, f/7.1)
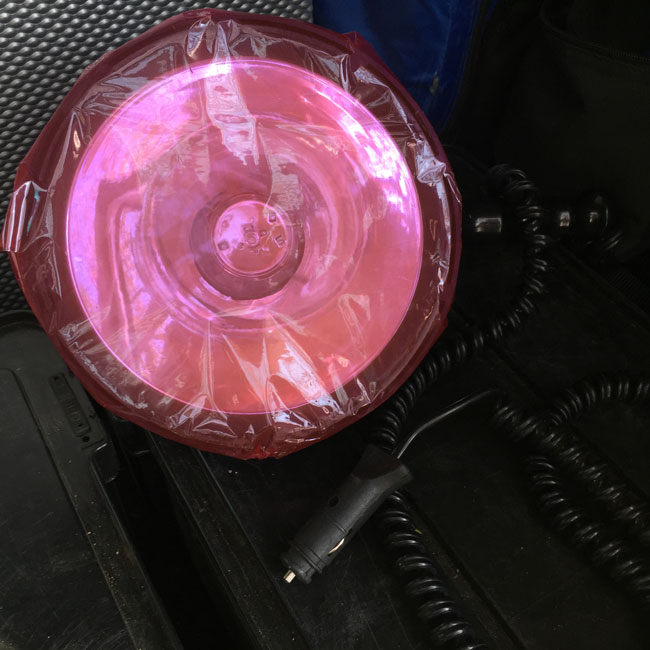
On a night safari, you lose 360-degree daytime visibility. You rely on the vehicle’s lights and any hand-held spotlights to spot game. There’s no ‘best time’ for a night game drive. The action can unfold at any time.
A spotlight provides illumination of the subject. However, the best approach is not to focus the beam of light directly on the subject but to the side so the animal is lit with the softer, non-direct light.
This reduces any discomfort to the animal and means that when photographing, the highlights of reflected light will be much reduced. I’ve sometimes shot at f4.0 as the subject was sufficiently illuminated and the shutter speed fast enough to prevent any blurring in the image.
As a final measure, we try as much as possible to use a red cellophane filter over our spotlights as the red light does not interfere with most nocturnal animals’ night vision.
12. The Patience Game on Safari
On any safari, patience wins the day. This is an important tip to remember for successful safari photography.
Pick your spot to stop, such as a waterhole, and play the waiting game.
Park the vehicle to:
- Have the sun in the best position,
- Not to crowd the animal’s space and
- Minimise any unwanted foliage interference.
While you wait, check your camera settings and battery power. Make sure the lens switches are in the correct position, and the lens glass is clear of dust and marks.
We, as safari self-drivers, practice this all the time.
Our patience has always provided some unexpected rewards.
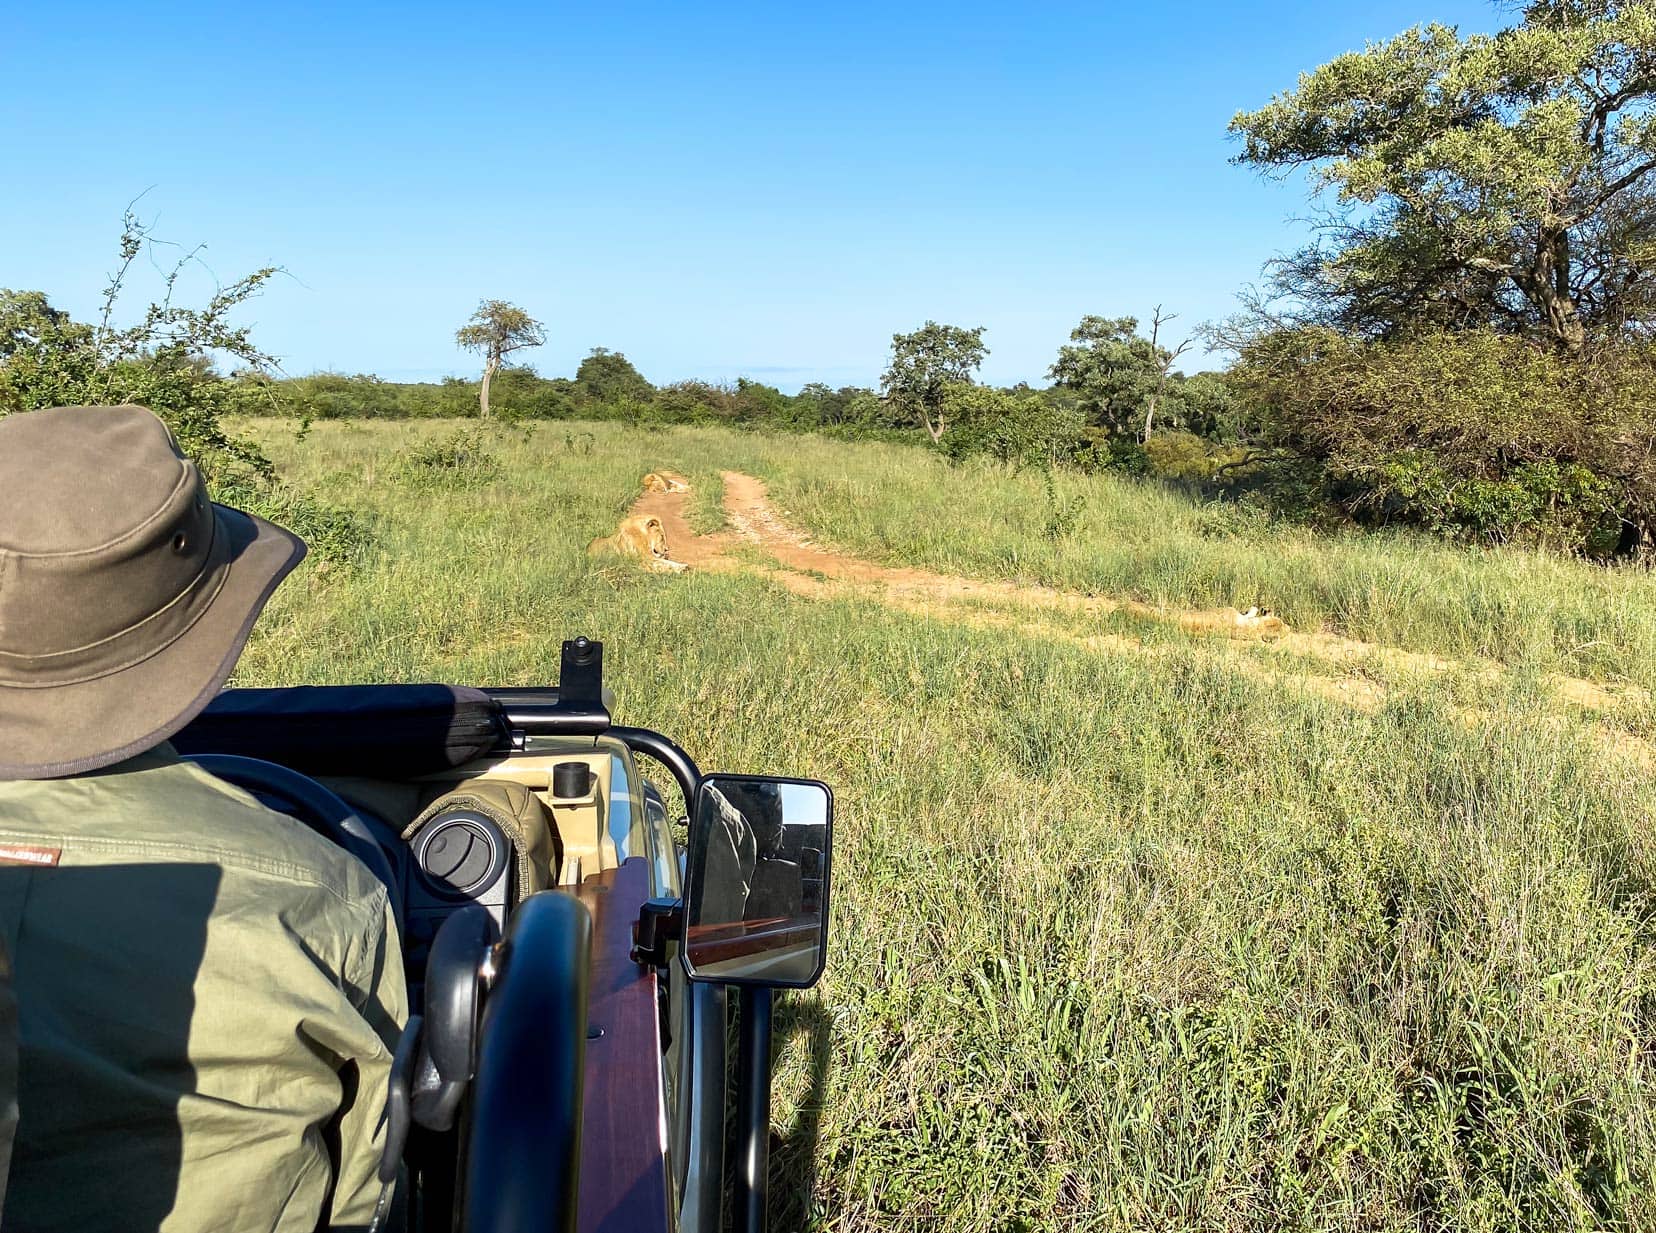
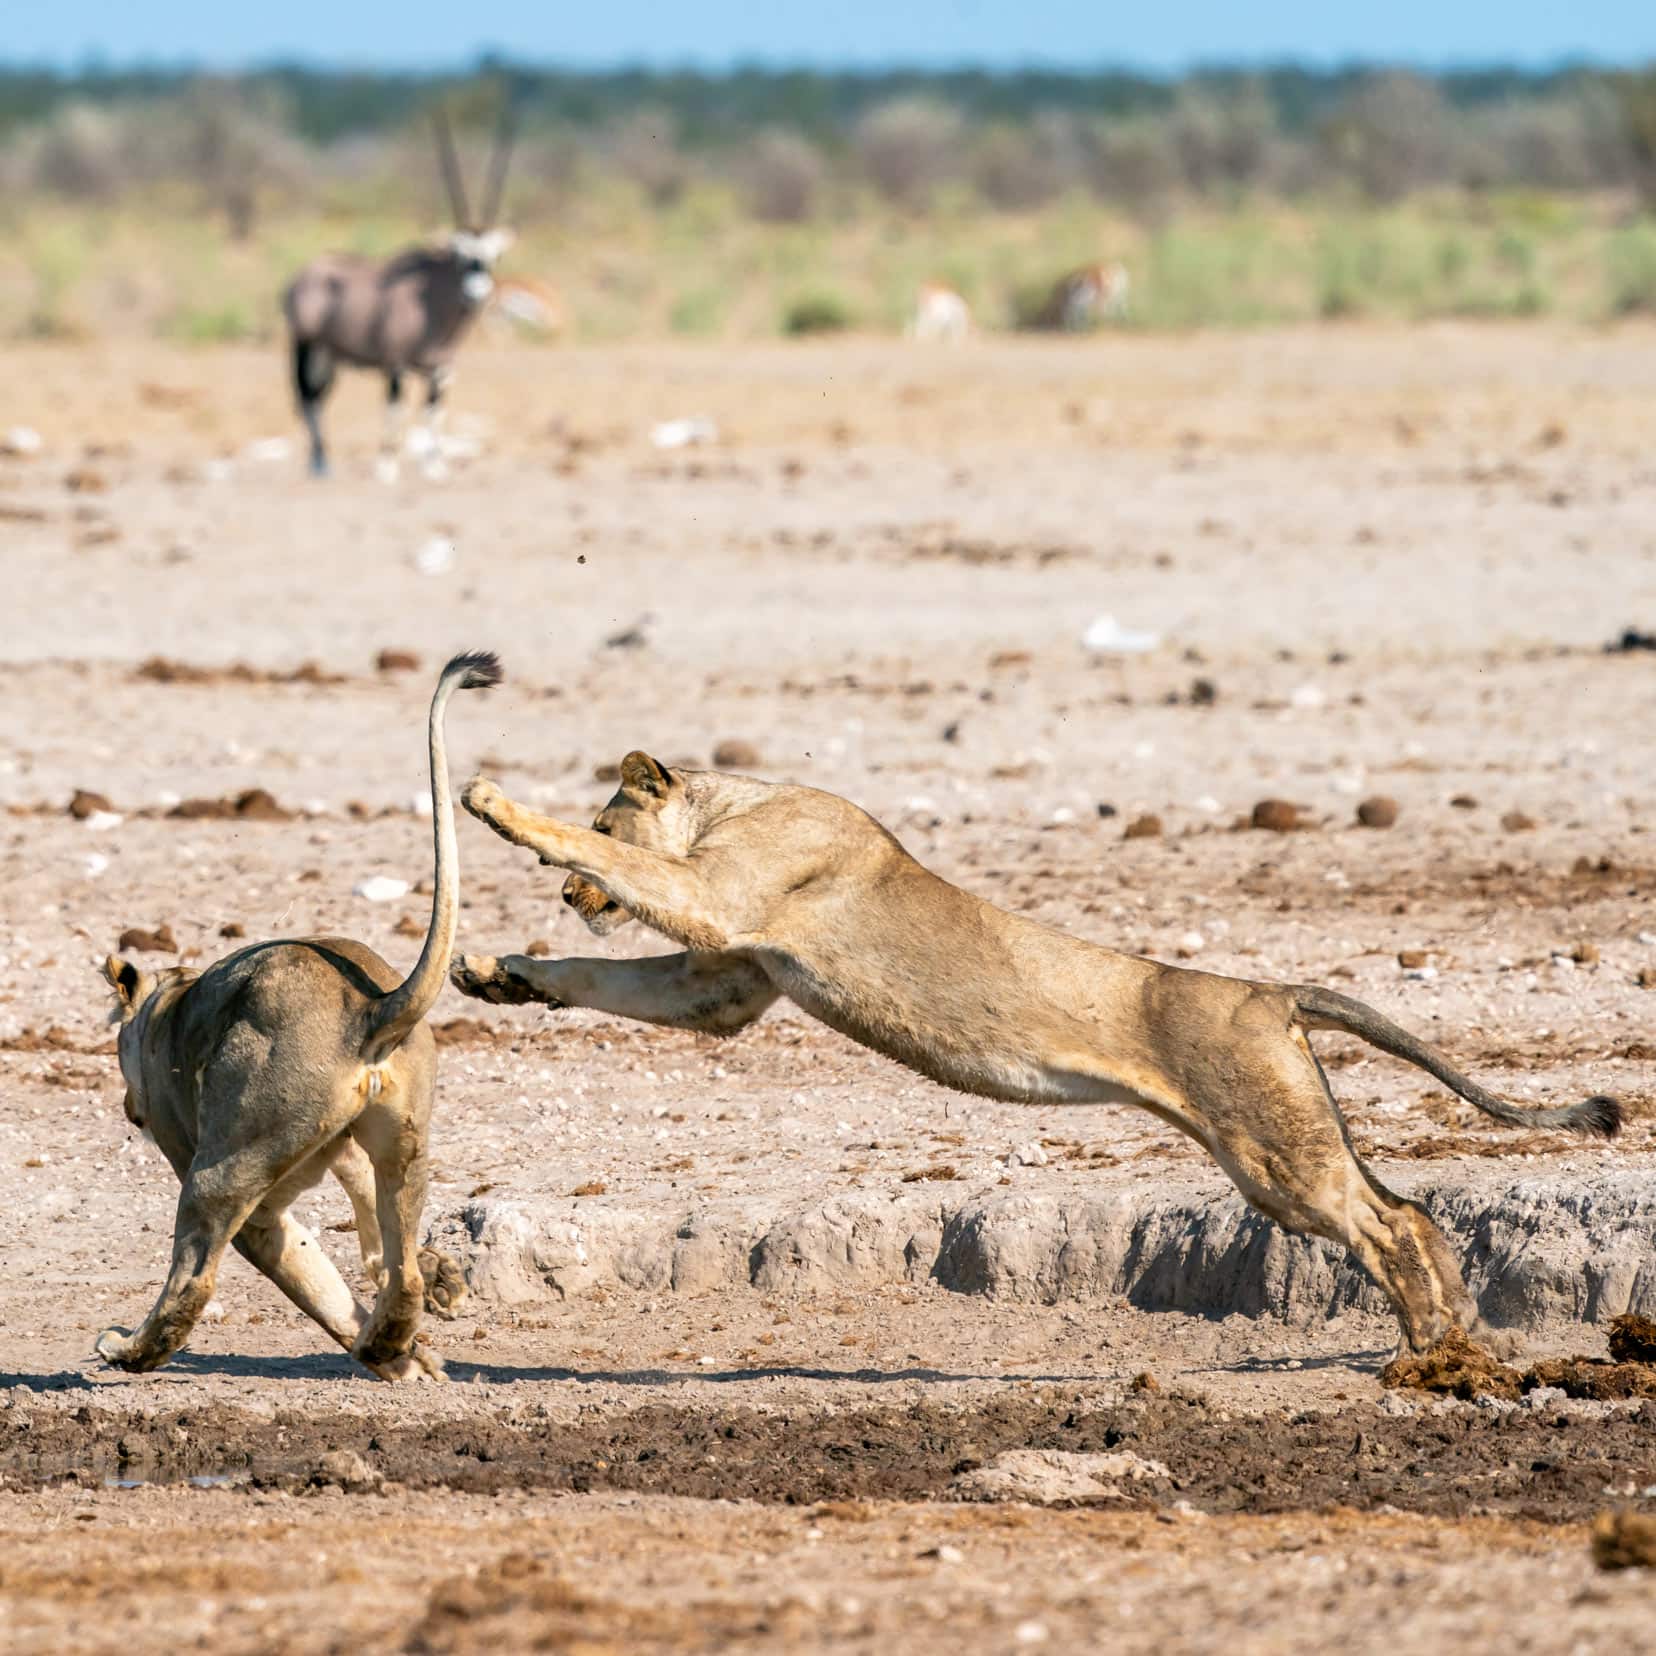
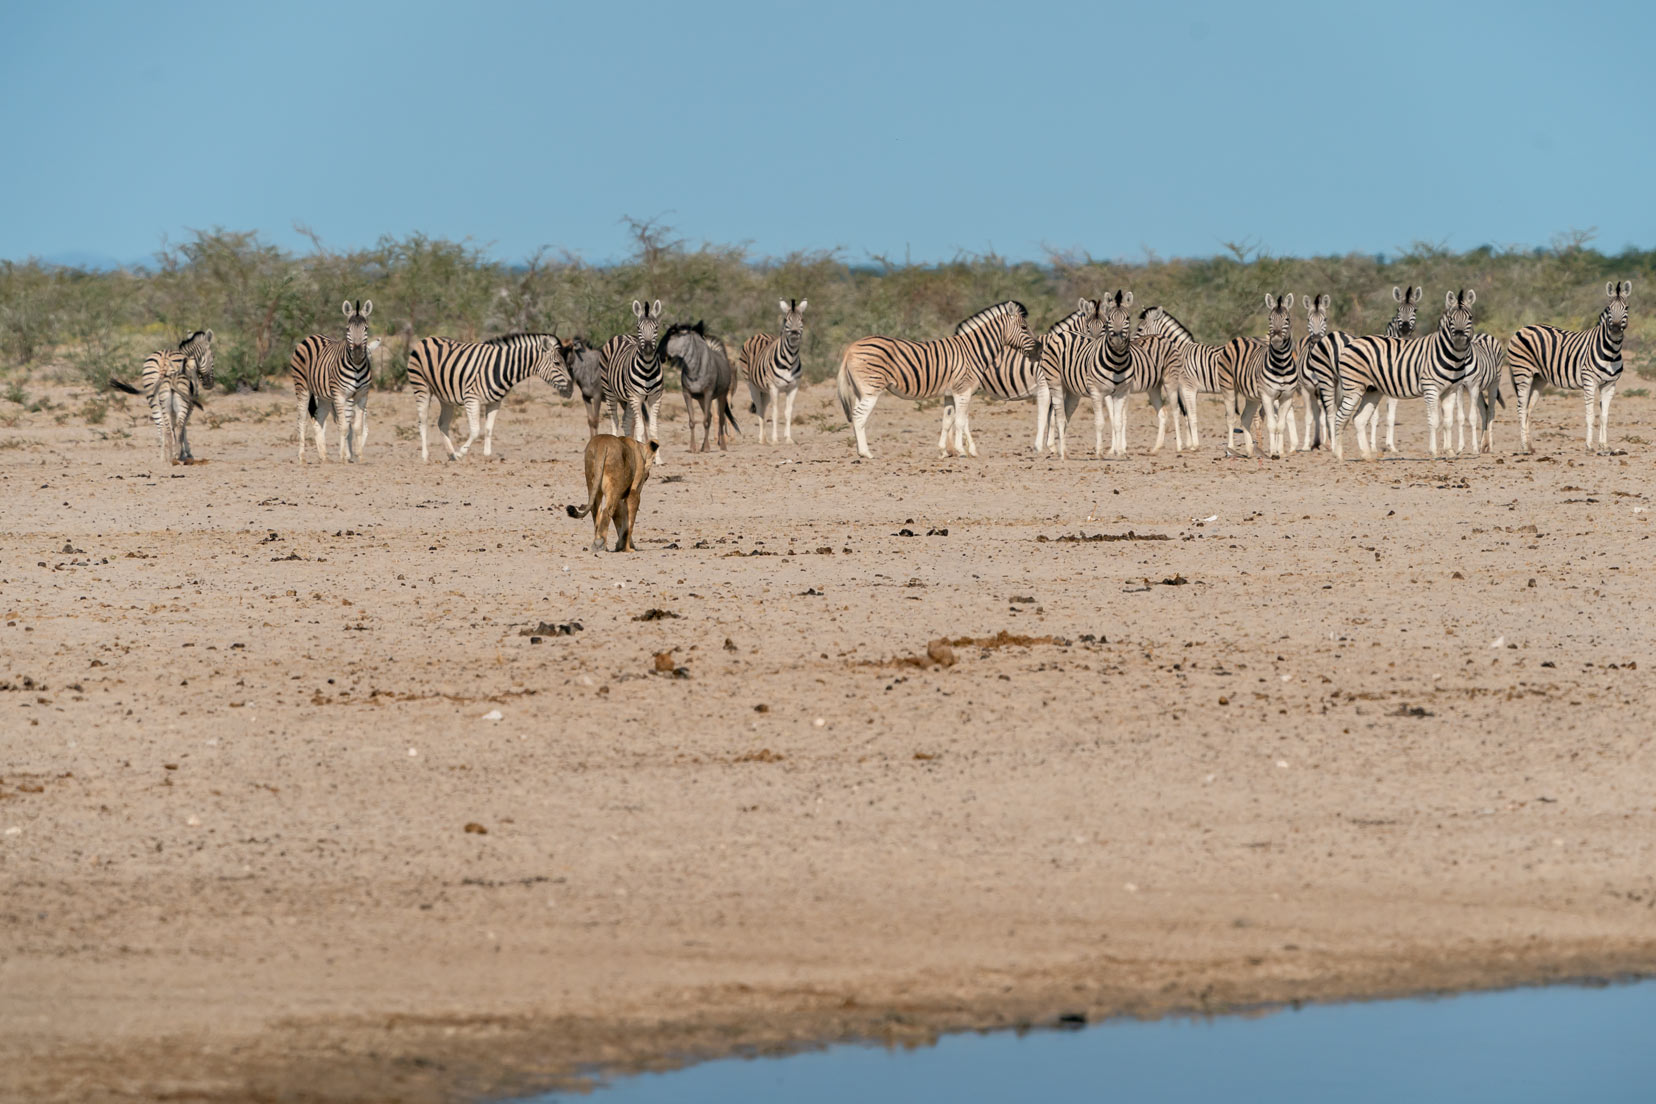
There are many examples, but one that jumps to mind is our self-drive through Etosha National Park in Namibia.
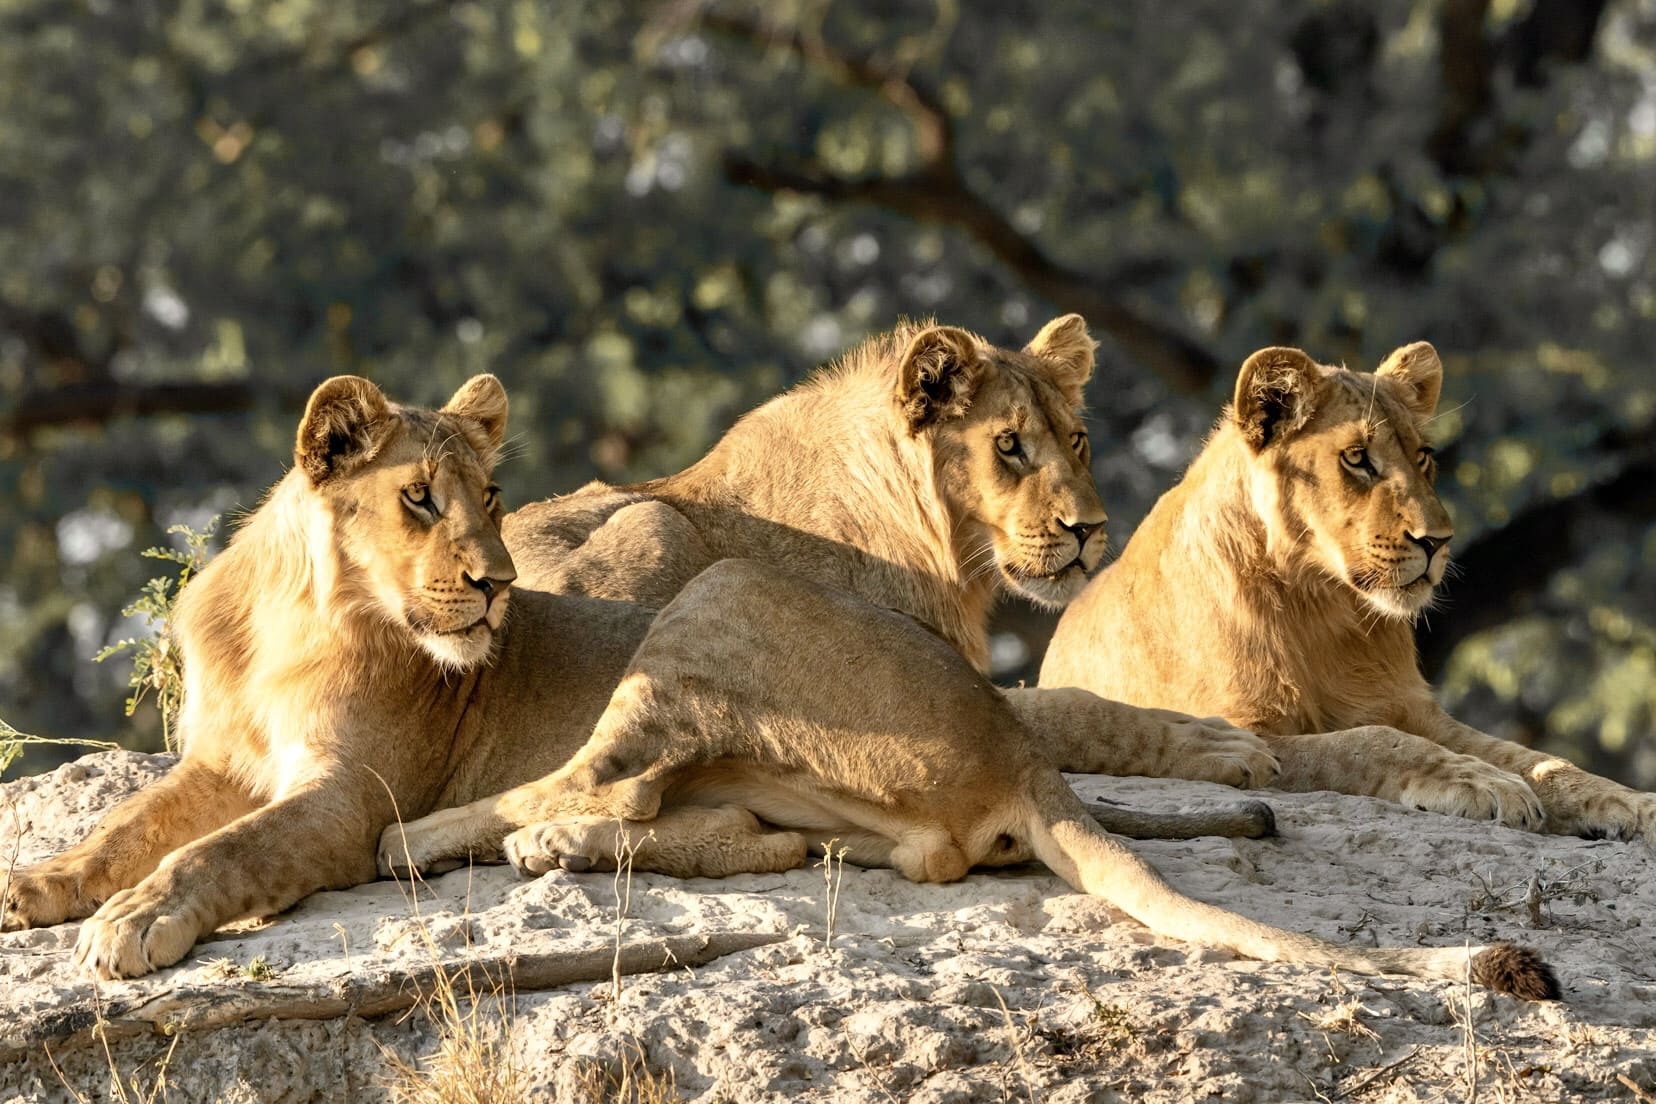
Sometimes we would drive up to a water hole and not see a single animal. But all is not what it seems. Looking carefully through the binoculars into the scrub, we found the cause of the lack of other animals … lions.
(Sony 200-600mm, 1/1000, 600mm, f/9.0)
They were playing a waiting game.
(Sony 200-600mm, 1/2000, 600mm, f/9.0)
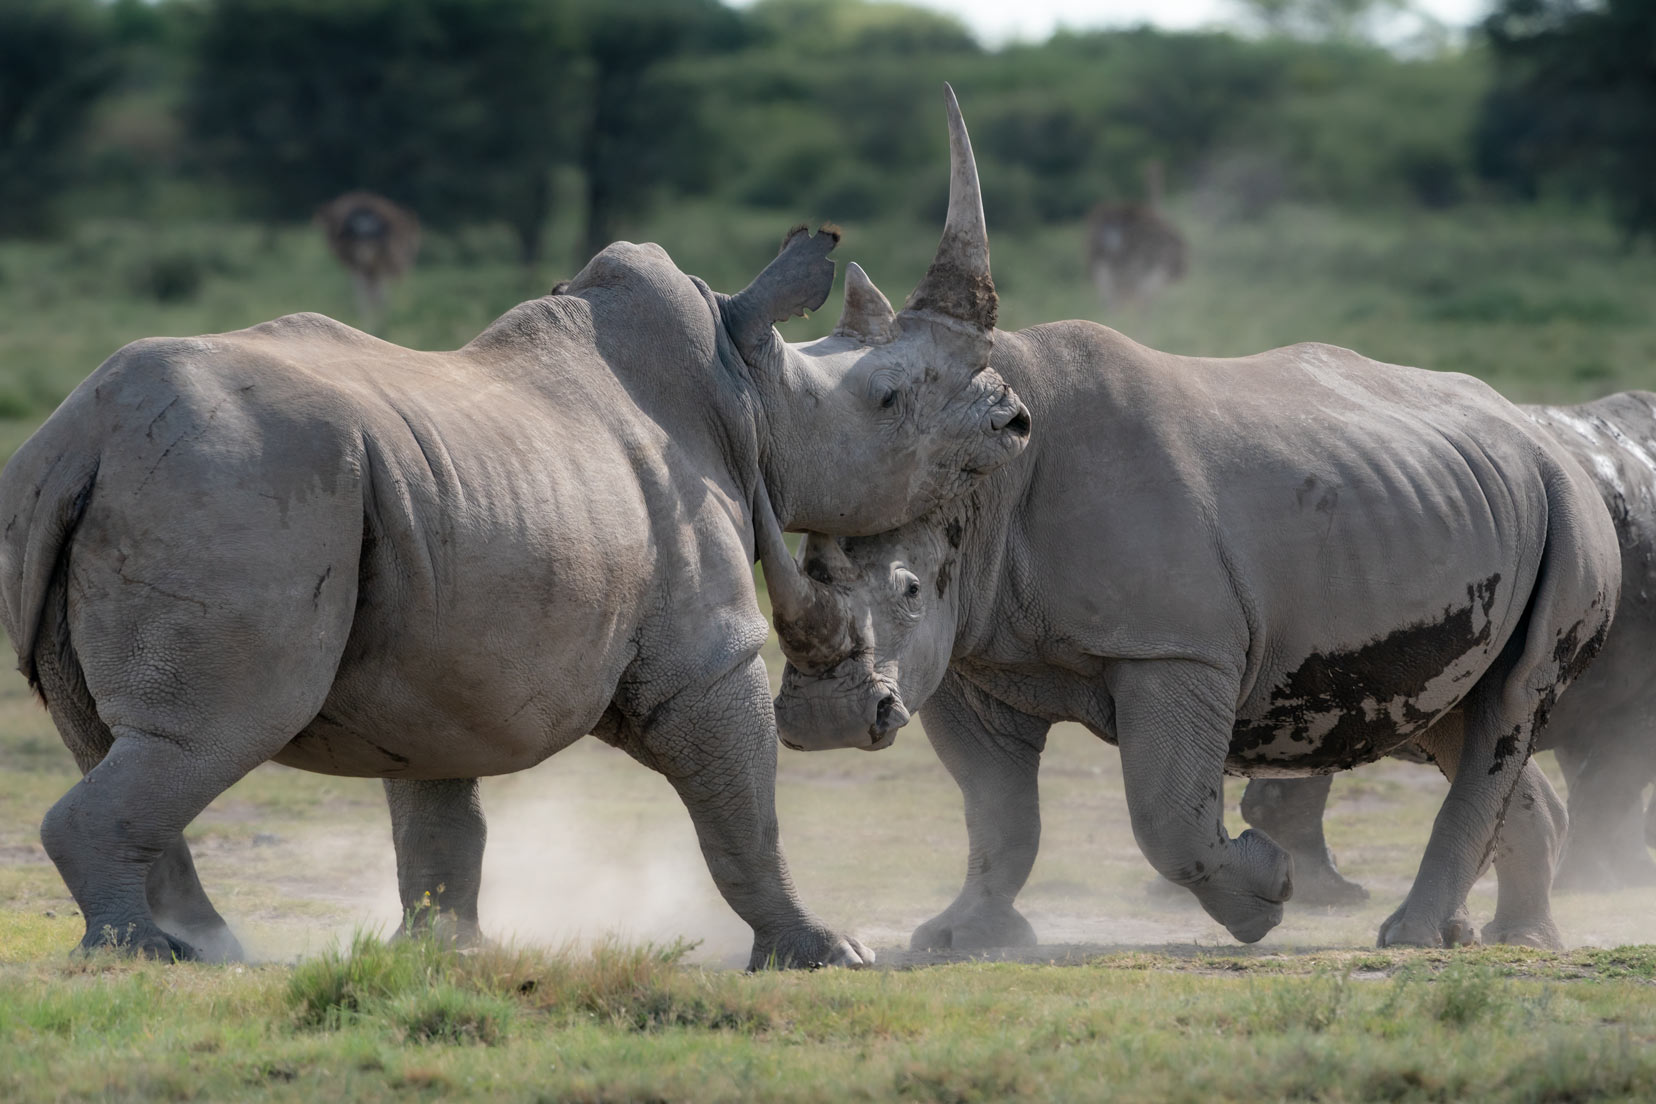
The waterhole was the only one within many kilometres, and animals needed to drink. Within the next two hours, we saw a multitude of animals braving it out at the waterhole, all the while being harassed and stalked by the felines.
(Sony 200-600mm, 1/2000, 467mm, f/9)
It was exhilarating to watch and made for some great photography shots. Had we left shortly after arriving at the waterhole, we would have missed all this action.
13. How to Find Game During a Safari
If you are on a guided safari, you’ll sometimes see the driver using a radio or phone, likely talking to their fellow guides about what game they’ve seen and where it’s located.
It’s commonplace on an African-guided safari.
The same sort of approach is taken on a self-drive safari.
Often, you’ll see cars stopping alongside each other and the drivers discussing what animals have been seen, where that was and when. This grapevine of sharing up-to-date tips to help you plan your safari route is super helpful.
14. How to Photograph Animals on a Driving or Walking Safari
If you’re on a guided safari drive, then the guide will always try to get the vehicle in the best position for you to view the wildlife. This won’t always equate to being the best position for taking wildlife photos.
So, you have little option but to compose and shoot the scene as it is. I have already mentioned earlier about using two cameras with two different focal length lenses to give you options for a decent shot should the game be close or far from the vehicle.
Shelley and I have two Sony A9 cameras, each with different lenses, so we cover pretty much all scenarios (distance and up close).
For some of the big game, such as elephants or giraffes, you may be able to pull off an eye-level shot that gives the image some atmosphere and intimacy.
During a walking safari, the approach to photographing animals is somewhat different. Most animals can be photographed at or close to eye level but normally not up close.
Being on foot, the animals may react differently to your presence than if you were in a game vehicle. Buffalo is a good example. Buffalo generally tolerate vehicles, but if they see people on foot, they have no hesitation in charging.
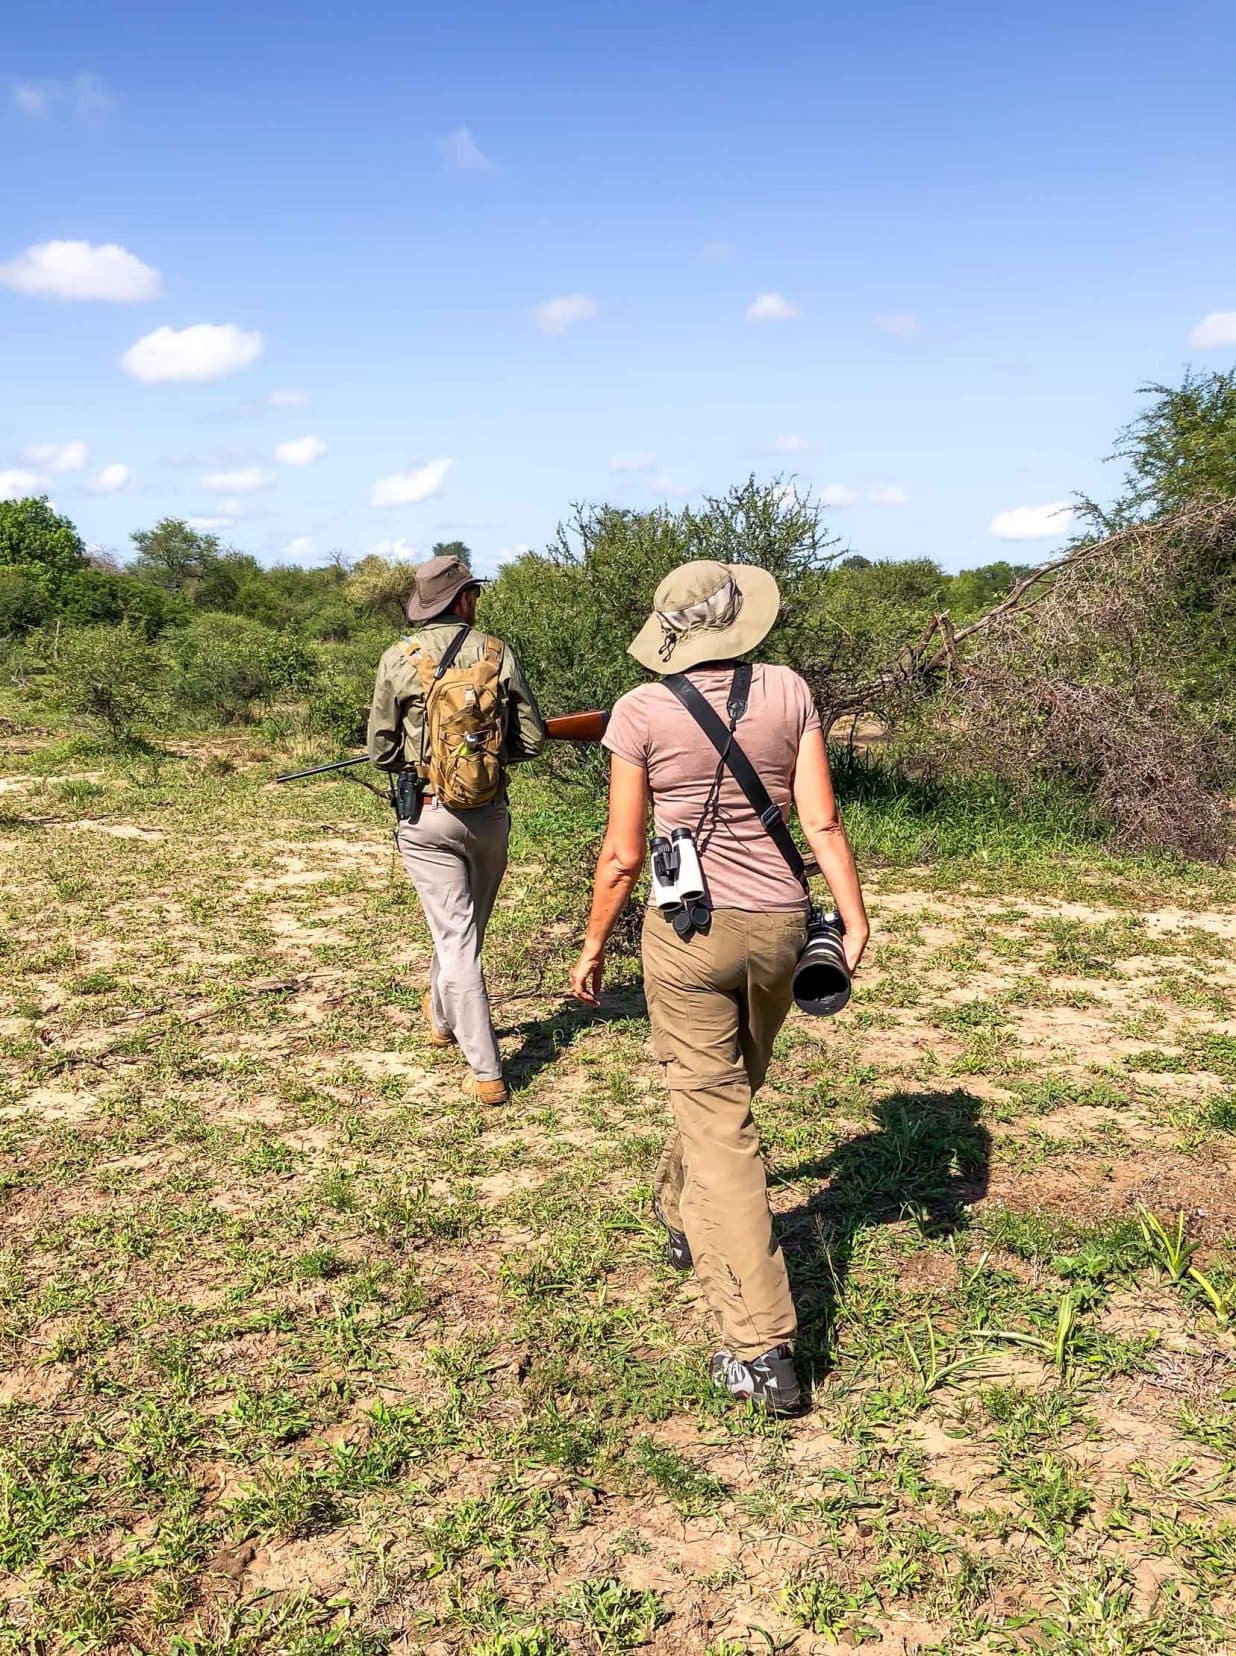
Luckily, we don’t have any first-hand experience of charging buffalos. But during our tracking of rhinos, we diverted to track nearby lions, which was an experience in itself.
Even though we approached the five lions from downwind and ever so quietly, they were aware of our presence even though they couldn’t see us … at first.
There was no chance of photography at that time. Shelley told me afterwards that her walking safari days were at an end! As you can see from the image above, the guide was armed.
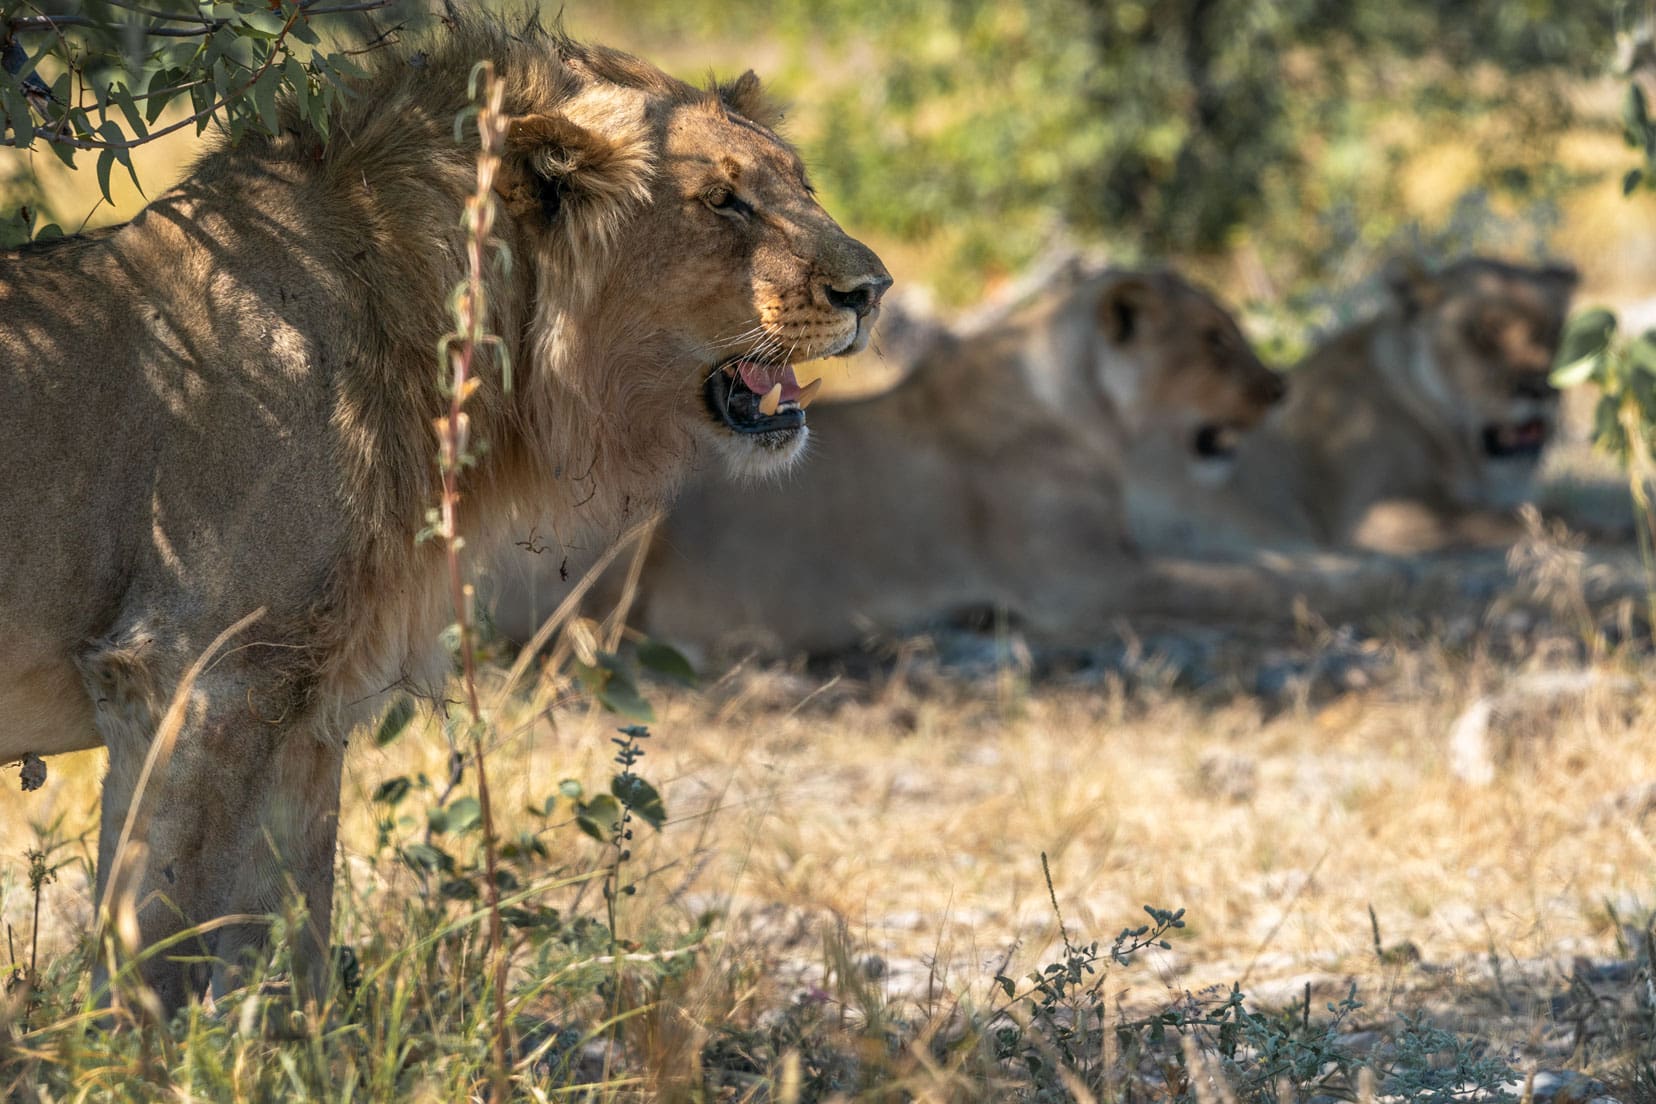
Understand and Look for Animal Behaviours
If you know what animals you will likely see, then try to research some typical animal behaviours before you arrive. And, of course, ask your guide for their top tips for African animals. Not only do guides undertake training, but they will also have local knowledge.
A typical example that comes to mind is when a lion sniffs another lion’s urine. The head tilts up, the mouth opens, the lips pull back, and the teeth are bared. A photo opportunity.
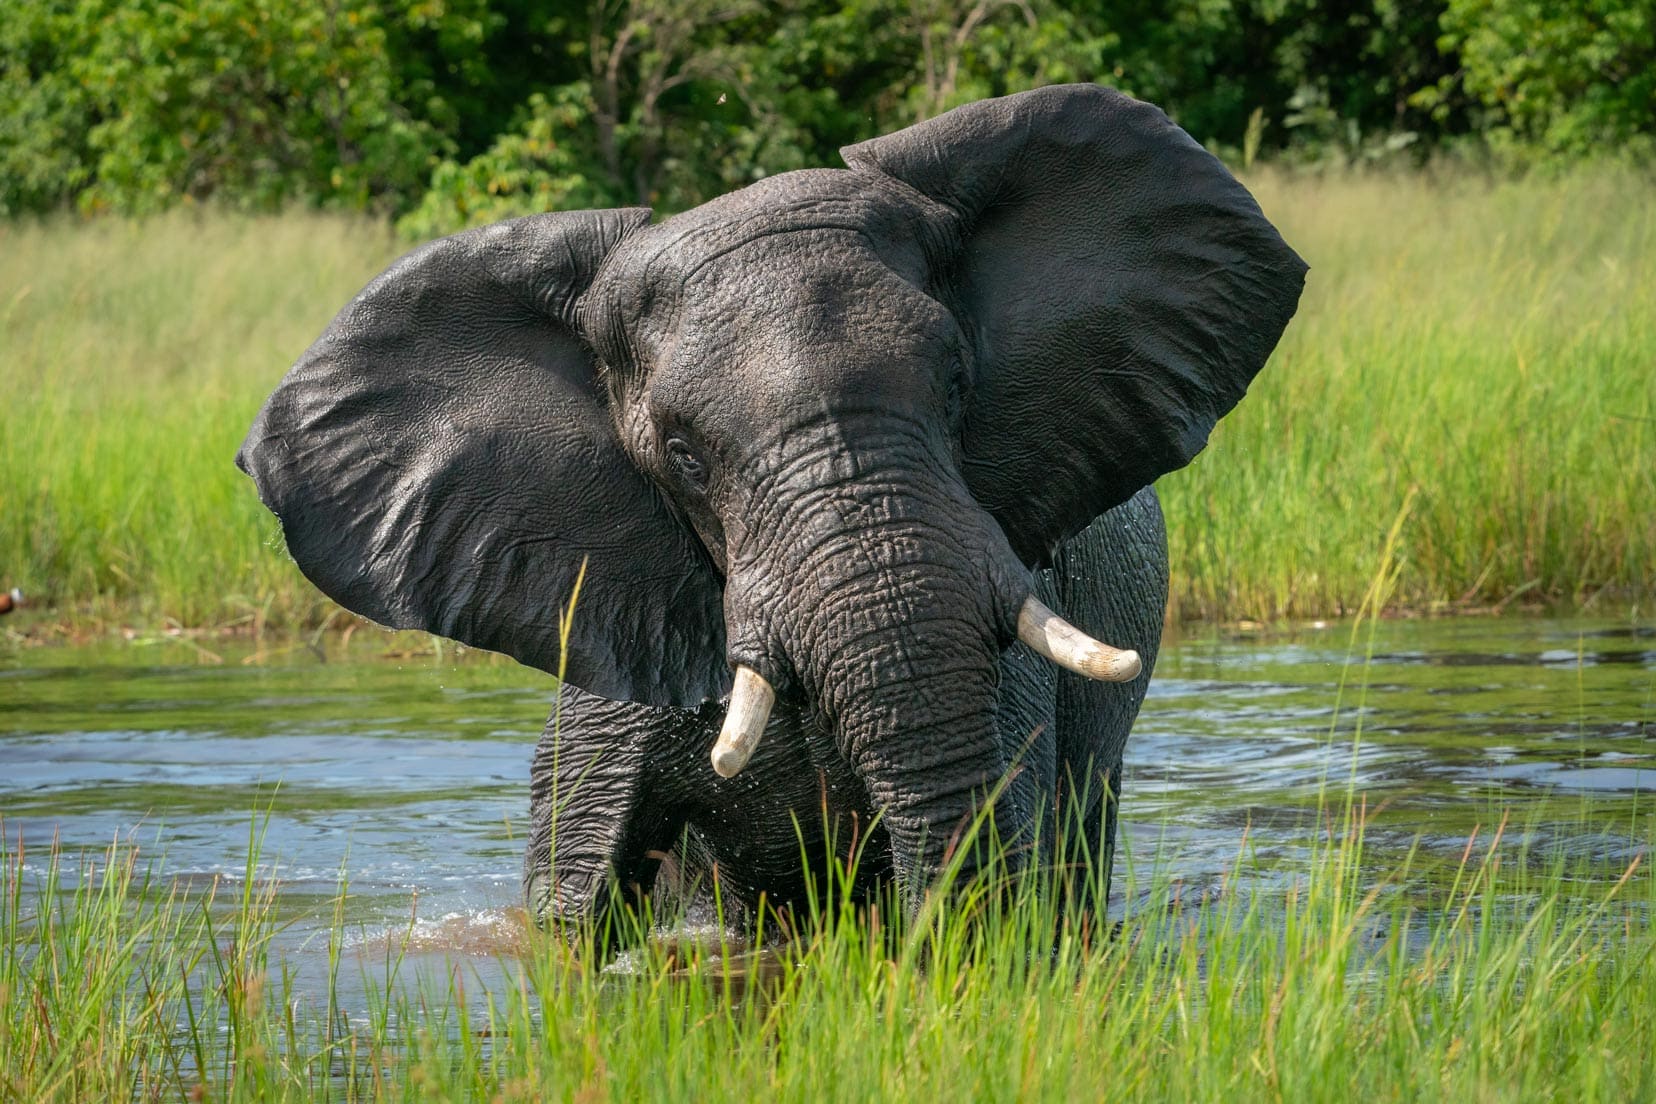
Some elephant behaviours to look out for are elephants standing with one leg in the air, moving backwards and forwards, displaying uncertainty; the elephant’s head shaking as a sign of irritation; and the dreaded, flattened ears and head down indicating a pending charge.
You want to pick when to take a shot carefully and when to retreat.
Respect the Animals
Wild animals are amazing, and their behaviours are sometimes enthralling. However, the animal’s space needs to be respected. Another important safari photography tip is not to get too close and make an animal feel threatened.
It will likely remove itself from the situation, meaning the photo opportunity is possibly lost.
In some national parks/reserves, during a guided safari, when the game is spotted, a certain maximum number of vehicles at a time are allowed in close.
You may find that some guides don’t adhere to the ‘respect the animal’ principles and harass the animal to the point that it reacts and guests can be wowed.

The image above shows a game-drive vehicle that sped to intercept the elephant crossing the track. The animal was spooked and then displayed aggressive behaviour before disappearing. The driver’s action was totally unnecessary and unprofessional.
You can’t blame the elephant for being annoyed. Now that the animal is irritable, how do you expect it to react when the next game-drive vehicle comes in too close? Food for thought.
How to Blend in on Safari
Muted-toned clothes are definitely best for safari, not black or white. Dark colours (black and dark blue) can attract mosquitoes and the Tsetse fly, while white colours are not natural in the bush and attract attention.
The idea is that you want to blend into the environment as much as possible. This allows the wildlife to see you and your clothes as just a ‘part of the bush’ so it can go about its normal routines.
15. Shooting Safari Video
For shooting wildlife videos up close, it’s hard to beat using one of the recent model mobile phones. Everyone is already a photographer to a degree.
Most of us bring a modern phone and can take photos and videos, which are quite high quality.
The apertures on mobile phone cameras are wide, normally in the range of f/1.8, so they are good for capturing up-close footage. We use our iPhones and a GoPro 11, which gives great wildlife video footage.
For subjects that are more distant, Shelley shoots video using the Sony a9 with a Sony 100-400mm lens, supported by a bean bag on the window sill from the passenger side of our Hilux.
Our method for capturing video is to position the vehicle and then stop the engine to prevent any vibrations. The video quality from this camera/lens combination has been excellent.
16. Edit Your Images by Post-Processing
There are many programs available to process your camera images. Some require a laptop for use, and some are mobile-friendly apps. Regardless of what you use, it’s important not to overdo the post-processing.
Depending on what ‘feel’ you are looking for in the final image, you may choose to recreate the scene as you remember it or try for a black-and-white image.
(Sony 200-600mm, 1/1000, 600mm, f/10)
One of the main tips for processing African images is to avoid over-saturating the colours as it makes the image look a bit unnatural, but hey, if this is your intention or style, then go right ahead.
Photography is subjective; there’s no right or wrong to it.
(Sony 200-600mm, 1/1000, 341mm, f/8.0)
Safari Photography Tips … That’s a Wrap
These safari photography tips are what I have learned and put into practice over the years of embarking on our own 4×4 self-drive safaris, guided game drives, and walking safaris.
Whether this is your first safari or you’re an old hand, the goal is to enjoy nature and the animals and to take some amazing images for lifelong memories.
I hope these tips have helped you, and I’d love to hear about your safari experiences. Drop us a line here, or leave a comment below.
Planning Your Travels?
These are the travel resources we recommend and use when planning our trips.
- 🚘 Car Hire: We use DiscoverCars.com
- Motorhome/Campervan Rental: We highly recommend the Motorhome Republic
- 🪪 Order your International Driver’s Licence online here
- ✈️ Flights: Find flights on Skyscanner
- 🛏 Book Accommodation: We use Booking.com to find accommodation that suits our budget
- 🐶 Pet Sitting/Pet Sitters: Check Out TrustedHousesitters here (Use our Discount code: LIFEJOURNEY25 for 25% off. )
- Activities and Experiences: Get Your Guide and Viator
- Travel Insurance: Safetywing or World Nomads
- 🥾 Travel Gear and Accessories: Check out our top picks here — Lifejourney4two page on Amazon
For a more thorough list, visit our Travel Resources page here.